Jet Tools 708315BTA operating instructions Sliding Extension Wing, Assembly if required

Page 15

Sliding Extension Wing

Right Wing used on Models BTC, LSA and LSB Left Wing used on Model LSB

Assembly (if required)
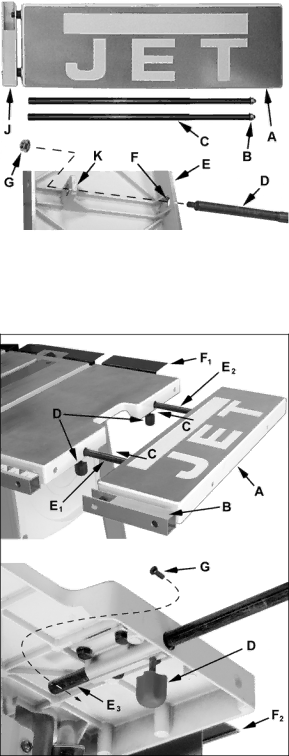
Refer to Figure 14.

For saws using the sliding extension wings, two extension rods (C) need to be assembled before mounting to the table. Assembly for the right extension wing (A), identified by no rule on the rail (J), is described below. Assembly for the left wing is the same.

1.Using two 10mm wrenches, remove the lock nut (B) from the extension rods (C and D).

2.Turn the extension wing (A) over so the JET logo lays face down and the mounting holes and tabs (F,K) are visible.

3.Insert the rods (D) through the mounting holes on the extension wing (F) and tab (K)

The threaded end of the rod (D) should protrude through the hole in the tab (K).

4.Place hex nuts (G) on the threaded ends of the extension rods (D), leaving loose enough to rotate the rods by hand.

5.Rotate the extension rods so that the threaded holes, located near the ends away from the extension table, are in line with the top of the extension table.

6.Secure the extension rods with two 10mm wrenches, placing one wrench on the hex nut and the other on the flat indents of the rod.

7.Repeat the above steps for the left extension wing for models that include it.

Mounting the Right Extension Wing Assembly

Models BTC, LSA and LSB – the right extension wing looks like A in Figure 15

Referring to Figure 15:

1.Select the right extension table (A), which is identified by no scale on the guide rail (B).

2.Mount the extension table by sliding the extension rods into the mounting holes (C) on the right side of the saw table. The lock knobs (D) may need to be loosened.

3.From the bottom of the table, thread an M4x8 pan head screw (G) into the hole near the end of the rear extension rod (E3). This is the rod closest to the rear extension (F1 and F2).

4.Tighten the lock knobs (D).

15

Figure 14

Figure 15

Image 15
Contents Part No. M-708315 Table SawMore Information WMH Tool Group Warranty WarrantyTable of Contents Page Page Protection Tips from Kickback Kickback PreventionDefinitions and Terminology SpecificationsShipping Contents Index Description Quantity Contents TableModels LSA, LSB AssemblyWhere to Begin Leg AssemblyModel LSB only Mounting the ShelfDust Shroud Rubber FeetInstalling the Blade Guard and Splitter Aligning the Blade Guard and SplitterAll models Saw Blade Attaching the Rip FenceCalibrating the Rip Fence Scale Model BTB the extension wing should look like InstallationAdjustment Stamped Steel Extension WingAssembly if required Mounting the Right Extension Wing AssemblySliding Extension Wing Left rail extension is now properly Mounting the Left Extension Wing AssemblyLeft Scale Extension Right Scale ExtensionOptional Left Table Support Handwheel HandleModels BTB, BTC and LSA Tighten the blade tilt lock knob B AdjustmentsDegree Positive Stop Scale CalibrationReplacing the Blade Adjusting Blade Parallel to Miter Gauge SlotsFor Replacement and Adjustment Replacing/Adjusting the Drive BeltMiter Gauge Operation Extension Cord ChartElectrical Connections Operating ControlsOperations Table SawsKickbacks Rip Sawing Crosscutting Bevel and Miter Operations Dust CollectionDo not use the standard table insert for dadoing operations Feather Board Safety DevicesMaintenance CleaningLubrication TroubleshootingOrdering Replacement Parts PartsIndex No. Part No Description Size Qty Motor/Trunnion Parts List708315-53 Motor/Trunnion -- Assembly Blade Guard Assembly Miter Gauge Assembly Rear Support Assembly Rip Fence Assembly Right Extension Assembly Left Extension Assembly Main Saw Parts Main Saw Assembly 708315-159 Dust Shroud Stand AssemblySteel Wing Assembly AccessoriesWMH Tool Group Sierra de mesa de 10 pulgadas Más información Garantía de WMH Tool Group GarantíaÍndice Advertencia Advertencia Consejos prácticos para protegerse contra los contragolpes Prevención de contragolpesDefiniciones y terminología EspecificacionesContenido de las cajas ContenidoContenido de las cajas Herramientas necesarias no incluidasTabla de contenido Núm. de Índice Parte Descripción CantidadArmado Para empezarModelos LSA, LSB Pies de caucho Montaje del estanteModelo LSB únicamente Cubierta contra el polvoApriete los tornillos de cabeza hexagonal H Instalación del resguardo de la hoja y placa abridoraAlineación del resguardo de la hoja y placa abridora Todos modelosHoja de la sierra Ajuste de la guía para cortar al hiloCalibrado de la escala de la guía para cortar al hilo Reposicionamiento del riel delantero Prolongación de la mesa en acero estampadoInstalación AjustesArmado Prolongación deslizable de la mesaModelos BTC, LSA y LSB Prolongación de la escala izquierdaProlongación de la escala derecha La prolongación izquierda del riel está ahoraSoporte izquierdo para la mesa, opcional Rueda de manoModelos BTB, BTC y LSA Parada positiva de 45 grados AjustesParada positiva de 90 grados Calibrado de la escalaFigura Cambio de la Hoja Reemplazo/Ajuste de la Correa de AccionamientoReemplazo y ajuste Operación del calibre de ingletes Retire la correa E de las poleas del motor y mandril F, GAjustes Conexiones Eléctricas Controles de OperaciónTabla de cordones de prolongación Operaciones Sierras de mesaContragolpes Cortes al hilo Cortes transversales Operaciones de bisel e inglete Recolección del polvo Dispositivos de seguridadTabla escalonada Pieza de madera de empujeLubricación MantenimientoPieza de relleno LimpiezaSíntoma Causa posible Solución Identificación y solución de problemasNúm. de Índice Parte Descripción Tamaño Cant PartesPedido de repuestos Motor/Muñón Lista de partesTS-1541021 Tuerca de bloqueo del accesorio Motor/Muñón Ensamble Ensamble del resguardo de la hoja Ensamble del calibre de ingletes Ensamble del soporte trasero Ensamble de la guía para cortar al hilo Ensamble de la prolongación derecha de la mesa Ensamble de la prolongación izquierda de la mesa Sierra principal Partes Sierra principal -- Ensemble Descripción Tamaño Cant Ensamble del soporteEnsamble de la prolongación de la mesa en acero AccesoriosPage WMH Tool Group