Delta 36-650 instruction manual Connecting Motor Cord to Switch Assembly

Page 13

8. IMMEDIATELY AFTER ASSEMBLING

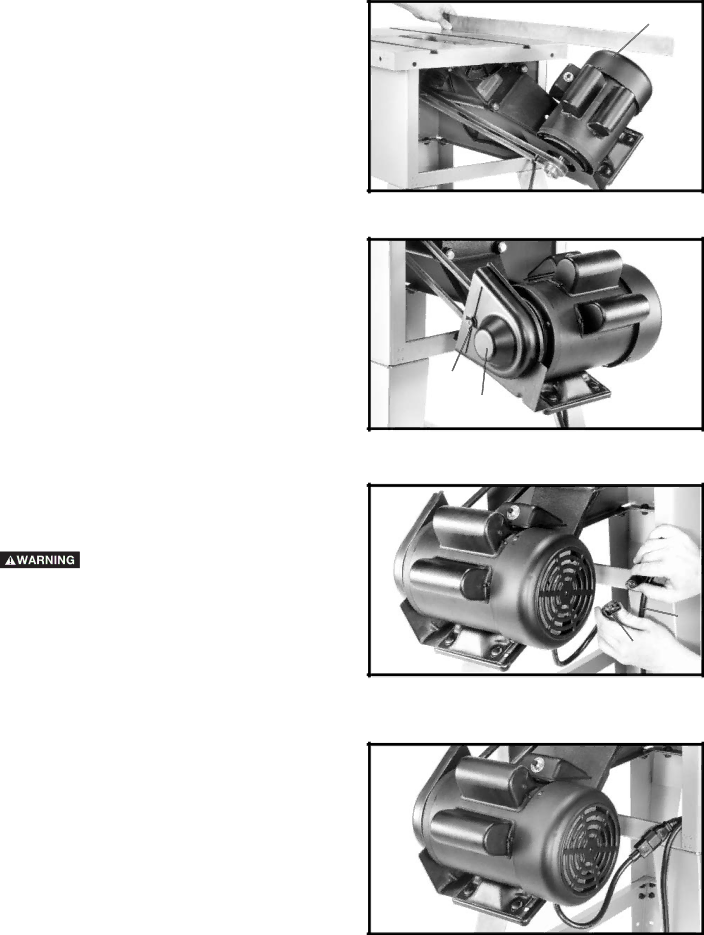
THE BELT, RAISE THE SAW BLADE TO ITS MAXIMUM HEIGHT AND TILT THE SAW BLADE TO 45 DEGREES. USING A STRAIGHT EDGE (L) FIG. 25, CHECK TO SEE IF THE MOTOR END (J) FIG. 25, IS BELOW THE TOP OF THE TABLE SURFACE (K). IF THE MOTOR END (J) IS ABOVE THE TOP OF THE TABLE SURFACE, THE MOTOR MUST BE MOVED TO THE LEFT UNTIL YOU ARE CERTAIN THE TOP (J) OF THE MOTOR IS BELOW THE TOP OF THE TABLE SURFACE. THEN RE-ALIGN THE MOTOR PULLEY TO THE ARBOR PULLEY.

9.Place a 1/4" flat washer onto the 1/4-20x1-1/2" hex head screw (D) Fig. 23. Place the spacer (F) Fig. 23, onto the 1/4-20x1-1/2" hex head screw (D) Fig. 23, and thread a 1/4-20 hex nut (E) Fig. 23, onto the hex head screw.

10.Align the hole in the outer cover (D) Fig. 26, with the 1/4-20x1-1/2" hex head screw (D) Fig. 23. Place the outer cover (E) Fig. 23, onto the hex head screw. Place a 1/4" external tooth lockwasher onto the hex head screw, thread a 1/4-20 wing nut onto the hex head

screw, and tighten securely. Make certain the outer cover does not interfere with the drive belt and the motor pulley.

CONNECTING MOTOR CORD TO SWITCH ASSEMBLY

DISCONNECT MACHINE FROM POWER

SOURCE.

1.Insert the pronged motor plug (A) Fig. 27, into the female receptacle (B) of switch-to-motor cord (C).

2.Fig. 28, illustrates the motor cord connected to the switch assembly.

K L J

Fig. 25

D

E

Fig. 26

B

C

A

Fig. 27

Fig. 28

13

Image 13
Contents Professional Table Saw General Safety Rules Safety Guidelines / DefinitionsAdditional Safety Rules for Table Saws Motor Specifications Power ConnectionsGrounding Instructions Extension Cords Unpacking and CleaningFence Parts Professional Table SAW PartsHardware Stand PartsStand Legs AssemblyStand to SAW Blade Tilting and Raising Handwheel Recommended Motor for Your SAW Installing Switch Motor CordMotor and Motor Mounting Plate to SAW Motor to Motor Mounting PlateMotor PULLEY, Pulley GUARD, and Drive Belt Illustrates the motor cord connected to the switch assembly Connecting Motor Cord to Switch AssemblyBlade Guard and Splitter Assembly Page Extension Wings Guide Rails Switch Assembly RIP Fence to Guide Rails Locking Switch OFF Position Operating Controls and AdjustmentsStarting Stopping SAW Tilting the Blade Raising and Lowering the BladeRIP Fence Operation and Adjustments Miter Gage Operation and Adjustment Adjusting Table Insert MaintenanceChanging the SAW Blade Overload ProtectionCROSS-CUTTING OperationsRipping Using Accessory Moulding CutterheadAlways Install Blade Guard After Operation is Compete Using Accessory Dado Head Constructing a Featherboard Using Auxiliary Wood Facing on RIP FenceConstructing a Push Stick PushstickPARTS, Service or Warranty Assistance AccessoriesPage Canadian PORTER-CABLE Delta Service Centers