Panasonic SC-BTT560 SC-BTT500 SC-BTT460 SC-BTT400 manual Unit and media care, Accessories

Page 6

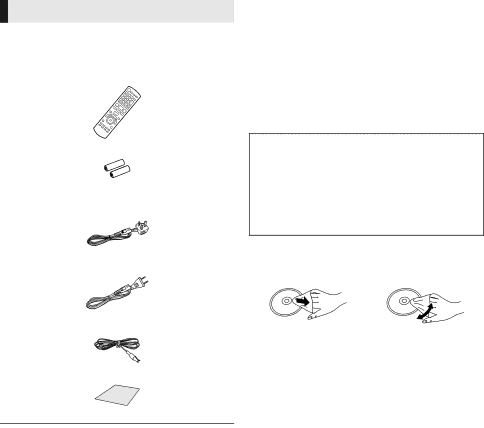
Accessories

1 Remote control

For the United Kingdom and Ireland (N2QAYB000728)

Except the United Kingdom and Ireland (N2QAYB000729)

2 Batteries for remote control

1 AC mains lead

For the United Kingdom and Ireland (K2CT2CA00007)

Except the United Kingdom and Ireland (K2CQ2CA00006)

1 FM indoor antenna (RSAX0002)

1 Sheet of speaker cable sticker

Product numbers provided in these operating instructions correct as of December 2012. These may be subject to change.

Do not use AC mains lead with other equipment.

Please note that the actual controls and components, menu items, etc. may look somewhat different from those shown in the illustrations in these Operating Instructions.

Unit and media care

Clean this unit with a soft, dry

cloth

Never use alcohol, paint thinner or benzine to clean this unit.

Before using chemically treated cloth, carefully read the instructions that came with the cloth.

This unit’s lens

Lens cleaner: RP-CL720AE

This lens cleaner may not be available for sale in all countries, e.g. not available in Germany, please consult your Panasonic dealer for advice.

This lens cleaner is sold as specific for DIGA, but can be used on this unit as well.

Clean discs

DO

DO NOT

Wipe with a damp cloth and then wipe dry.

Disc and card handling

precautions

Handle discs by the edges to avoid inadvertent scratches or fingerprints on the disc.

Do not attach labels or stickers to discs.

Do not use disc cleaning sprays, benzine, thinner, static electricity prevention liquids or any other solvent.

Clean any dust, water, or foreign matter from the terminals on the rear side of the card.

Do not use the following discs:

Discs with exposed adhesive from removed stickers or labels (rented discs etc.).

Discs that are badly warped or cracked.

Irregularly shaped discs, such as heart shapes.

6 VQT4Q16

Image 6
Contents Firmware updates Precautions Wireless LAN connectionRestriction on use of unauthorized copied content To dispose or transfer this unitTable of contents Package contents and accessories Accessories Unit and media careDevice Disc markings Device types Contents format Playable mediaFinalize Discs that cannot be played by this unitRegion management information BD-VideoRemote control Using the remote controlControl reference guide BTT560 BTT500 BTT460 BTT400 Standby/on switch Í/IMain unit Front 11 BTT560 BTT500HDMI1 in CABLE/SAT terminal Digital transmitter dock for wireless systemMain unit Rear 12 BTT560 BTT500Upgrade to 7.1-channel system BTT560 BTT500 Wireless connections SH-FX71Enjoy surround speaker sound wirelessly PositioningBTT560 BTT460 Front speakers Attach the stand to the base Preparing the speakersAssembling the speakers Thread the speaker Cable through BaseConnecting the speaker cables Speaker cable sticker ConnectorConnections Speaker connectionFM antenna connection Connecting to a TVWhat is ARC? TV AudioSet Top Box, etc When the connecting devices do not have an Hdmi terminalOther device connection Set Top Box, etc Optical digital audio cable not supplied≥ BTT560 BTT500 Connecting to the networkWireless LAN connection BTT560 BTT500 LAN cable connectionConnecting the AC mains lead AC mains lead supplied To a household mains socketEasy Network Setting SettingsEasy Setting Wired connectionReprogramming Remote control Firmware updatesInserting or removing media Enjoying TV with unit’s speakersSelecting the type of audio Network ServiceHome menu SD CardUsing coloured buttons Multi User ModeSwitching the user Using facial recognitionPlayback Operations during playbackDisplaying menus and playback information Enjoying 3D video and photosEnjoying BD-Live Using the iPod/iPhone SlideshowIPod/iPhone Connection Connecting with a dedicated USB cableBTT560 BTT500 Connecting to the Dock IPod/iPhone PlaybackViera remote control Automatic input switching Power on linkPower Off Link Viera Link Hdavi ControlSelect the TV audio Connecting the optical digital audio cableEnjoying TV and STB with unit’s speakers Select the STB audioManual tuning and presetting Presetting stations automaticallyListening to a preset channel Listening to the RadioPress Internet ≥ Network connection ≥ Network settingTo enjoy video communication e.g. SkypeTM Select the item and press OK To exit from Viera ConnectHome Network feature Playing back contents on the Dlna serverUsing the Digital Media Controller Option menu Operation MenuPicture Settings Personal TasteSound Settings Setup menu 3D SettingsPicture Sound ¾ BD-Video Secondary Audio Audio DelayManual Settings Graphic Display Level ¾ Hdmi Audio OutputLanguage NetworkRatings SystemRemote Control ¾ Power Off LinkUnit Settings Firmware UpdateSpeaker settings Adjusting speaker levelDelay time Surround Effects Changing the sound settingsSpeaker installation option Attaching to a wallTo prevent tipping/falling of the speakers  Troubleshooting guide General operationCannot eject disc Images from this unit do not appear on the TV Unit switches to standby modeUnit does not turn off Video is not output in high-definitionNo surround sound Cannot switch audioCannot hear the desired audio type ¾ BTT560 BTT500IPod/iPhone operation RadioMessages On the televisionOn the unit’s display or F  stands for a number UPD/  stands for a numberSpecifications GeneralPhoto File formatSupported format for Dlna AudioLanguage code list Display languages listSide of product Back of product \For\the\United\Kingdom\and\Ireland\customers\ Panasonic Corporation