Drolet 75281 Bricks and Insulation Installation HT-1600, HT-1600 Refractory Bricks Assembly

Page 7

BRICKS AND INSULATION INSTALLATION (HT-1600)

1.Remove from the stove all bricks and insulation.

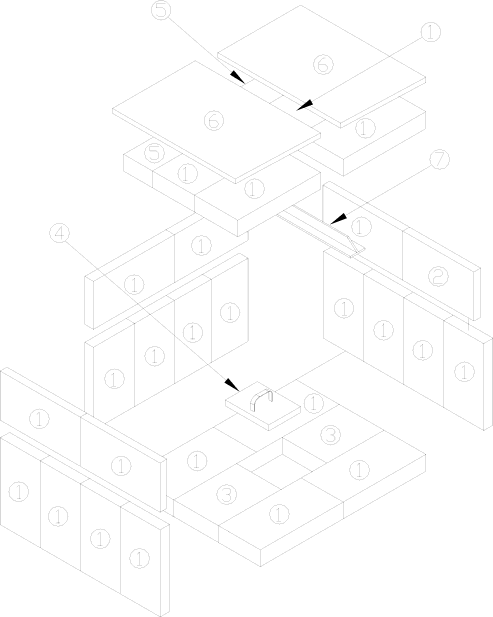
2.Install all side bricks (11 x 4 1/2" x 9" & 1 x 4 ½” x 8 3/16") as shown in drawing below.

3.Install the back bricks (6 x 4 1/2" x 9")

4.Install the bottom bricks (4 x 4 1/2" x 9") + (2 x 6 " x 8") and the ash cap.

5.Install the "T" shape support.

6.Install the baffle bricks (4 x 4 1/2" x 9") + (2 x 3" x 9") on T shape support.

7.Finally, gently slide the insulation panels over the baffle bricks.

Nbr.


Description

Qty

1

1

¼” x 4

½” x 9”

25

2

1

¼” x 4

½” x 8 3/16"

1

3

1

¼” x 6” x 7"

2

4

ASH CAP (SE09224)

1

5

1 ¼” x 3” x 9"

2

6

ISOLATOR (9 ½" x 12" )

2

7

SUPPORT (SE09242)

1

Figure 2: HT-1600 Refractory Bricks Assembly

6

Image 7
Contents Read and Keep this Manual for Reference OWNER`S Manual Drolet EPA WoodstovesTable of Contents Introduction Overall Technical SpecificationsTips on Wood Heating Pedestal and Decorative Sidewall Installation AssemblyHT-1600 Refractory Bricks Assembly Bricks and Insulation Installation HT-1600HT-2000 Refractory Bricks Assembly Brick and Insulation Installation HT-2000Air Tubes Installation AIR Tubes Installation HT-2000Door Adjustment Door AdjustmentBenefits of Installing a Blower Positioning the Stove InstallationFloor Protector Canada ClearancesType of Protection Reduced ClearancesChimney Chimney Connector Stove Pipe Factory Built Chimney Typical InstallationsClay liner Factory Built Thimble Brick Thimble Average Energy Yield Of One Air Dried Cord Of Cut Wood Woodstove UtilizationFirst Fires Testing Your WoodIgnition Heating Creosote Formation and Need for Removal ReloadingASH Disposal Paint MaintenanceGlass GasketingDrolet Limited Lifetime Warranty