KitchenAid YKEHV309, KBHV109 manual Crisping Chart, Broiling Chart

Page 20

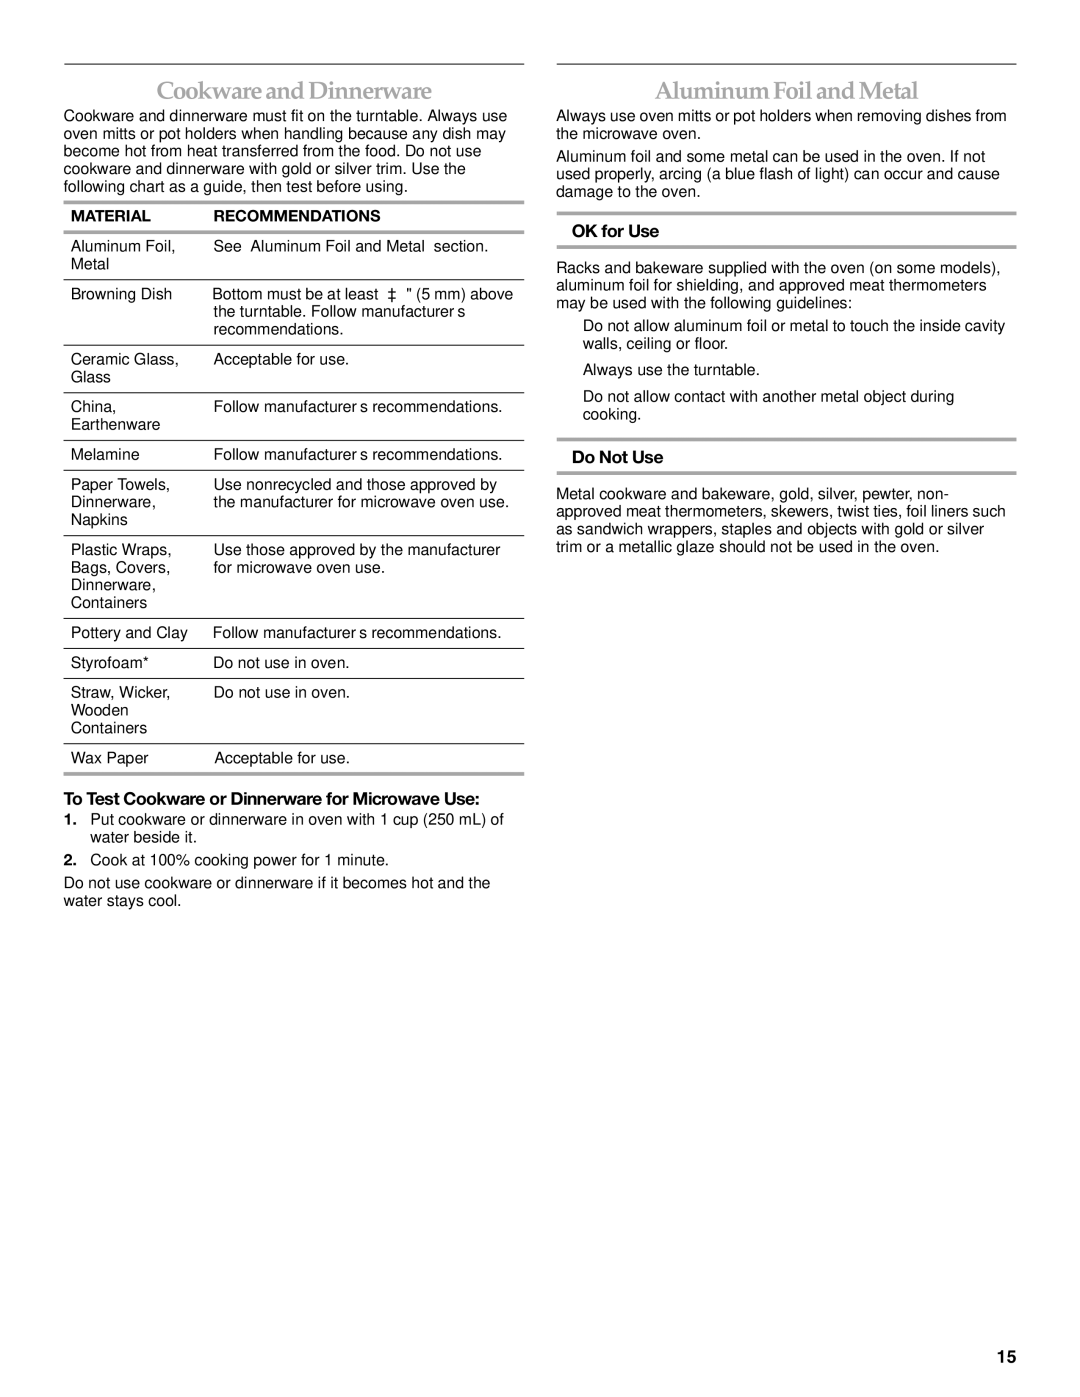
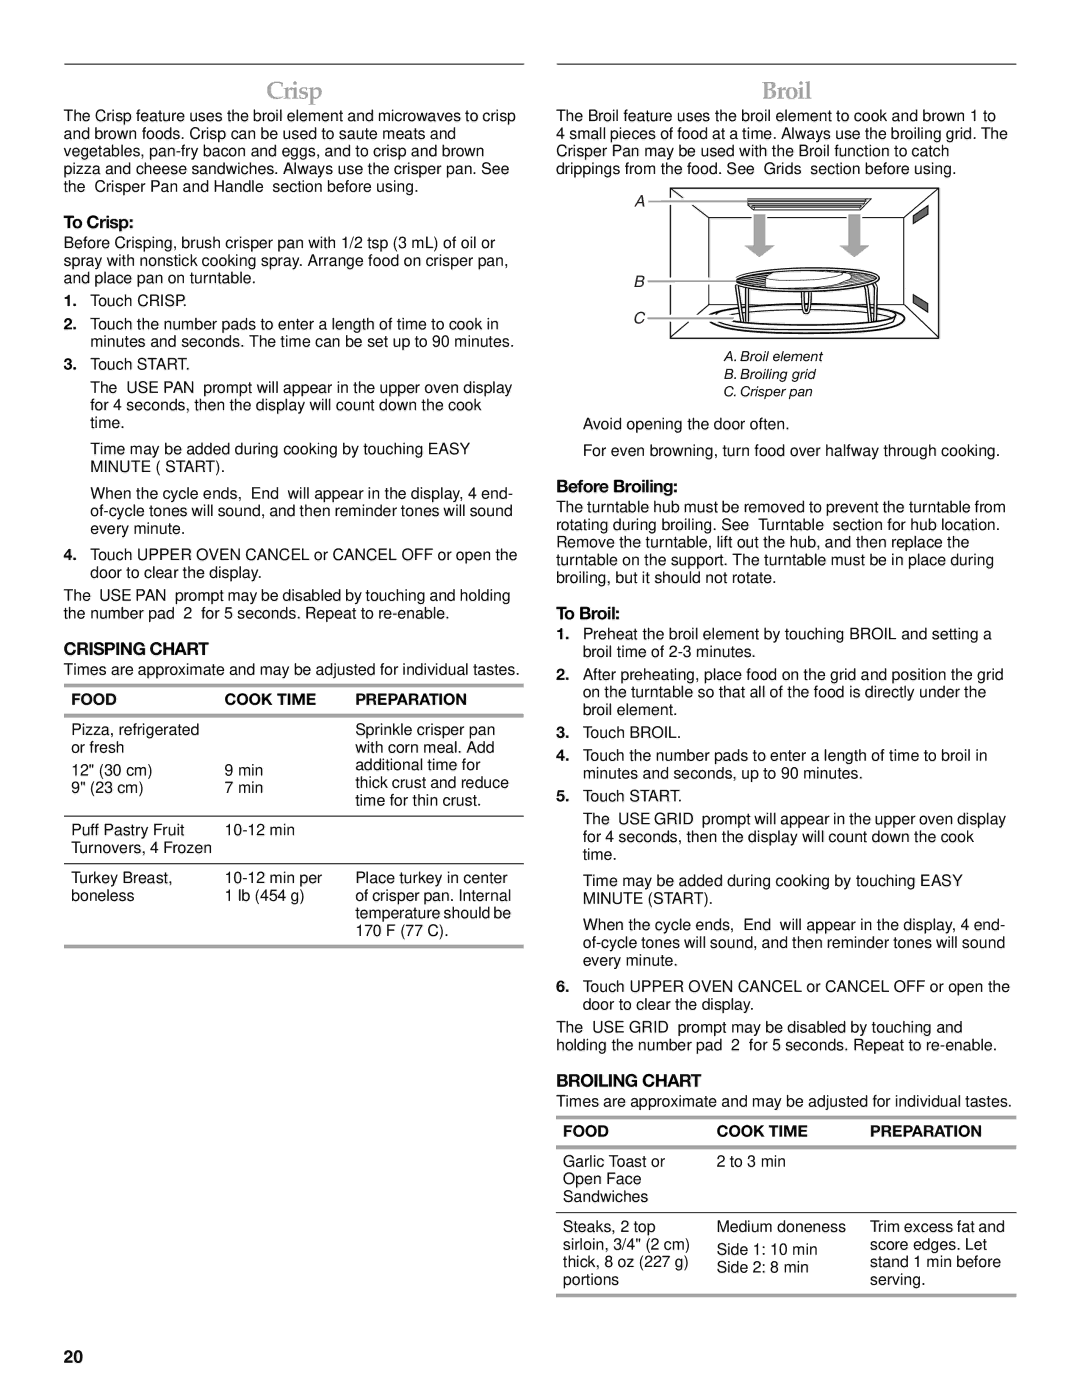
Crisp

The Crisp feature uses the broil element and microwaves to crisp and brown foods. Crisp can be used to saute meats and vegetables, pan-fry bacon and eggs, and to crisp and brown pizza and cheese sandwiches. Always use the crisper pan. See the “Crisper Pan and Handle” section before using.

To Crisp:

Before Crisping, brush crisper pan with 1/2 tsp (3 mL) of oil or spray with nonstick cooking spray. Arrange food on crisper pan, and place pan on turntable.

1.Touch CRISP.

2.Touch the number pads to enter a length of time to cook in minutes and seconds. The time can be set up to 90 minutes.

3.Touch START.

The “USE PAN” prompt will appear in the upper oven display for 4 seconds, then the display will count down the cook time.

Time may be added during cooking by touching EASY MINUTE ( START).

When the cycle ends, “End” will appear in the display, 4 end- of-cycle tones will sound, and then reminder tones will sound every minute.

4.Touch UPPER OVEN CANCEL or CANCEL OFF or open the door to clear the display.

The “USE PAN” prompt may be disabled by touching and holding the number pad “2” for 5 seconds. Repeat to re-enable.

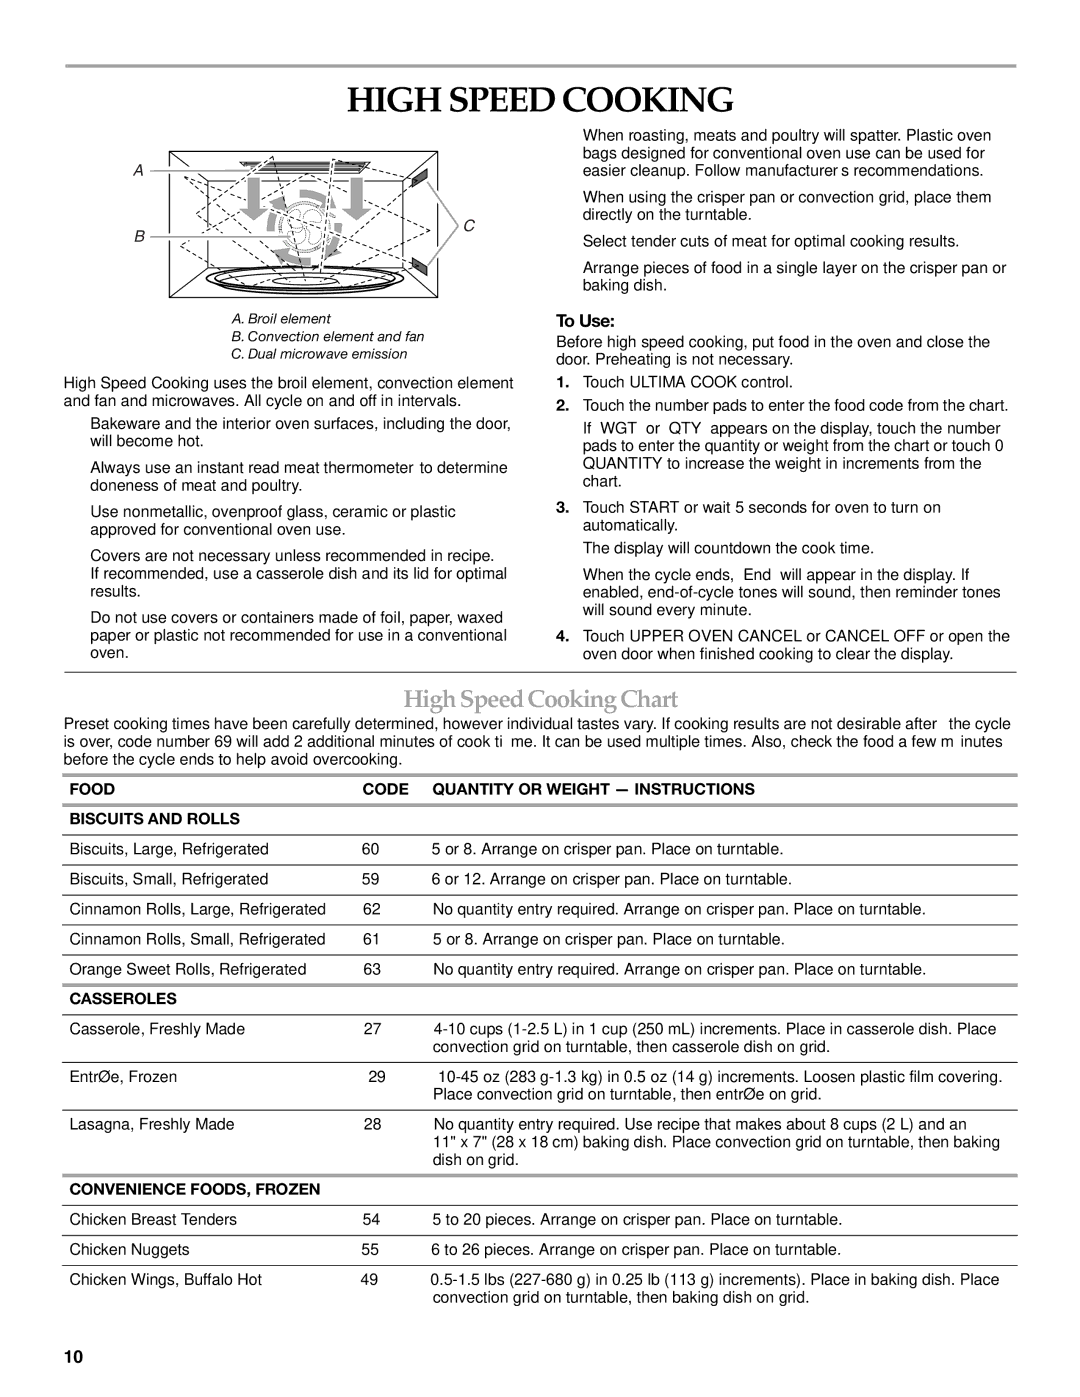
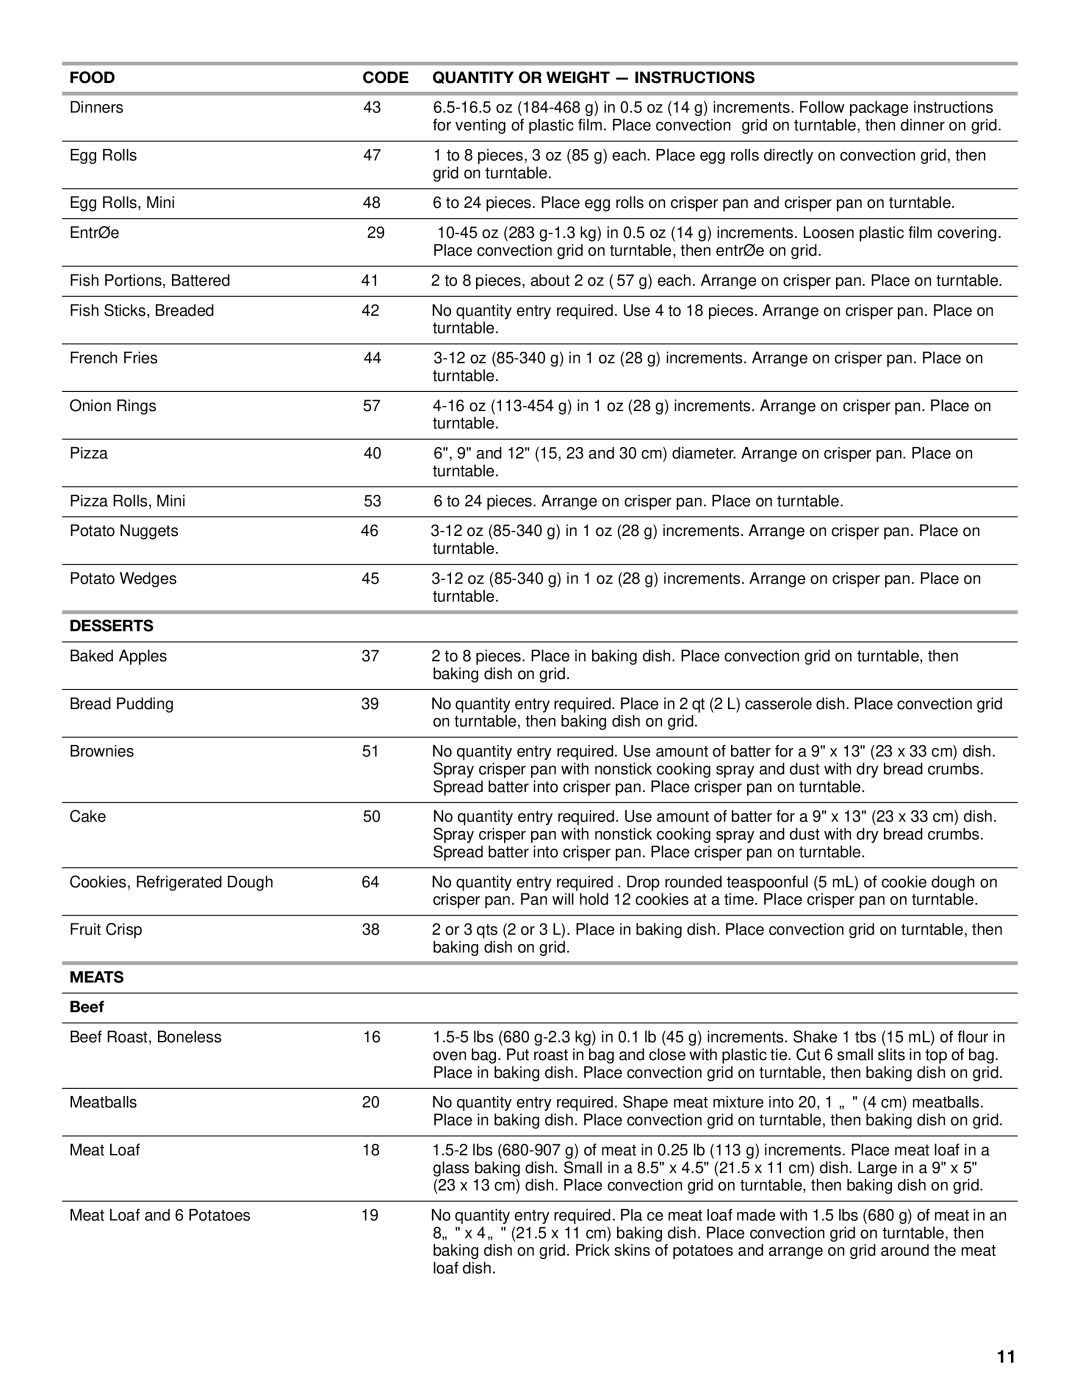
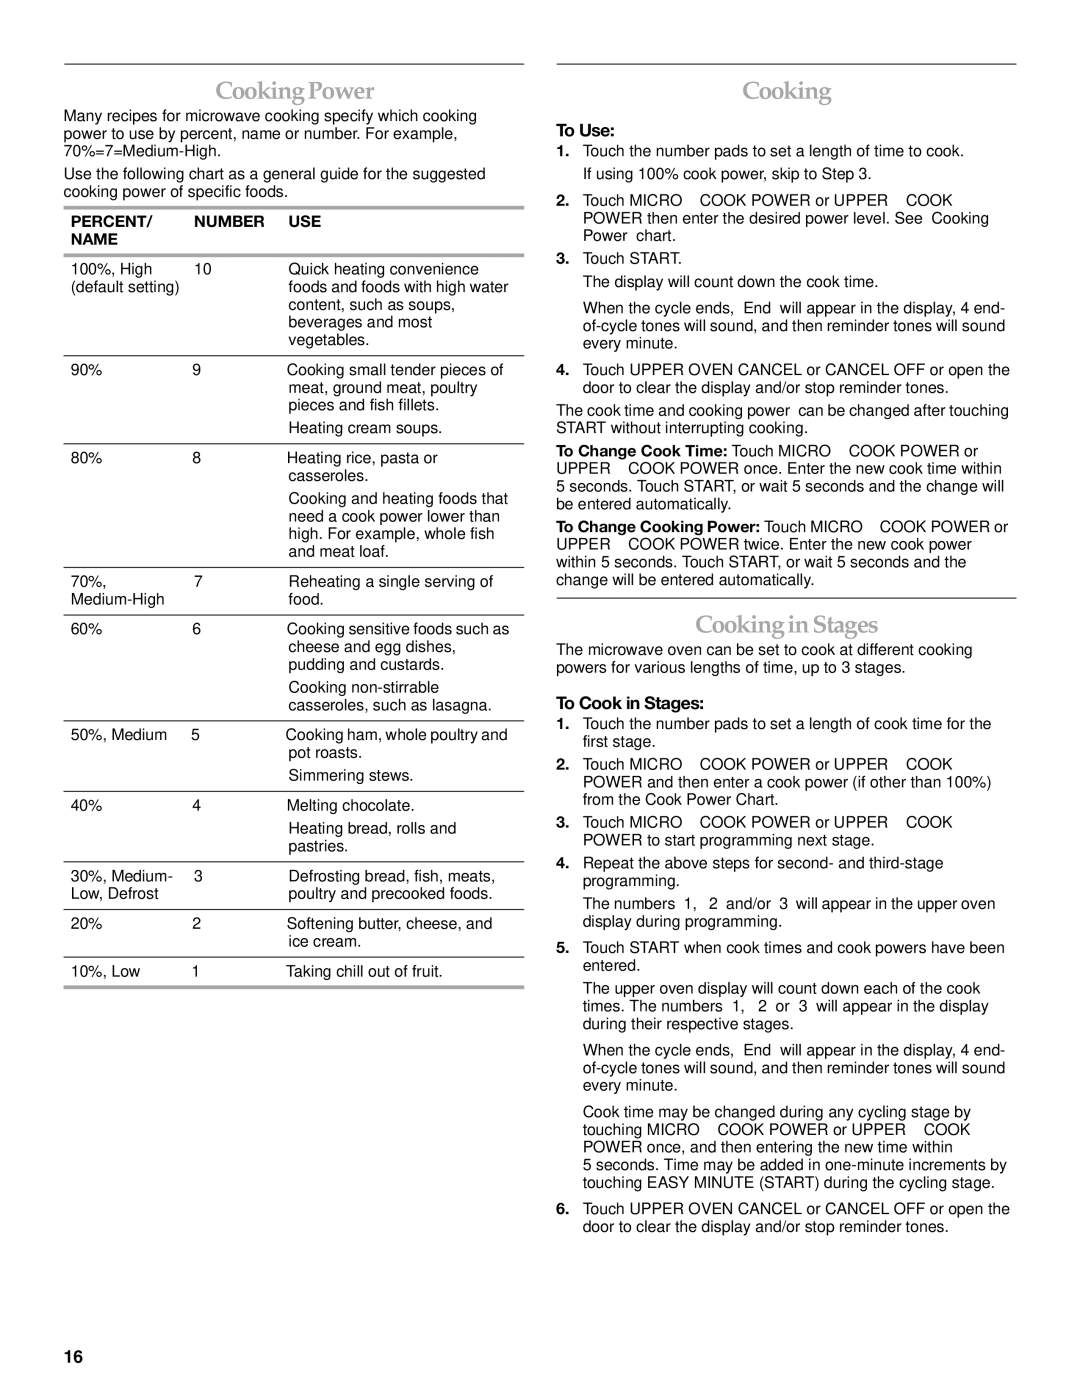
CRISPING CHART

Times are approximate and may be adjusted for individual tastes.

FOOD

COOK TIME

PREPARATION

Pizza, refrigerated


Sprinkle crisper pan

or fresh


with corn meal. Add

12" (30 cm)

9 min

additional time for

thick crust and reduce

9" (23 cm)

7 min

time for thin crust.


Puff Pastry Fruit

10-12 min


Turnovers, 4 Frozen


Turkey Breast,

10-12 min per

Place turkey in center

boneless

1 lb (454 g)

of crisper pan. Internal


temperature should be


170°F (77°C).


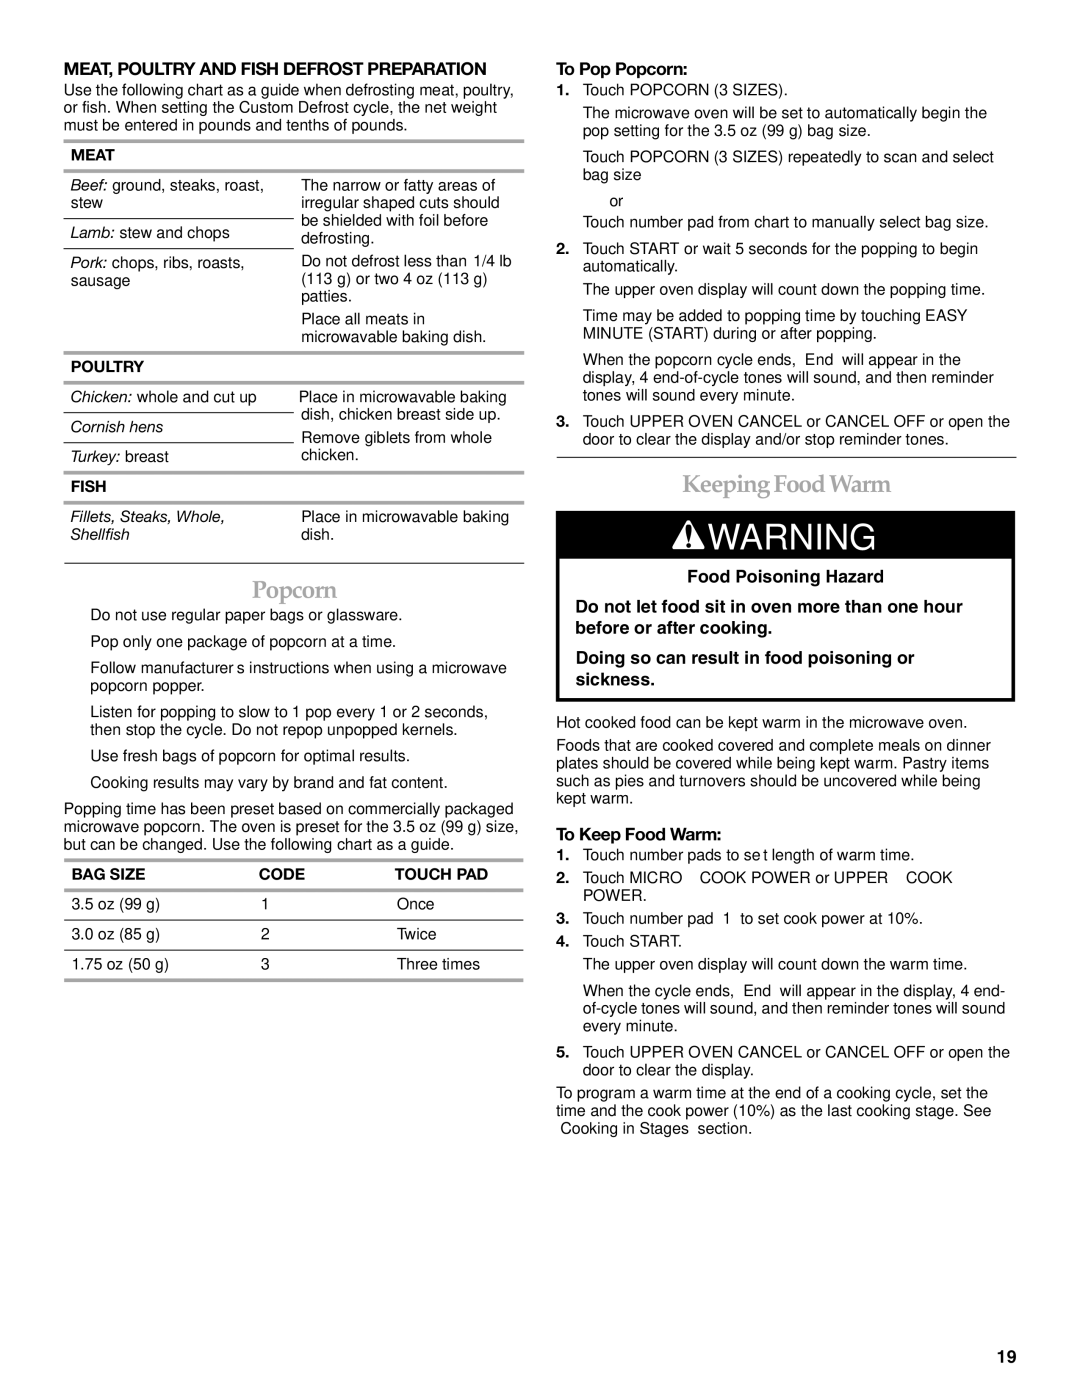
Broil

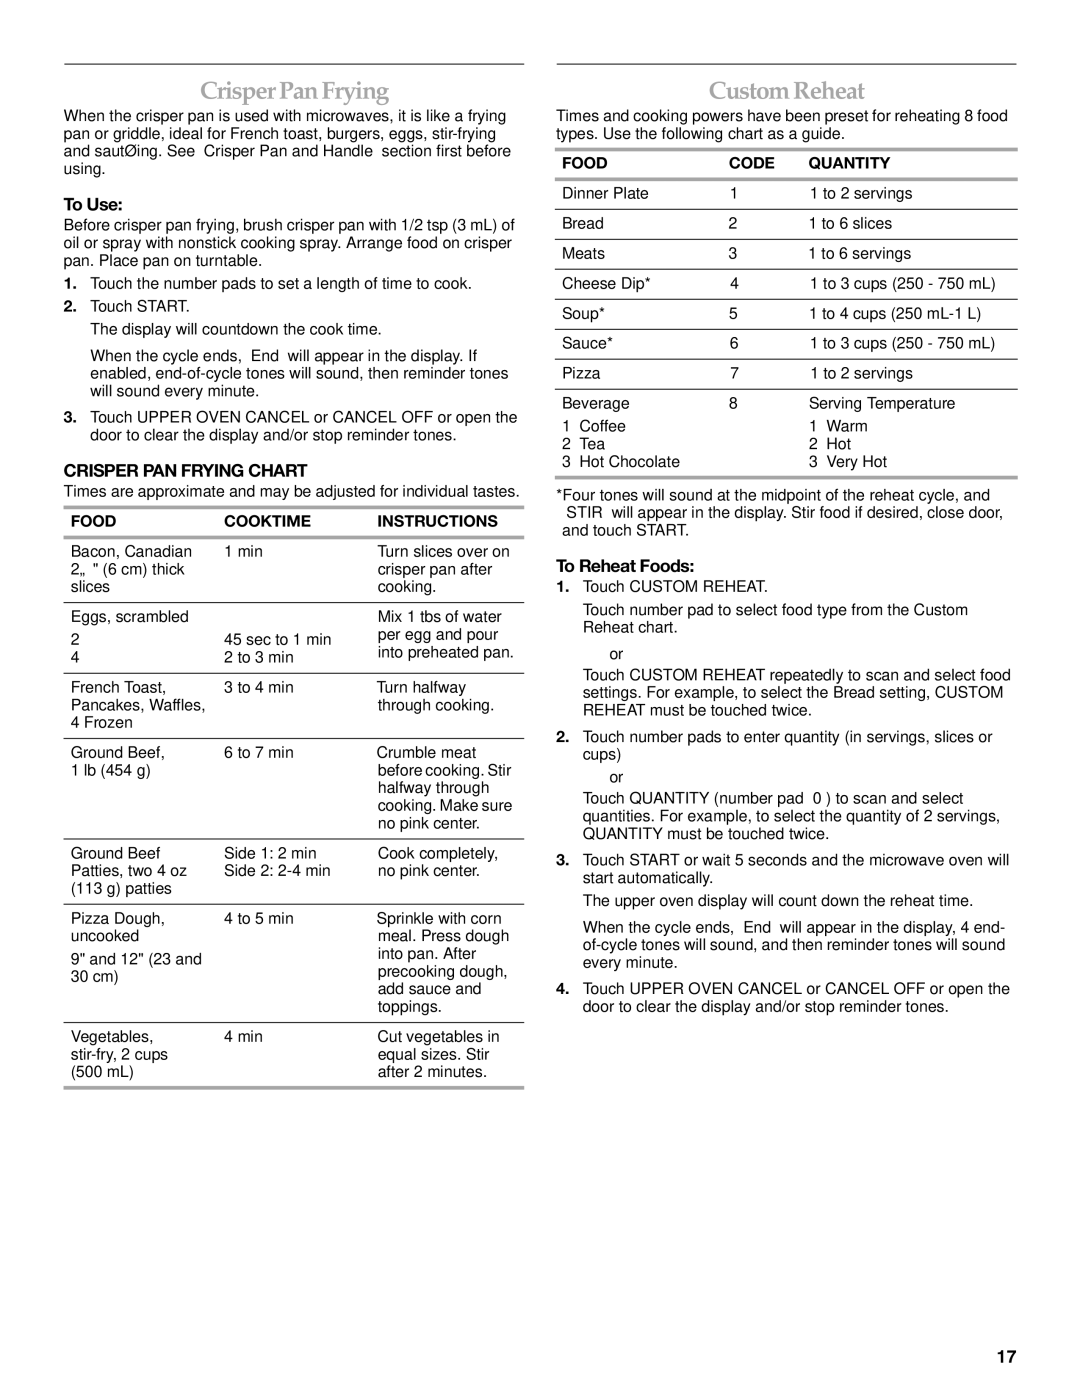
The Broil feature uses the broil element to cook and brown 1 to

4 small pieces of food at a time. Always use the broiling grid. The Crisper Pan may be used with the Broil function to catch drippings from the food. See “Grids” section before using.

A

B

C

A. Broil element

B. Broiling grid

C. Crisper pan

Avoid opening the door often.

For even browning, turn food over halfway through cooking.

Before Broiling:

The turntable hub must be removed to prevent the turntable from rotating during broiling. See “Turntable” section for hub location. Remove the turntable, lift out the hub, and then replace the turntable on the support. The turntable must be in place during broiling, but it should not rotate.

To Broil:

1.Preheat the broil element by touching BROIL and setting a broil time of 2-3 minutes.

2.After preheating, place food on the grid and position the grid on the turntable so that all of the food is directly under the broil element.

3.Touch BROIL.

4.Touch the number pads to enter a length of time to broil in minutes and seconds, up to 90 minutes.

5.Touch START.

The “USE GRID” prompt will appear in the upper oven display for 4 seconds, then the display will count down the cook time.

Time may be added during cooking by touching EASY MINUTE (START).

When the cycle ends, “End” will appear in the display, 4 end- of-cycle tones will sound, and then reminder tones will sound every minute.

6.Touch UPPER OVEN CANCEL or CANCEL OFF or open the door to clear the display.

The “USE GRID” prompt may be disabled by touching and holding the number pad “2” for 5 seconds. Repeat to re-enable.

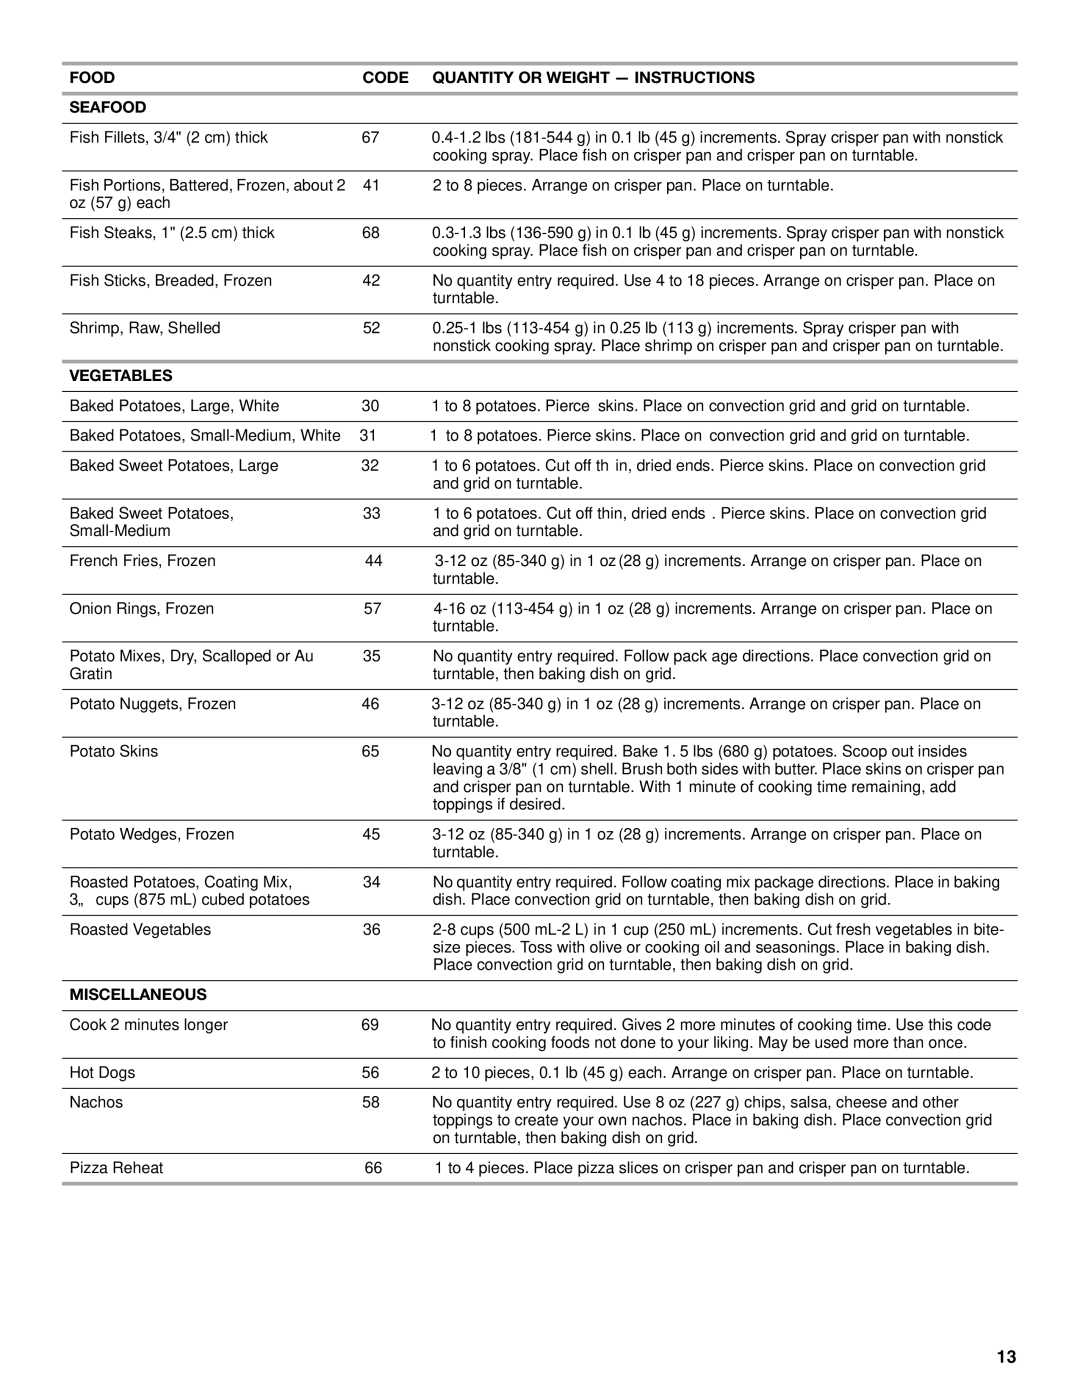
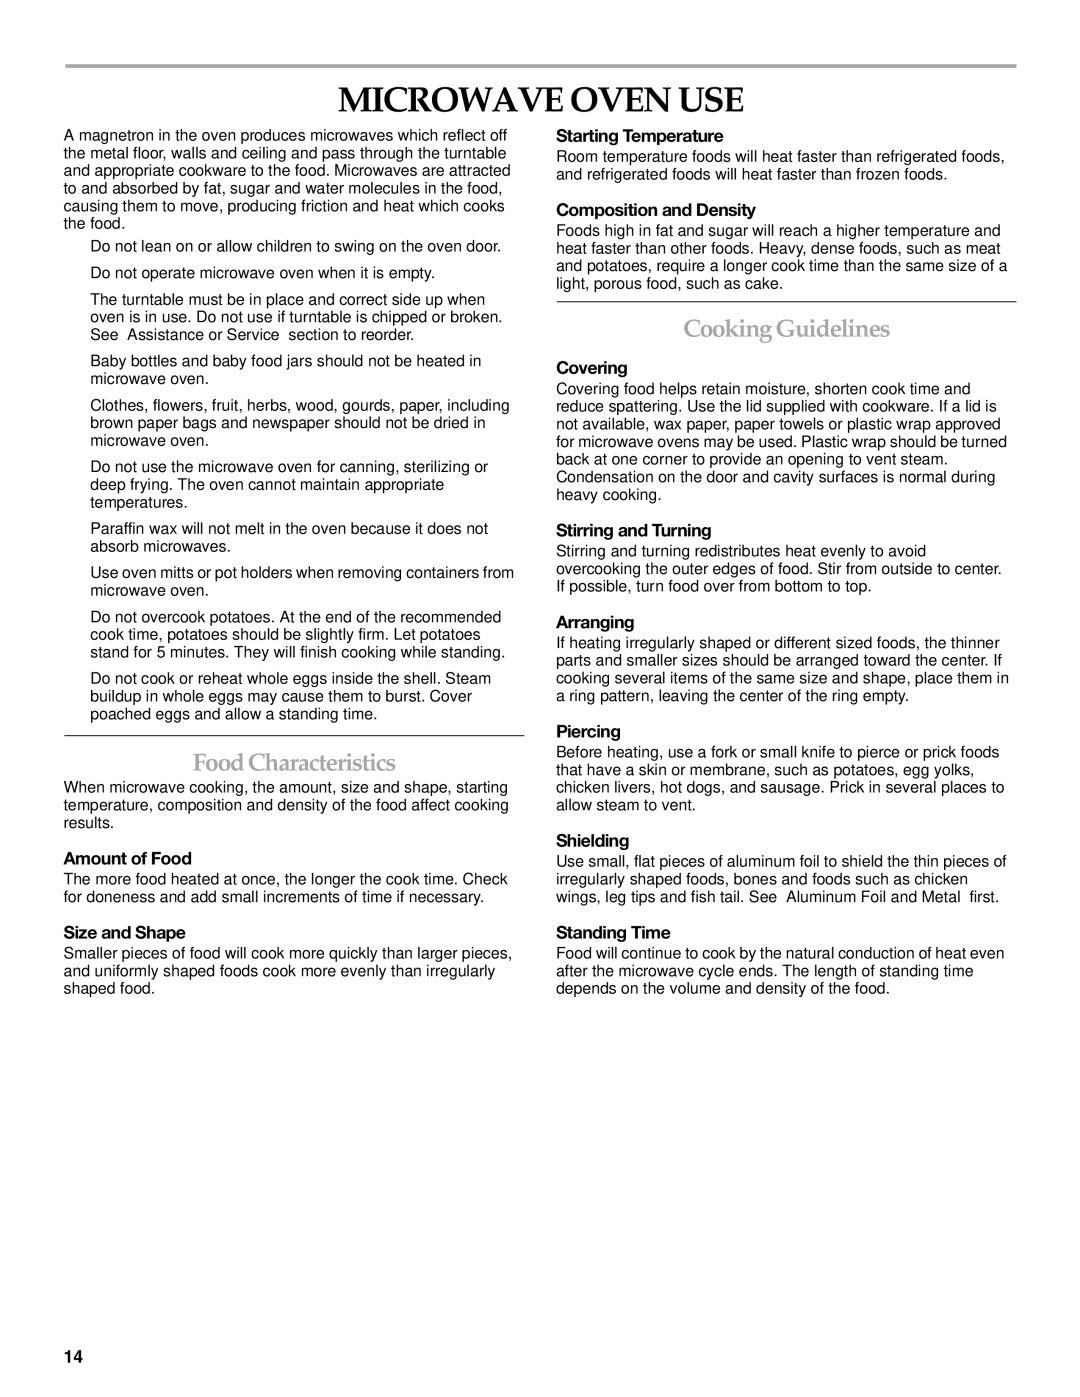
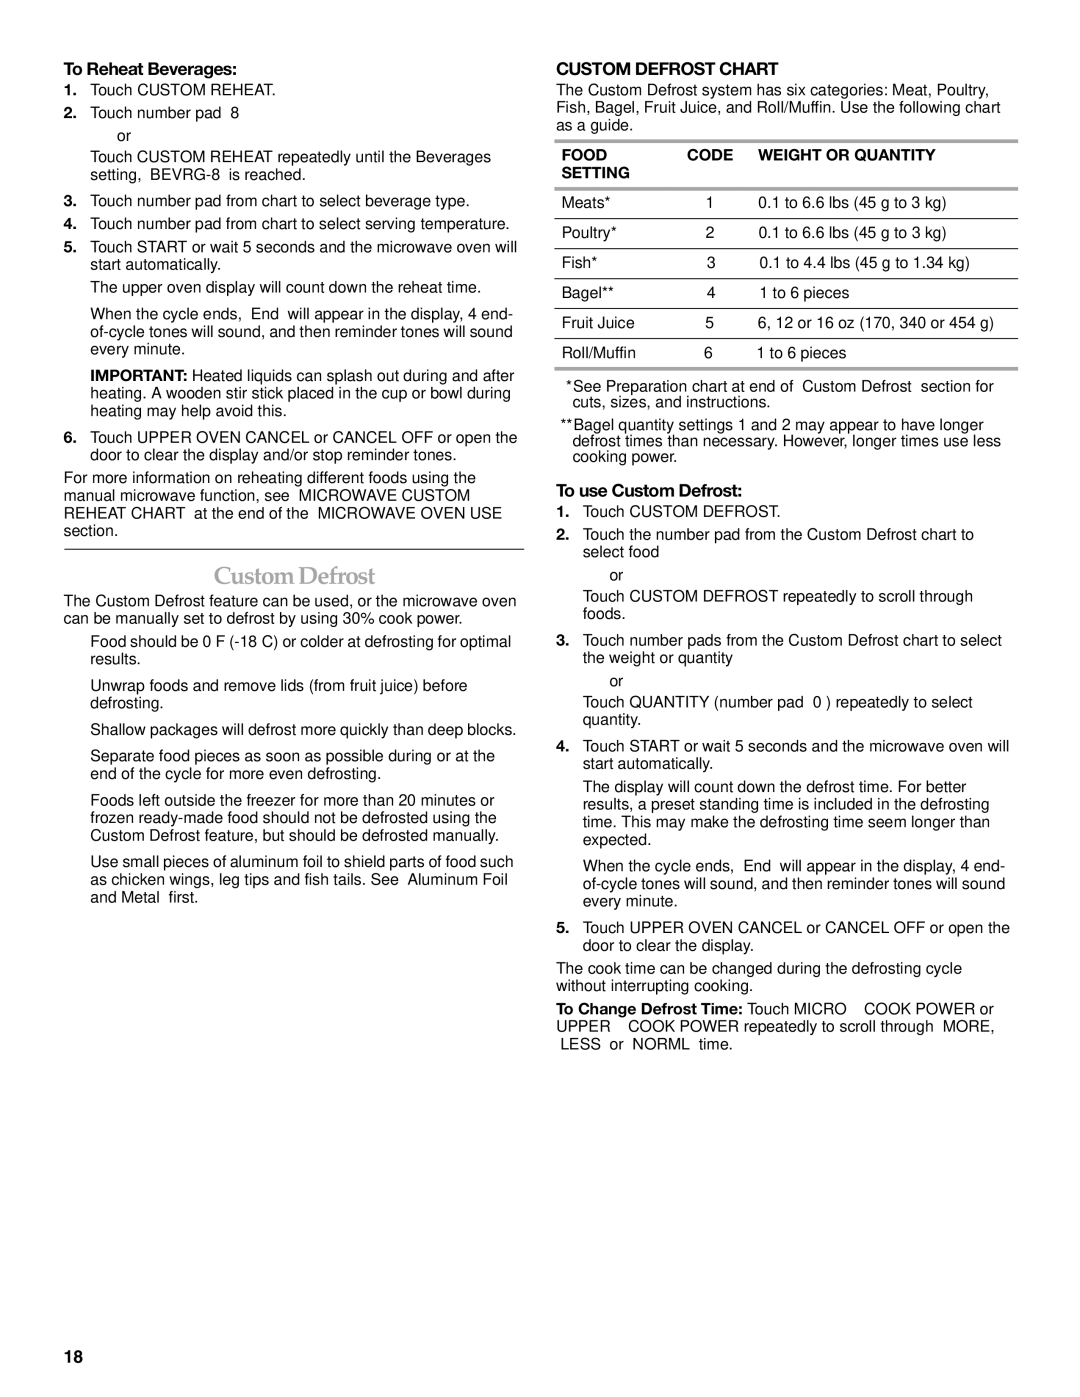
BROILING CHART

Times are approximate and may be adjusted for individual tastes.

FOOD

COOK TIME

PREPARATION

Garlic Toast or

2 to 3 min


Open Face


Sandwiches


Steaks, 2 top

Medium doneness

Trim excess fat and

sirloin, 3/4" (2 cm)

Side 1: 10 min

score edges. Let

thick, 8 oz (227 g)

stand 1 min before

Side 2: 8 min

portions

serving.


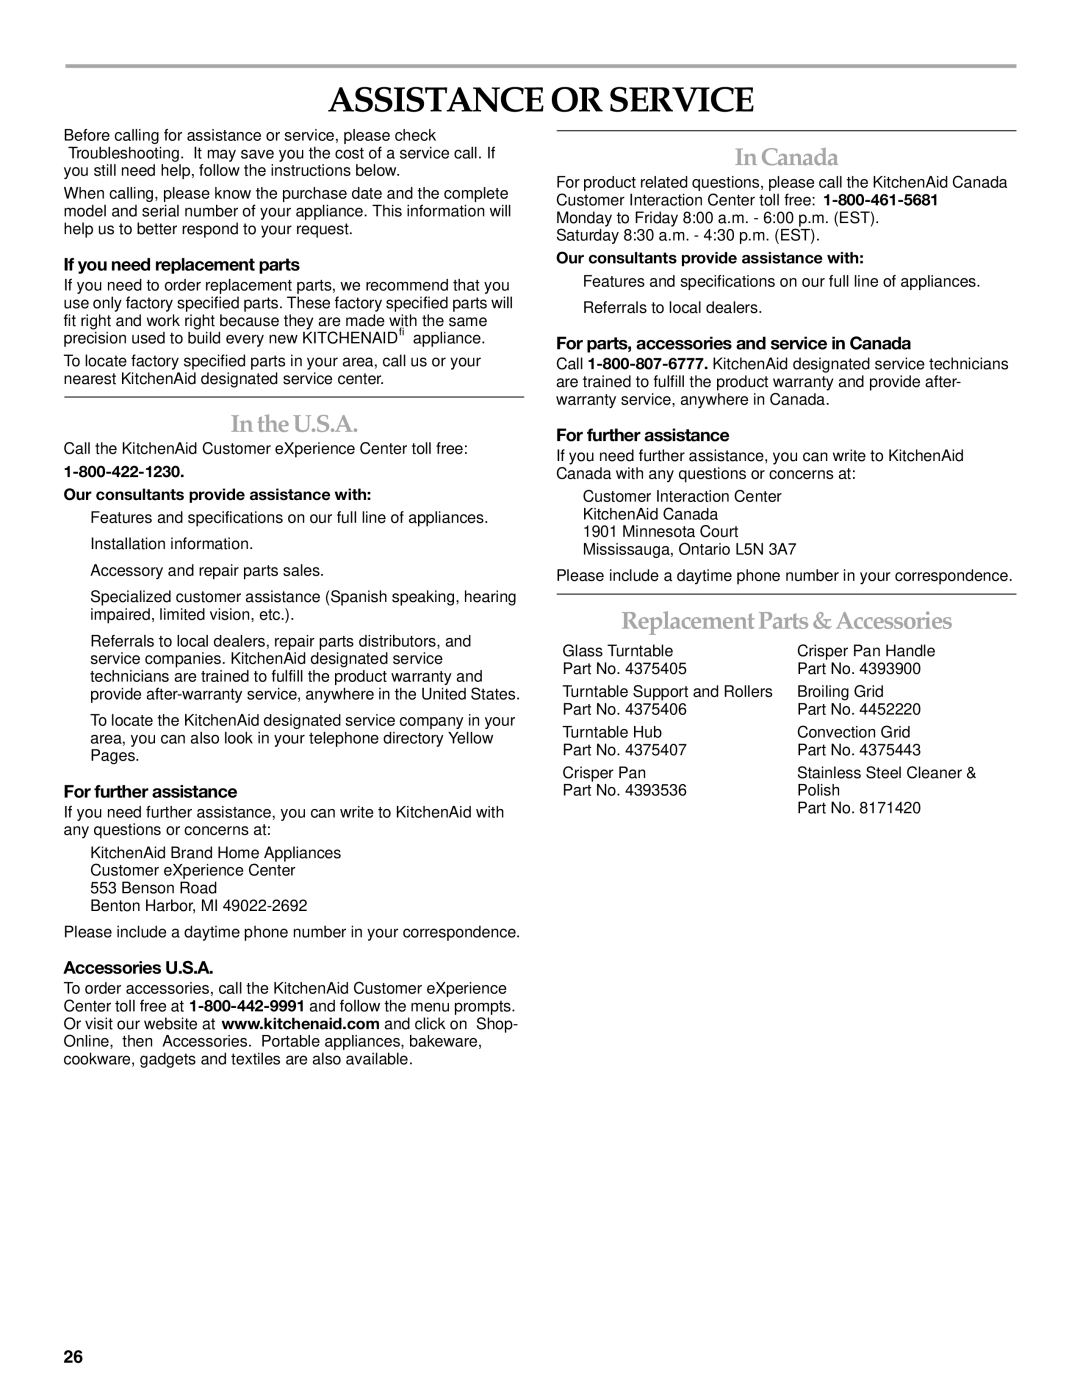
20

Image 20
Contents BUILT-IN High Speed Microwave Oven Table of Contents Microwave Oven Safety Your safety and the safety of others are very importantImportant Safety Instructions Parts and Features Electrical RequirementsTurntable GridsBroiling Grid long legs Convection Grid short legsSingle Oven Model Electronic Oven ControlCombination Oven Models Upper Oven Cancel and Cancel Off DisplaysStart, Easy Minute Number CodesTimer TonesFahrenheit and Celsius Control LockHigh Speed Cooking Chart High Speed CookingTo Use CasserolesFood Code Quantity or Weight Instructions DessertsMeats BeefPoultry LambPork Miscellaneous Food Code Quantity or Weight Instructions SeafoodVegetables Cooking Guidelines Food CharacteristicsMicrowave Oven USE Cookware and Dinnerware Aluminum Foil and MetalTo Test Cookware or Dinnerware for Microwave Use OK for UseCooking Power CookingCooking in Stages To Cook in StagesCrisper PAN Frying Chart Crisper Pan FryingCustom Reheat To Reheat FoodsCustom Defrost Chart Food Code Weight or Quantity SettingCustom Defrost To Reheat BeveragesPopcorn Keeping Food WarmMEAT, Poultry and Fish Defrost Preparation To Pop PopcornCrisping Chart Broiling ChartCrisp BroilTo Convect Cook without Preheat Convection CookingTo Convect Cook with Preheat Food Microwave Cook ChartCook Power Cook Power Preparation Microwave Reheat ChartFOOD/STARTING Temperature GeneralCleaning Oven CareTroubleshooting Assistance or Service Replacement Parts & AccessoriesU.S.A CanadaPage Kitchenaid BUILT-IN Oven & Microwave Warranty ONE Year Limited WarrantySecond Through Tenth Year Limited Warranty Items Kitchenaid will not PAY for

KBHV109, KEHV309, YKEHV309 specifications

The KitchenAid YKEHV309, KEHV309, and KBHV109 represent a trio of advanced kitchen appliances, each specifically designed to enhance home cooking and food preparation. These models offer a perfect blend of functionality, style, and innovative technologies that cater to the modern culinary enthusiast.

At the heart of these kitchen hoods is their exceptional airflow performance, which efficiently eliminates smoke, steam, and odors generated during cooking. The powerful ventilation systems ensure that your kitchen environment remains fresh and comfortable, preventing the buildup of unwanted pollutants. With multiple fan speed settings, users can easily adjust the airflow to match the intensity of their cooking.

One of the standout features of the KitchenAid hoods is their sleek, professional-grade design. Available in various finishes, including stainless steel, these hoods add a stylish touch to any kitchen décor while seamlessly integrating with other KitchenAid appliances. The streamlined construction not only enhances aesthetics but also ensures easy cleaning, helping maintain the appliance's appearance over time.

A key technology incorporated in these models is the intuitive LED lighting system. The bright, energy-efficient lights illuminate the cooking surface, providing excellent visibility while preparing meals. This feature is particularly beneficial when working with intricate recipes that require precision or when entertaining guests.

Another impressive characteristic is the quiet operation of the hoods. Unlike conventional models that can be quite noisy, the KitchenAid YKEHV309, KEHV309, and KBHV109 are designed for minimal sound disruption. Users can cook and converse in a pleasant atmosphere, even at higher fan settings.

Moreover, the installation process for these hoods is made straightforward, as they are designed for both under-cabinet and wall-mounted applications. This flexibility allows users to customize their kitchen layout according to personal preferences.

In addition to their aesthetic and functional aspects, these models are built with durability in mind. Constructed from high-quality materials, they are designed to withstand the rigors of daily use and offer longevity, ensuring an excellent return on investment.

In summary, the KitchenAid YKEHV309, KEHV309, and KBHV109 kitchen hoods stand out for their exceptional ventilation capabilities, stylish designs, and thoughtful features like LED lighting and quiet operation. These appliances are not just tools; they elevate the overall cooking experience, making them a valuable addition to any kitchen.