Smeg SA561X-9 Electronic programmer on some models only, Setting the time, Using the timer

Page 20

Instructions for the User

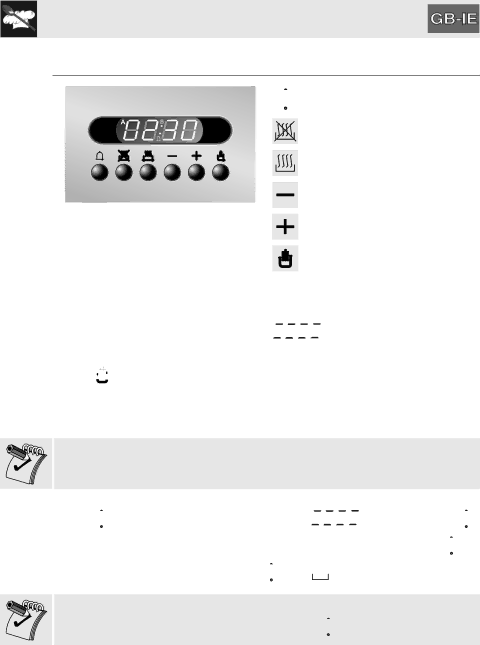
6.5Electronic programmer (on some models only)

Timer button

End of cooking button

Cooking duration button

Value decrease button

Value increase button

Manual mode button

6.5.1 Setting the time

On the first use, or after a power failure, will be flashing on the oven's display.

Press to stop the flashing. The time can be set using or . Hold down the button to increase or decrease rapidly.

6.5.2 Using the timer

Warning: the timer does not stop the cooking process. It only warns the user that the preset number of minutes have passed.

The timer can be activated at any time.

Press ; the display will show the numbers ; press and hold

and use or to set the desired number of minutes. When is

released, the countdown will start and and will appear on the display.

After the timer has been programmed, the display will go back to showing the

current time; to display the remaining time, press .

21

Image 20
Contents SA561X-9 Contents General instructions Instructions for USEGeneral instructions Safety Precautions General instructions Instructions for disposal Environmental ResponsibilityGET to Know Your Oven Multifunction PyrolyticAvailable Accessories Some models are not provided with allMechanical lock must always face the back of the oven Using the rack or trayUsing the support rack Using the handle Using the rotisserie rod on some models only Ovens with frames Ovens with runners Using the OvenGeneral Description Oven runners Cooling system Oven inside lightsInstructions for the User Description of the controls on the front panel Oven Thermostat KnobInstructions for the User Instructions for the User Function Knob Electronic programmer on some models only Setting the timeUsing the timer Automatic cooking Stopping the buzzerSemi-automatic cooking Adjusting the buzzer volume End of semi-automatic / automatic cookingDeleting the set data Modifying the set dataCooking with the Oven ECOFAN-ASSISTED Grill Cooking advice and instructions Advice for cooking meatAdvice for cooking desserts and biscuits Advice for defrosting and provingAdvice for cooking with the Grill and the Fan-assisted grill To save energyCooking process information table Meat1ST Surface 2ND Surface Pizza 280 190 180 160 170 150 Proving Quantity Proving and defrosting functionsOn pyrolytic models only Cleaning and Maintenance Cleaning stainless steelOrdinary daily cleaning Cleaning the door glazingCleaning the inside of the oven Ovens with runners Removing guide frames Pyrolysis automatic oven cleaning on some models only Before starting the automatic cleaning cycle Cleaning Light Dirt Medium Dirt Heavy Dirt DurationSetting the cleaning cycle To select a cleaning cycle with a delayed startVapor Clean assisted oven cleaning on some models only Before starting the assisted cleaning cycleSetting the assisted cleaning cycle End of the assisted cleaning cycle Extraordinary Maintenance Replacing the light bulbOn some models only the bulbs are Directly with your fingers, wrap themRemoving the door With moveable leversWith pins For multifunction models only Removing the door sealRemoving the internal glass panels Cleaning Removing the internal glass panelRemoving the middle glass panels pyrolytic models Multifunction modelsInstalling the Appliance Cable replacementElectrical connection Do not remove this plate for any reasonPositioning the oven Instructions for the installer MeasurementsInstructions for the installer Page Page 914773682/ B