GE JGBP34GEP manual Opemt~G T~ Self-Clea~G Own, Before a Clean Cycle, How to Set Oven for Cleaning

Page 22

OPEMT~G T~ SELF-CLEA~G OWN

Normal Cleaning Time: 4 hours

Before a Clean Cycle

Quick Reminder:

1.Prepare the oven for cleaning.

2.Close and latch the oven door.

3.Press the CLEAN pad.

4.Press the INCREASE pad.

If you wish to change preset clean time of 4 hours, press the INCREASE or DECREASE pad until desired stop time appears in the display.

1.Remove the broiler pan, broiler rack, all cookware and any aluminum foil from the oven—they cannot withstand the high cleaning temperatures. (Oven shelves may be left in oven. NOTE: Shelves will discolor after the self-clean cycle.)

2.Wipe up heavy soil on the oven bottom. If you use soap, rinse thoroughly before self cleaning to prevent staining.

Front Frame

Door Gasket

Light

3.Clean spatters or spills on the oven front frame (A) and only that area on the oven door that is outside the gasket (B). Do not clean the gasket. Use detergent and hot water with a soap-filled steel wool pad, then rinse well with a vinegar and water mixture. This will help prevent a brown residue from forming when the oven is heated. Buff these areas with a dry cloth. Never use a commercial oven cleaner in or around the self- cleaning oven.

Clean top, sides and outside front of oven door with soap and water. Do not use abrasives or oven cleaners.

Do not rub or clean the door gasket (B)—the fiberglass material of the gasket has an extremely low resistance to abrasion. An intact and well-fitting oven door gasket is essential for energy-efficient oven operation and good baking results. If you notice the gasket becoming worn, frayed or damaged in any way or if it has become displaced on the door, you should have it replaced.

Step 4: Close and latch the door. Make sure the oven light (C) is off.

Oven shelves may be cleaned in the self-cleaning oven. However, they will darken, lose their luster and become hard to slide. Wipe the shelf supports with cooking oil after self-cleaning to make shelves slide more easily.

Caution: Drip pans should never be cleaned in the self-cleaning ti~en.

Do not use commercial oven cleaners or oven protectors in or near the self-cleaning oven. A combination of any of these products plus the high clean cycle temperatures may damage the porcelain finish of the oven.

Important

The oven door must be closed and latched and all controls must be set correctly for the clean cycle to work properly.

How to Set Oven for Cleaning

1.Follow steps above to prepare the oven for cleaning.

2.Close the oven door and slide the latch handle to the right as far as it will go.

Never force the door latch handle. Forcing the handle may damage the door lock mechanism.

3.Press the CLEAN pad.

4.Press the INCREASE or

CLEAN DECREASE pad until desired Clean Time is displayed.

n

Clean Time is normally 4 hours. You can change the Clean Time to anywhere between 2 and 4 hours, depending on how dirty the oven is. The self-clean cycle will automatically begin within a few seconds after the word “CLEAN” is displayed and the word “ON” appears on the display. When the oven heats to a high temperature, the word “LOCK” will be displayed and, a short time later, the door latch handle will be locked in position. It will not be possible to open the oven door until the temperature drops below the lock temperature.

5.When the LOCK light is off, slide the latch handle to the left as far as it will go and open the door.

22

Image 22
Contents Ximt Self-Cleaning Gas Range Operating Instructions, Tips~ YOU ~ED Service ~LP US mLP YOUImportant Safety Notice Mportant Safety ~STRUCTIONS Flames when lifting cookware. Do not use a towelSelf-Cleaning Oven Keep all plastics away from top burnersFEATu~s of Your Mnge JGBP26GEN JGBP31GEP JGBP34GEP JGBP35GEP20,29 Before Lighting a Burner SU~ACE COO~GSurface Burner Controls To Light a Surface BurnerWok Cooking How to Select Flame SizeTop-of-Range Cookware Use of Stove Top GrillsFeatures of Your OWN Control 6666OWN CONTROL, Clock Am Tmer USmG Your Oven Oven Venk Adjusting the Oven ThermostatOven Moisture Surface LightHow to Set Immediate Start and Automatic Stop How to Set Your Range for BakingHow to Time Bake BA~GBake Quick ReminderPreheating Pan PlacementOven Shelf Baking PansPies Baking GuidesCookies CakesFor Frozen Roasb ROASTmGDual Shelf Cooking Oven Doneness Approximate Roasting Time Questions and AnswersROAST~G GU~E MeatUse of Aluminum Foil BRO~~GQuestions & Answers Broiling Tips Oven door must be closed during broilingOPEMT~G T~ SELF-CLEA~G OWN Before a Clean CycleHow to Set Oven for Cleaning Front Frame Door Gasket LightHow to Delay Start of Cleaning After a Clean CycleQuick Reminder-Delay Start for Self-Clean Why do I have ash left in my oven after cleaning? Should there be any odor during the cleaning?My oven shelves do not slide easily. What is the matter? ~Grate Sealed Burner Assemblies on some modelsCAm Am CLEAN~G ~GrateBurner Grates Cooktop SutiaceLift-Off Oven Door Outside of doorOven Bottom Broiler Pan and RackTo remove Control Panel and KnobsTo replace cover Removable Kick Panel on some models Removable Storage Drawer on some modelsTo remove storage drawer Surface Light and Starter on some models CAw Am CLEAN~GOven Air Vents Glass Surfaces~NOR ADmSTmNTS YOU can ~m Broil and Bottom Burner Air Adjustment ShuttersTo remove the oven bottom For Your Safety ~STALLATION ~STRUCTIONSLM~RTANT Safety Instructions NST&LAmON’tiSTRUCmONS PROVIDE Adequate GAS Supply CONMEl IHE Range 10 GAS‘~~!~Ada,5Ni7euW~w ~m ~~FœMF Connect the Wnge to GMRigid Pipe Hookup for Models Equipped with Sealed Burners Extension Cord Cautions ELECTRl~L ConnectionsGrounding IMPORT~-Please read careti~yElectric Disconnect Power Cord *be Disconnected tiequen@ELE~RIUL CONNE~lONS You will have one of tiese Disconnect plugsYellow tips on QuaIi~ of Flames%ft blue flame- Normal for natural gas Page Leveling the Range HOW to Convert the Range for USE with 1P GM or Natural GAS MSTALLATION ~STRUCTIONSOrifice Spuds for Convetiingto LPGas Orifice Spuds for Convetiingto NaturaI GasHOW to CONVE~ the Range for USE Broil Burner on some models Oven BurnerTo convert to natiral gas, loosen the spud about 2 turns ~STALLATION mSTRUCTIONS Yellow tips on outer conesA Number Flash on Display Yellow flames Yellow tips on outer Soft blue flamesQUESTIONS? USE this Problem Solver Clean Cycle80WEXARES80W32-Z737 80~626.2000Warranty

JGBP31GEP, JGBP34GEP, JGBP35GEP, JGBP38GES specifications

General Electric (GE) has made significant strides in the market of gas ranges, offering a blend of innovation and practicality in its models like the JGBP38GES, JGBP35GEP, JGBP34GEP, and JGBP31GEP. Each of these gas ranges is designed to cater to a variety of cooking needs, providing chefs and home cooks with the tools required for culinary success.

The GE JGBP38GES is a standout model featuring a spacious oven that utilizes a True European Convection system. This technology ensures even heat distribution, allowing dishes to cook uniformly. With a combined oven capacity of 5.0 cubic feet, it offers ample space for multiple dishes at once. The range also includes five sealed burners, which provide precise cooking control from a low simmer to high heat, catering to every cooking style. Its continuous grates make it easy to slide pots and pans across the surface, enhancing efficiency during meal preparation.

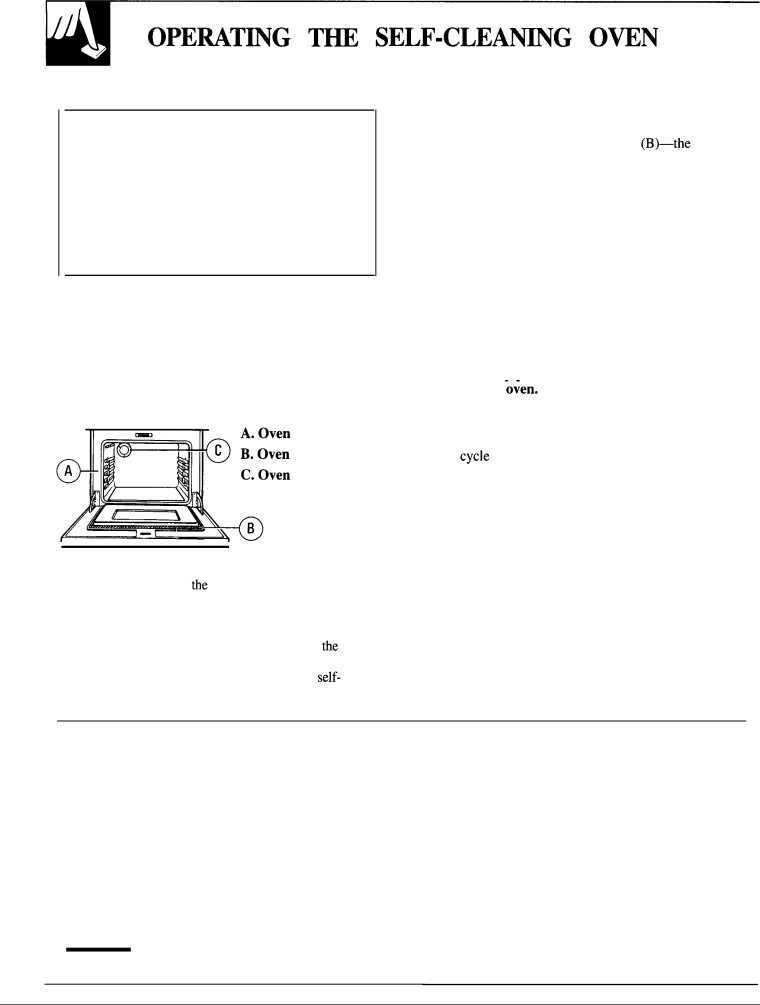
The JGBP35GEP model showcases GE's commitment to using advanced technologies for enhanced cooking performance. This model includes a precision touch control panel, providing users with easy access to features and settings. The oven's self-cleaning capability saves time and effort, while the broil feature lets you create delicious crispy edges on meats and vegetables. Its sleek design and durable construction make it an attractive addition to any kitchen.

Moving on to the JGBP34GEP, this appliance stands out with its air fry feature, allowing users to achieve crispy textures without the need for excess oil. The built-in air fry mode is perfect for healthier frying options and offers versatility in cooking styles. It also has a large oven window, enabling cooks to monitor progress without opening the door, which helps maintain temperature consistency.

Finally, the JGBP31GEP model is ideal for those looking for a compact yet powerful range. Despite its smaller size, it delivers a strong performance with four burners and an oven capacity similar to its larger counterparts. Notable is its easy-to-clean surfaces and reliable ignition system, ensuring that every cooking experience is both efficient and refreshing.

Overall, GE's gas ranges exemplify a perfect amalgamation of performance, style, and user-friendly features, making them exceptional choices for modern kitchens. Whether you choose the JGBP38GES, JGBP35GEP, JGBP34GEP, or JGBP31GEP, each model offers something unique while ensuring high quality and reliability.