Americana Appliances ABS200 owner manual Using the surface units, How to Set

Page 7

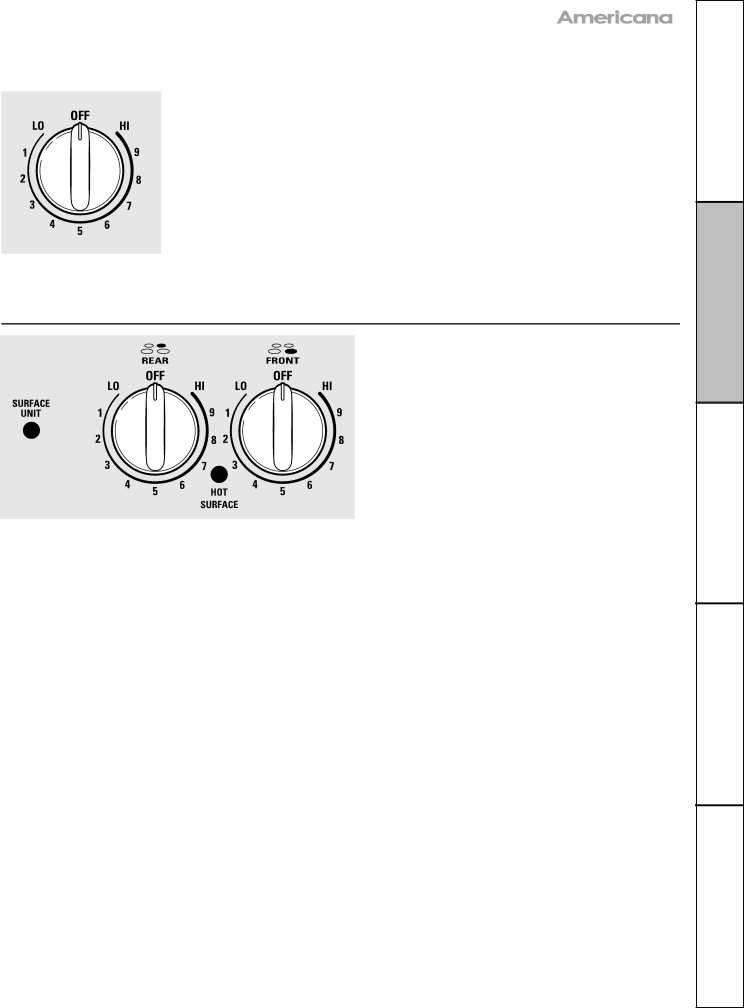
Using the surface units.


www.AmericanaAppliances.com

Throughout this manual, features and appearance may vary from your model.

How to Set

Push the knob in and turn in either

At both OFF and HI the control clicks

direction to the setting you want.

into position. You may hear slight clicking


sounds during cooking, indicating the


control is keeping the power level you set.

Be sure you turn the control knob to OFF when you finish cooking.

Indicator Lights (on radiant glass models only)

A HOT SURFACE indicator light will glow when any radiant element is turned on, and will remain on until the surface is cool enough to touch.

A SURFACE UNIT on indicator light will glow when any surface unit is on.

NOTE: The SURFACE UNIT on indicator light may glow between the surface control settings of LO and OFF, but there is no power to the surface units.

7

Safety Instructions Operating Instructions Care and Cleaning Troubleshooting Tips Consumer Support

Image 7
Contents Ranges Consumer Support Troubleshooting Tips Care and Cleaning Operating Instructions Safety InstructionsSafety Precautions Consumer Support Troubleshooting Tips Care and Cleaning Operating Instructions SafetyCleaning Troubleshooting Tips Consumer Support SELF-CLEANING Oven on some modelsTips Care and Cleaning Operating InstructionsHow to Set Using the surface unitsIndicator Lights on radiant glass models only Temperature Limiter Using the radiant surface units. on some modelsAbout the radiant surface units… Instructions Operating Instructions Care and Cleaning SafetySelecting types of cookware Care and Cleaning Using the oven controls. on some modelsOven Control, Clock and Timer Features and Settings Oven Temperature Knob on some models Using the ovenTips Care and Cleaning Clock and Kitchen Timer on some modelsBroiling Guide CleaningInstructions Operating Aluminum FoilComments Broiling GuideTo Turn Off the Clock Display Using the clock and timer. on some modelsTo Set the Timer To Set the ClockInstructions To Reset the TimerTo Cancel the Timer Power OutageHow to Set a Delayed Start and Automatic Stop Using the timed baking Roasting features. on some modelsSafety Instructions Special features of your oven control. on some modelsHour Shut-Off Designed for use on the Jewish Sabbath and Holidays Using the Sabbath Feature. on some modelsTroubleshooting Tips Consumer Support How to Set for Regular Baking/RoastingHow to Exit the Sabbath Feature Type of margarine will affect baking performance To Adjust the Thermostat with this Type of KnobTo Adjust the Thermostat on Other Models Each notch changes the temperature by 10FBefore a Clean Cycle Using the self-cleaning oven. on some modelsCleaning Operating Instructions Safety Consumer Support Troubleshooting Tips CareInstructions Operating Instructions Care How to Delay the Start of CleaningTo Stop a Clean Cycle After a Clean CycleLift-Off Oven Door Care and cleaning of the rangeTo clean the inside of the door To clean the outside of the doorTo remove the cover To replace the cover Oven Light Replacement on some modelsOven Heating Elements Oven RacksTo remove the storage drawer Control Panel and KnobsTo remove a surface unit Cleaning Troubleshooting TipsPorcelain Enamel Cooktop on some models Lift-Up Cooktop on some modelsNational Parts Center Oven VentPainted Surfaces on some models Do not use a steel-wool pad it will scratch the surfaceBurned-On Residue Cleaning the glass cooktop. on some modelsNormal Daily Use Cleaning SafetyOperating Instructions SafetyBefore you call for service… Properly See the Adjust the oven thermostat-Easy to doCoil Cooktops Surface units Not functioningBroil properly Control signals afterOr delay start Display flashes bAd Food does notHot or too cold Oven temperature tooClock and timer Power outageClean cycle Self-Cleaning ModelsDuring a clean cycle Not unlock Oven not clean after aLooking For Something More? AccessoriesPage Page We Will Provide Electric Range WarrantyWhat Is Not Covered Instructions CareContact Us Consumer Support