Woods Equipment BW180Q-3, BW126-3 Install 3-Joint Drive 540 RPM Only, Joint Drive Installation

Page 36

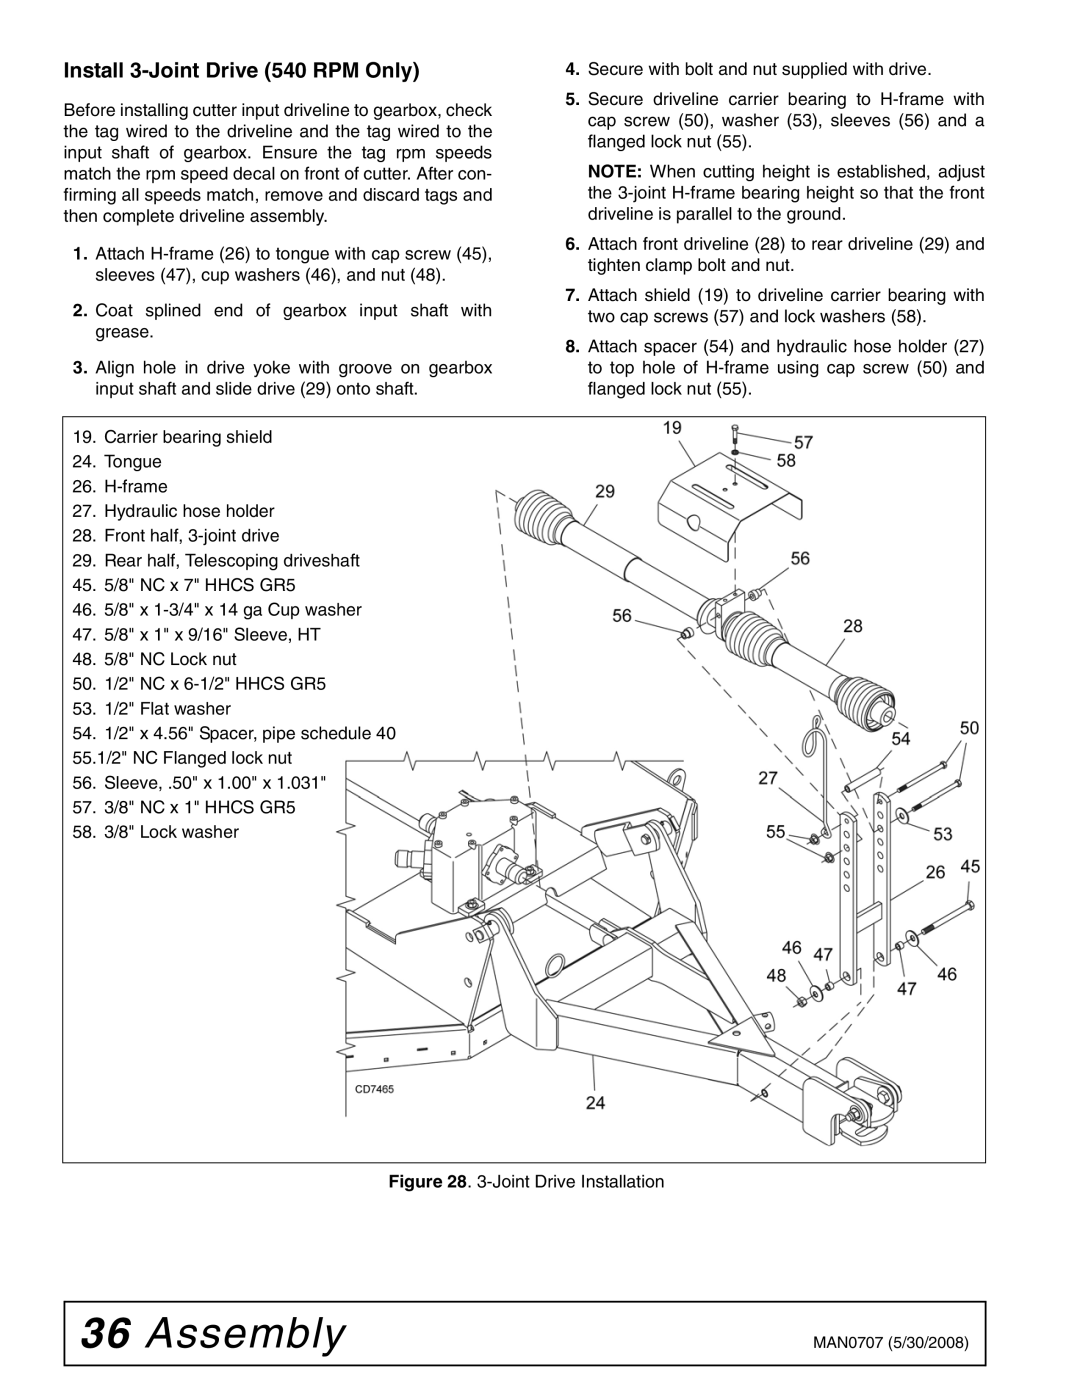
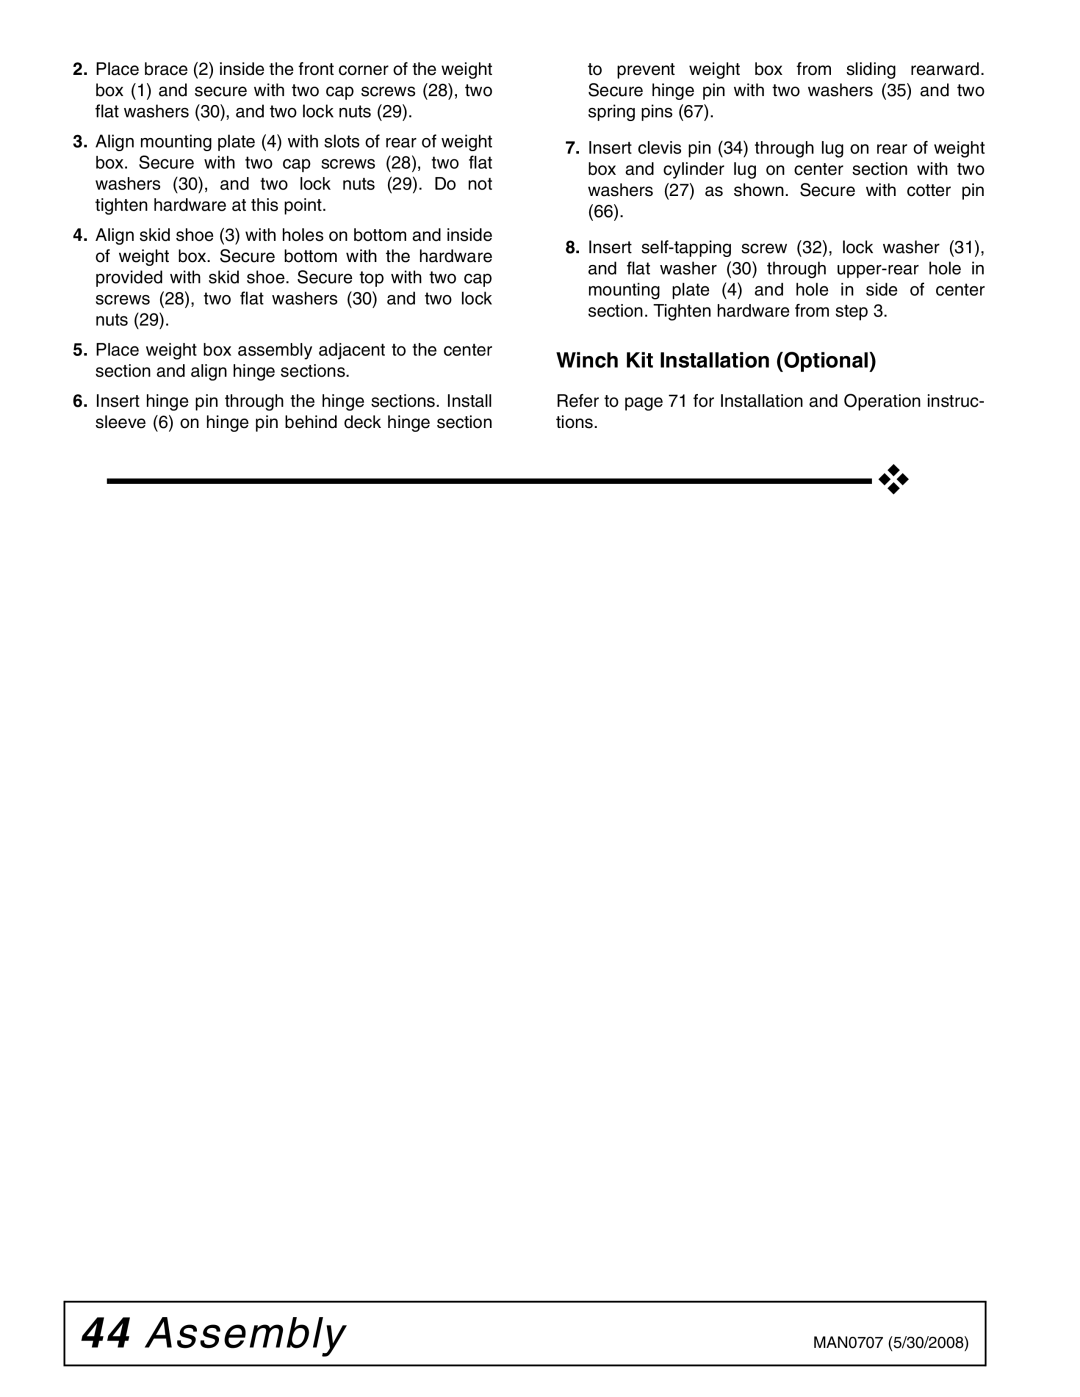
Install 3-Joint Drive (540 RPM Only)

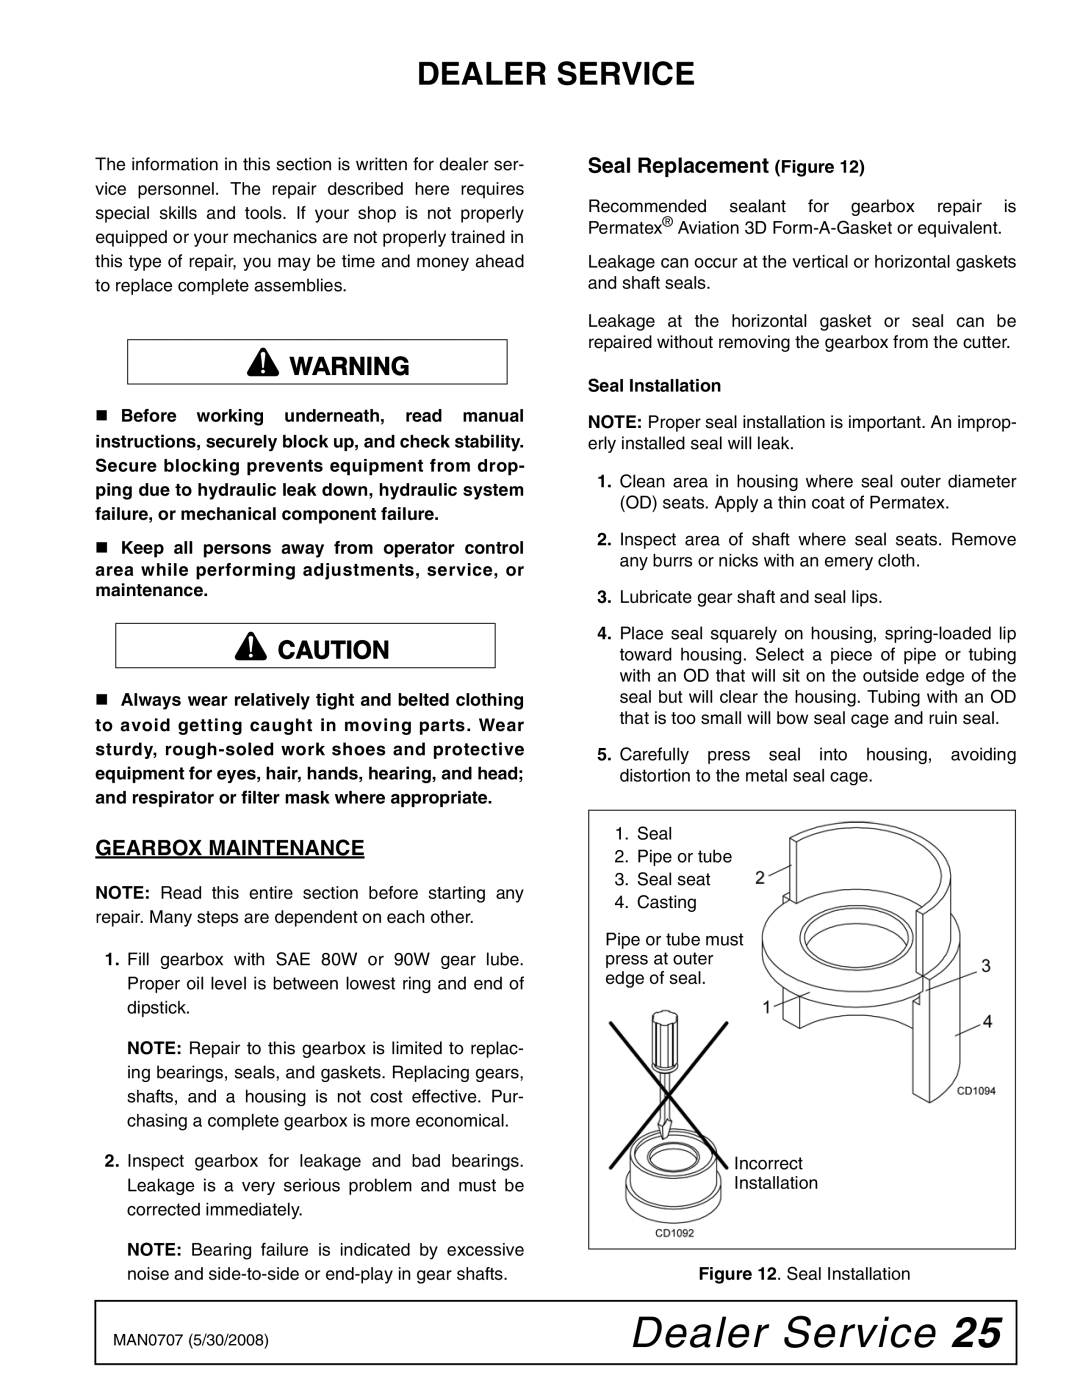
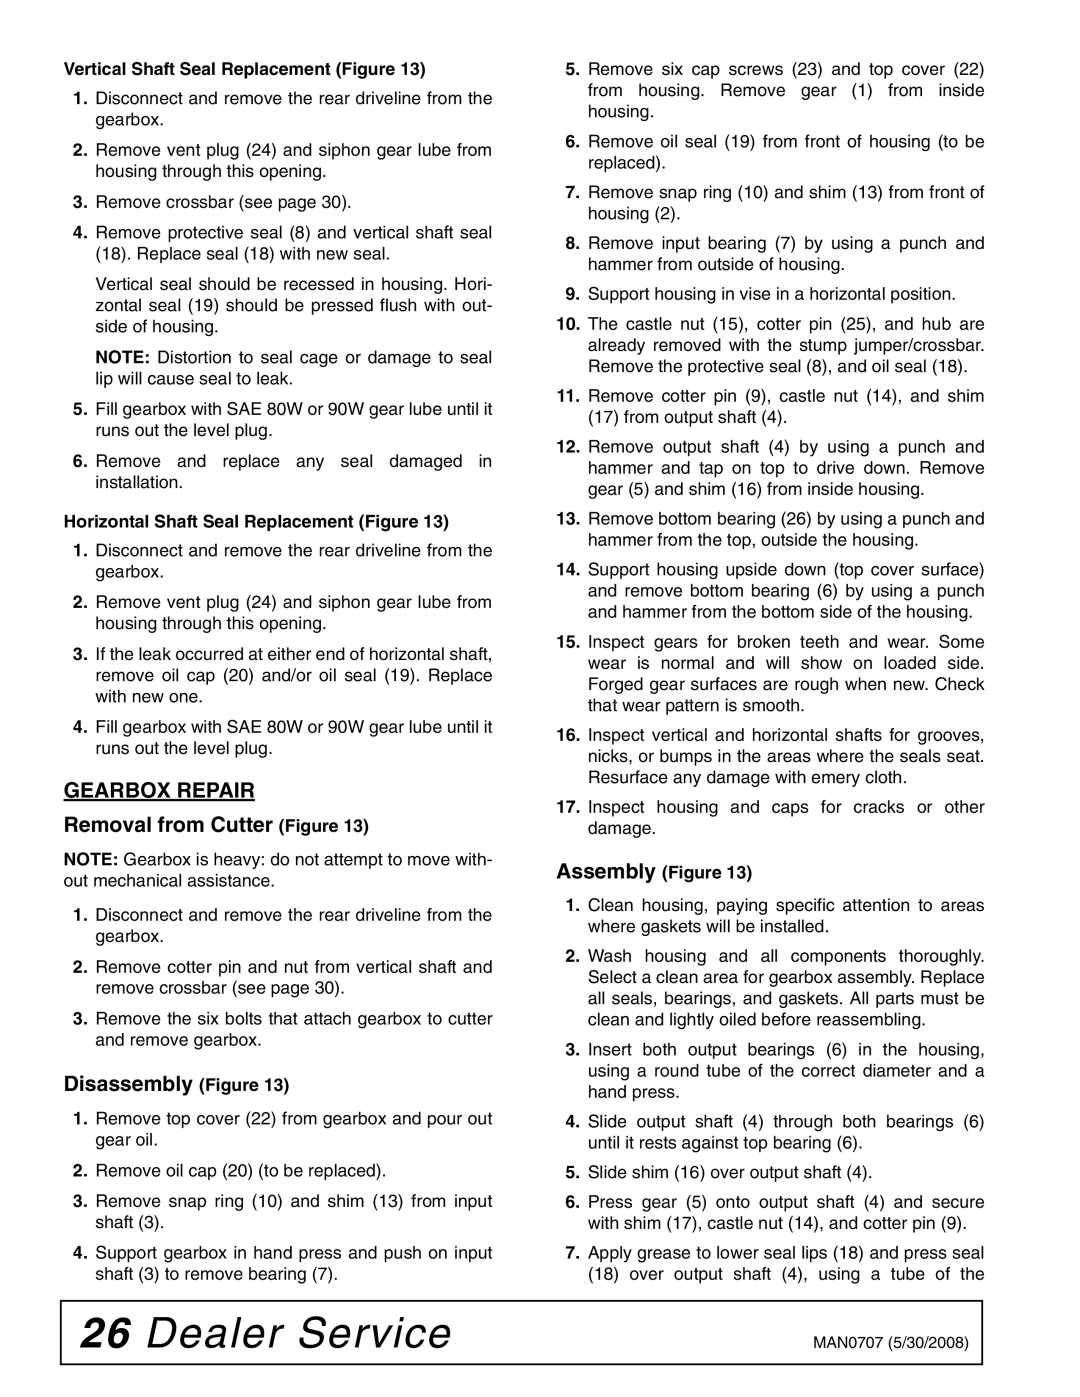
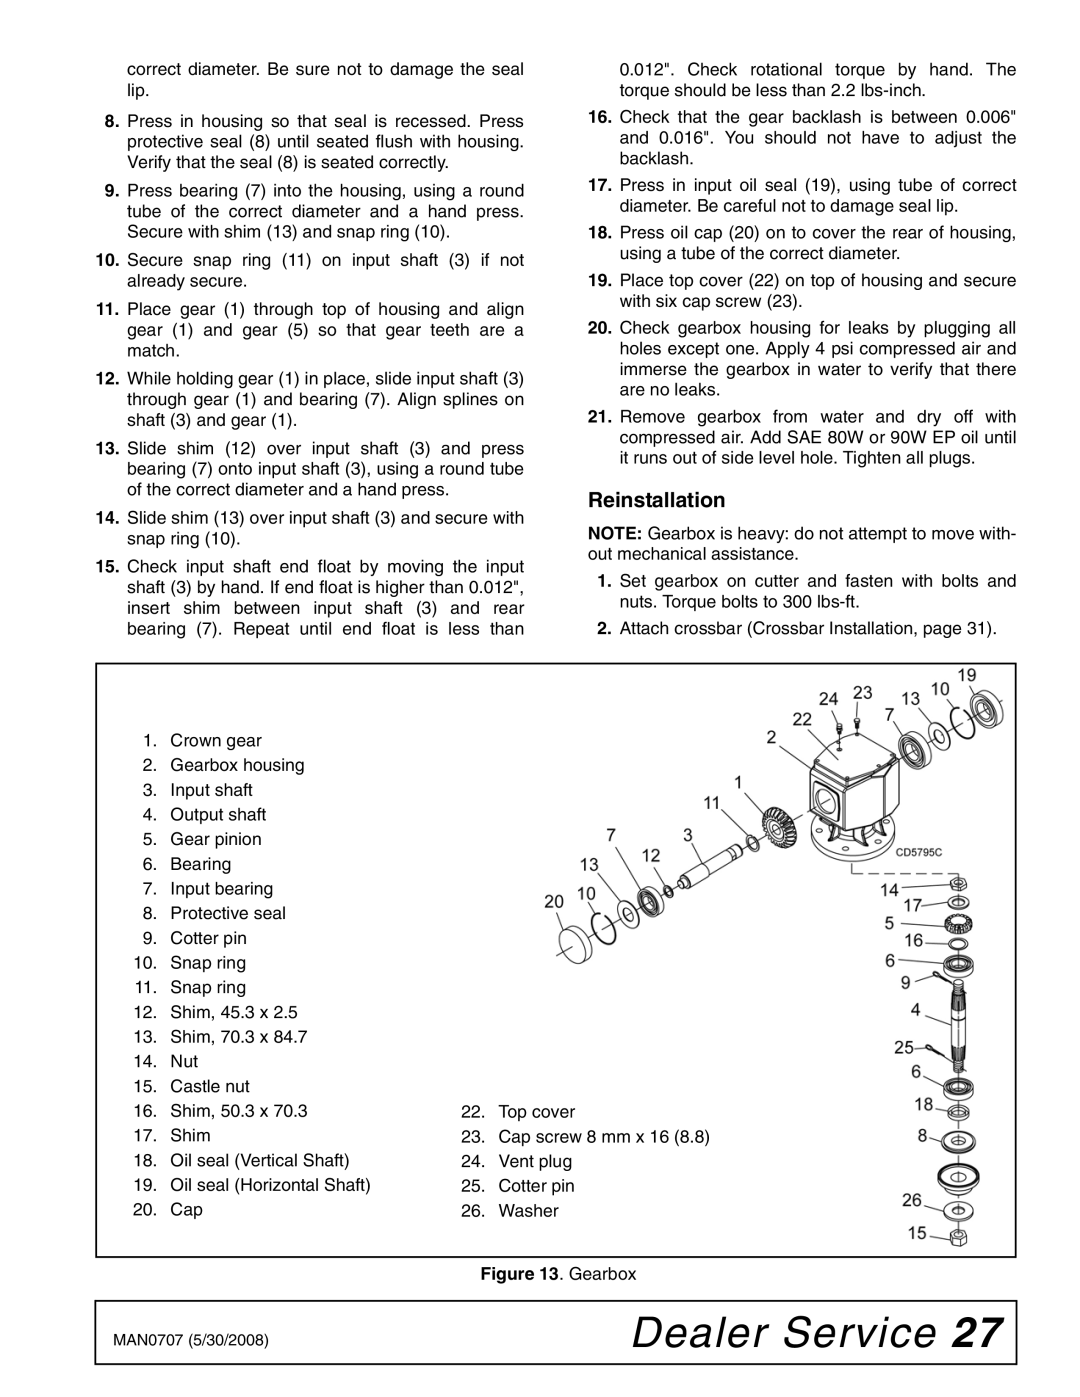
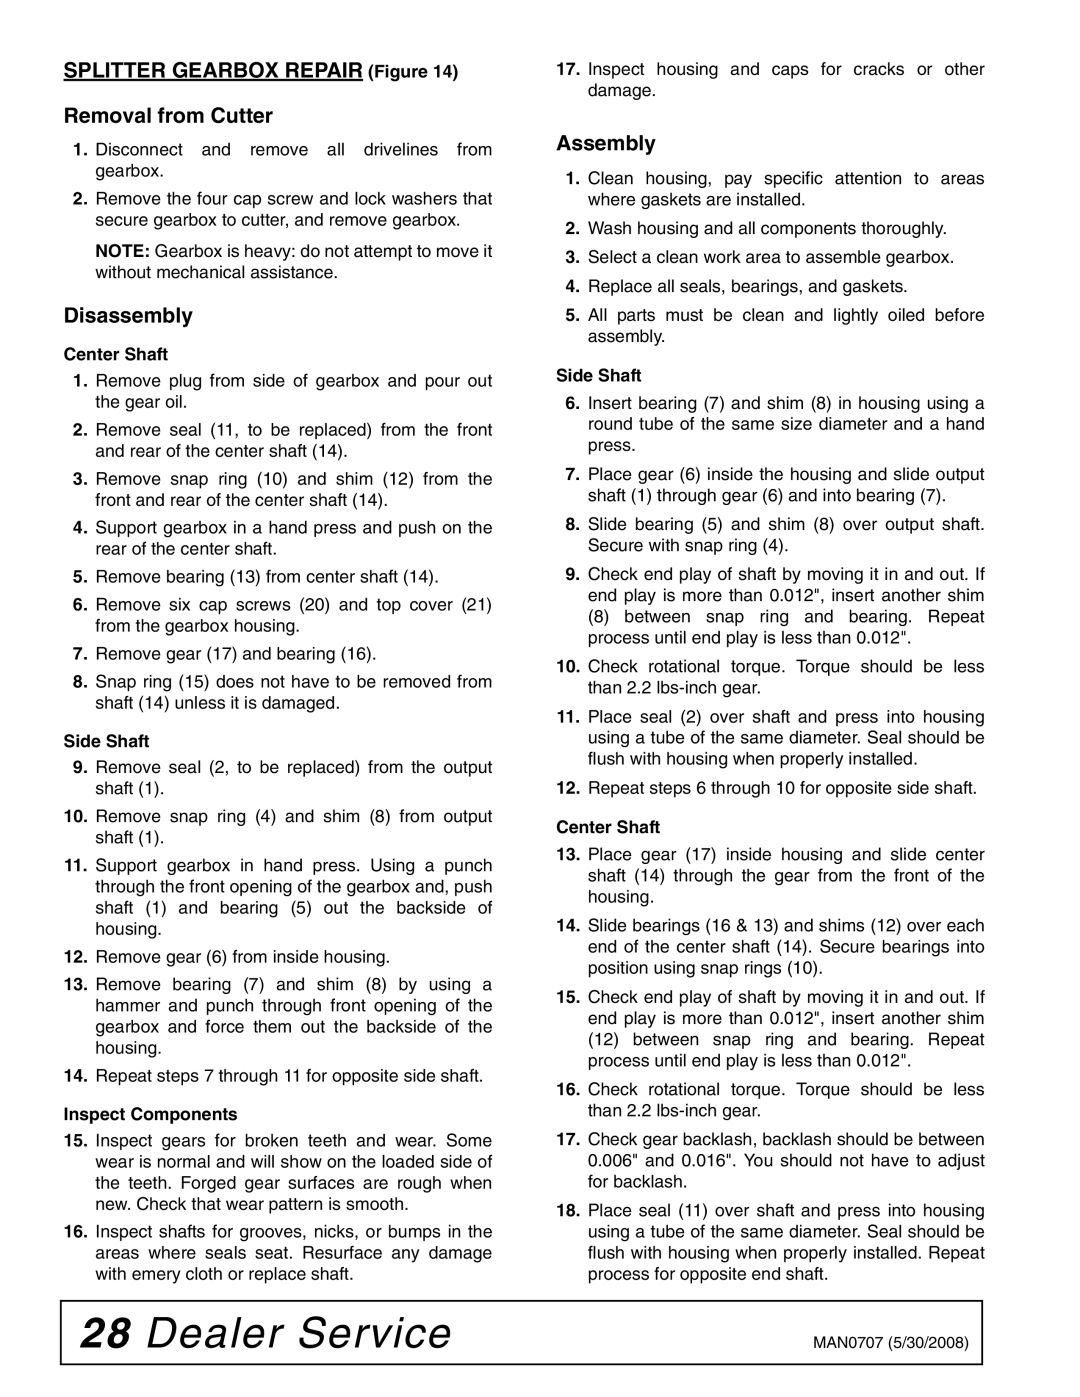
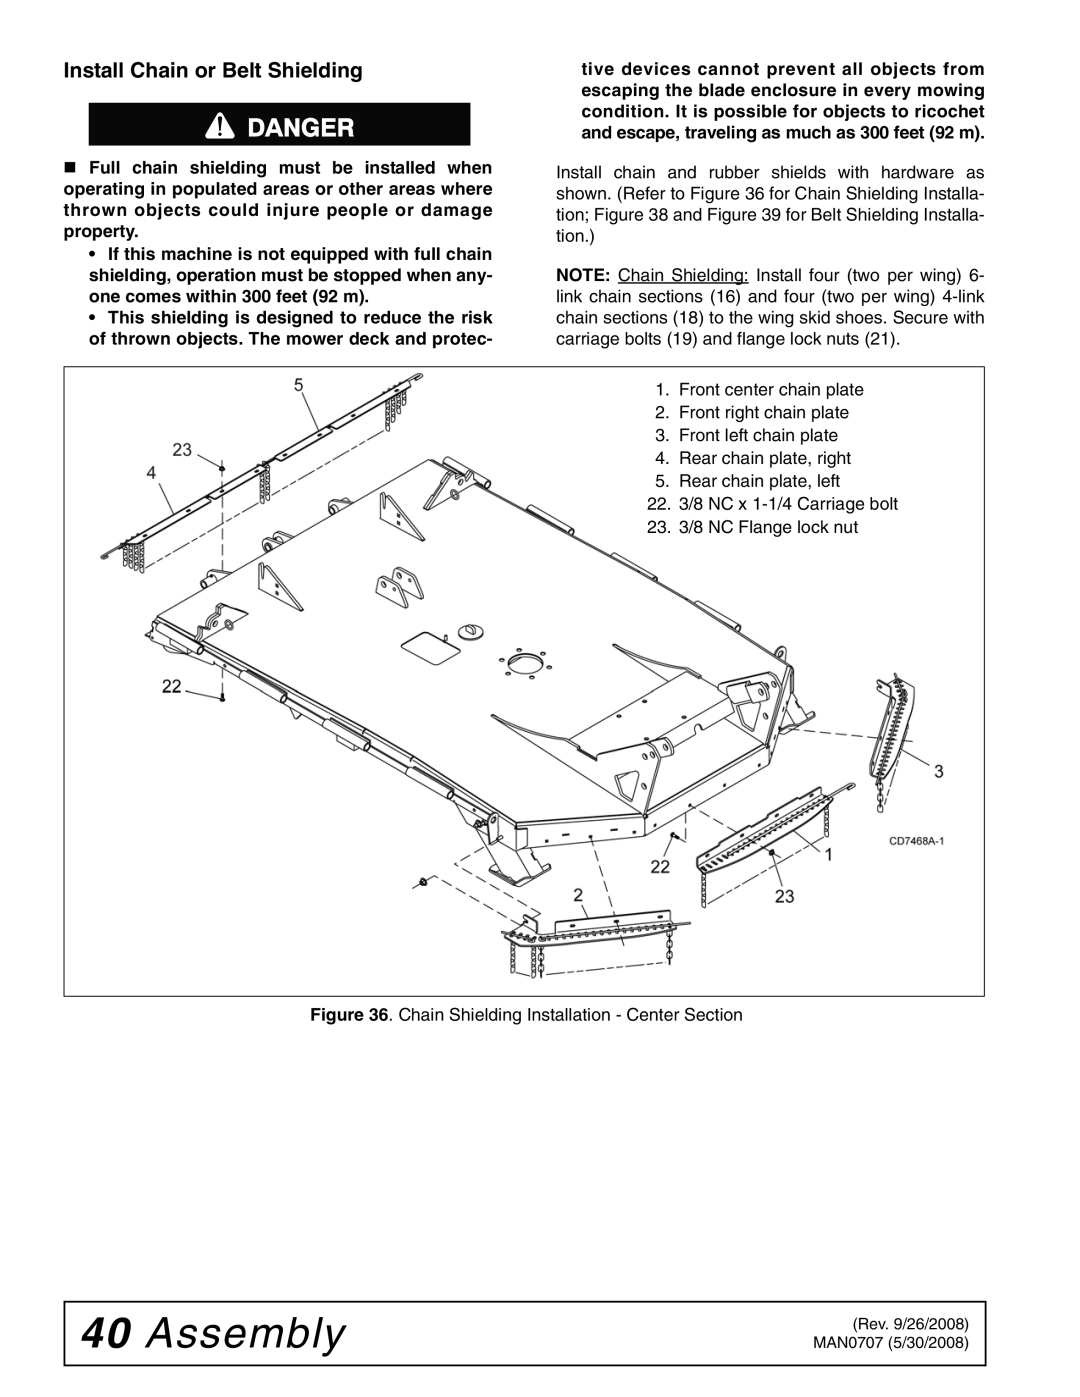
Before installing cutter input driveline to gearbox, check the tag wired to the driveline and the tag wired to the input shaft of gearbox. Ensure the tag rpm speeds match the rpm speed decal on front of cutter. After con- firming all speeds match, remove and discard tags and then complete driveline assembly.

1.Attach H-frame (26) to tongue with cap screw (45), sleeves (47), cup washers (46), and nut (48).

4.Secure with bolt and nut supplied with drive.

5.Secure driveline carrier bearing to H-frame with cap screw (50), washer (53), sleeves (56) and a flanged lock nut (55).

NOTE: When cutting height is established, adjust the 3-joint H-frame bearing height so that the front driveline is parallel to the ground.

6.Attach front driveline (28) to rear driveline (29) and tighten clamp bolt and nut.

2.Coat splined end of gearbox input shaft with grease.

3.Align hole in drive yoke with groove on gearbox input shaft and slide drive (29) onto shaft.

7.Attach shield (19) to driveline carrier bearing with two cap screws (57) and lock washers (58).

8.Attach spacer (54) and hydraulic hose holder (27) to top hole of H-frame using cap screw (50) and flanged lock nut (55).

19.Carrier bearing shield

24.Tongue

26.H-frame

27.Hydraulic hose holder

28.Front half, 3-joint drive

29.Rear half, Telescoping driveshaft

45.5/8" NC x 7" HHCS GR5

46.5/8" x 1-3/4" x 14 ga Cup washer

47.5/8" x 1" x 9/16" Sleeve, HT

48.5/8" NC Lock nut

50.1/2" NC x 6-1/2" HHCS GR5

53.1/2" Flat washer

54.1/2" x 4.56" Spacer, pipe schedule 40 55.1/2" NC Flanged lock nut

56.Sleeve, .50" x 1.00" x 1.031"

57.3/8" NC x 1" HHCS GR5

58.3/8" Lock washer

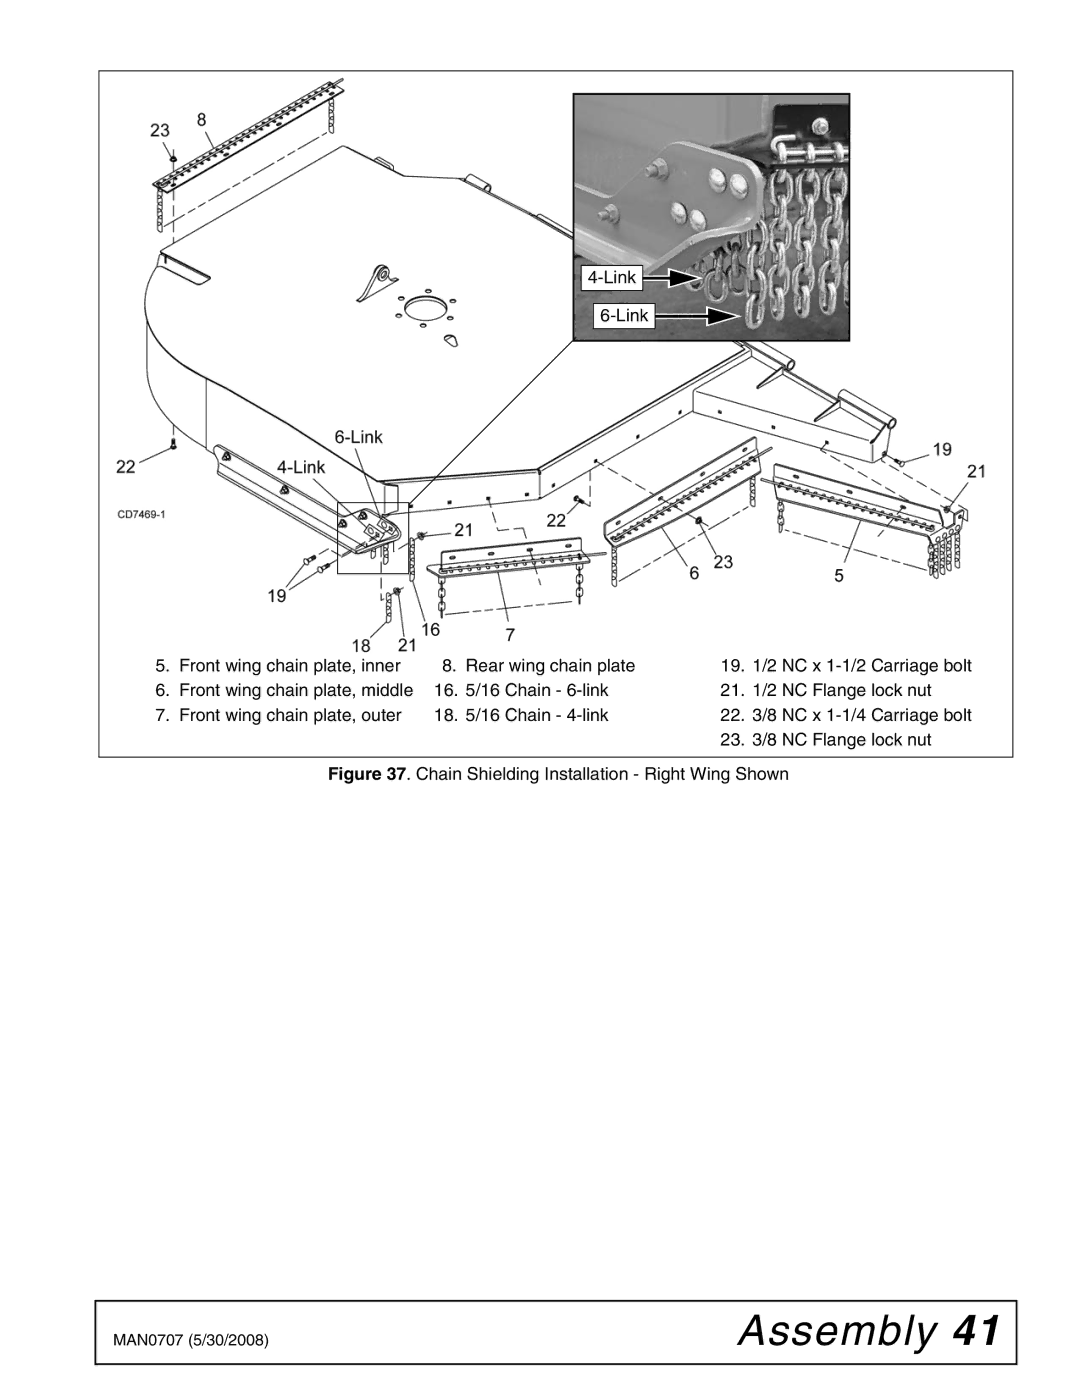
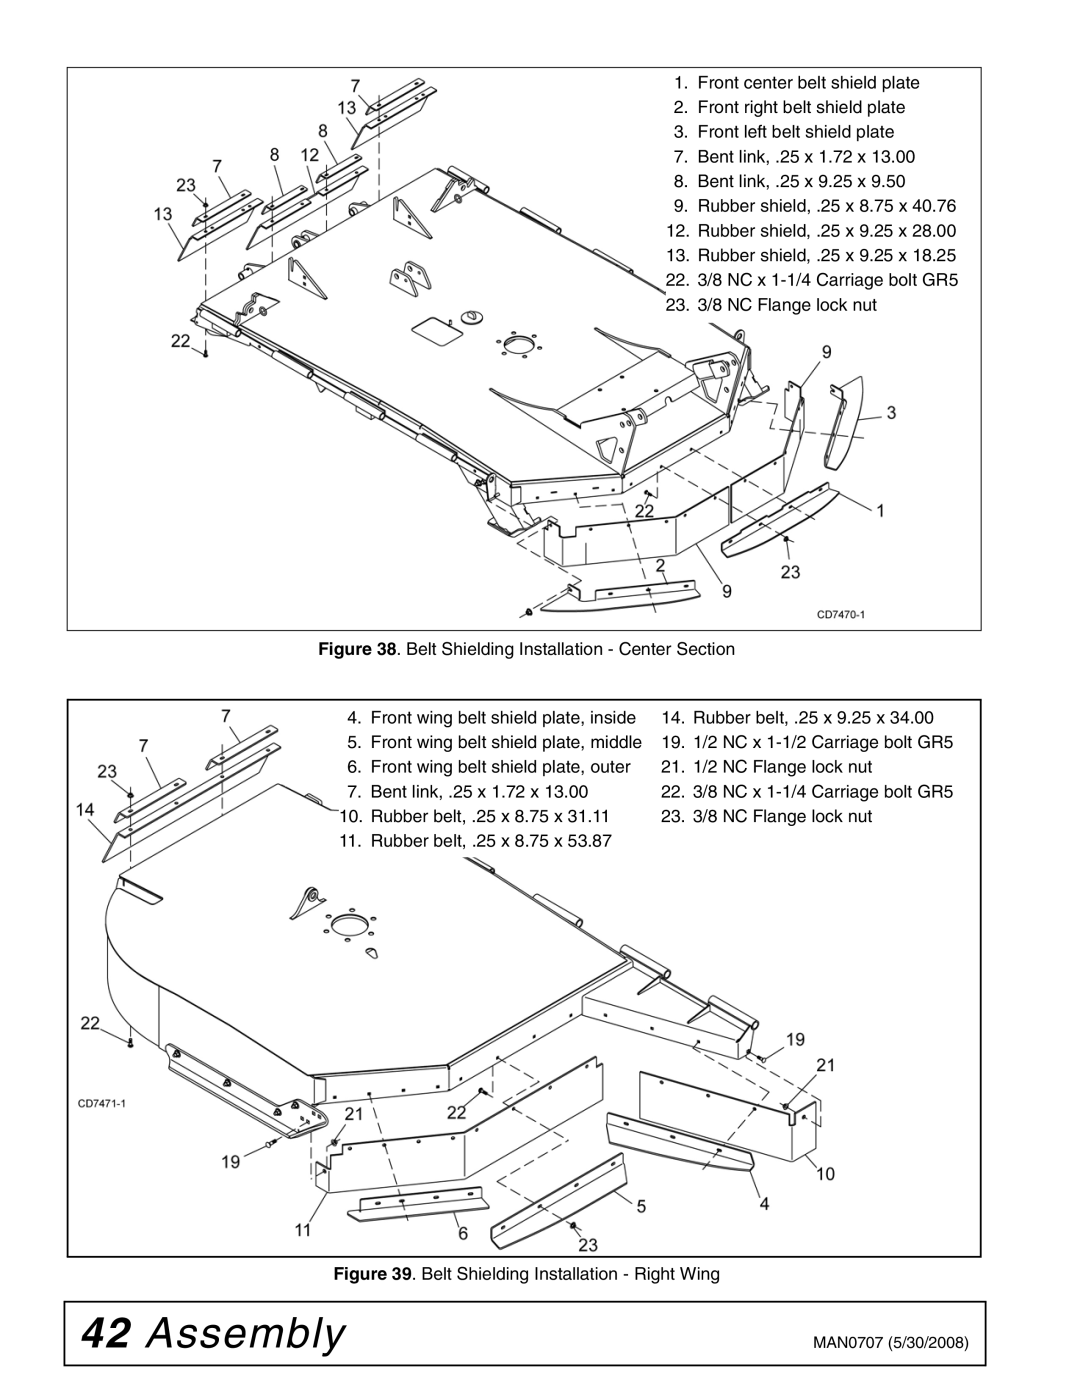
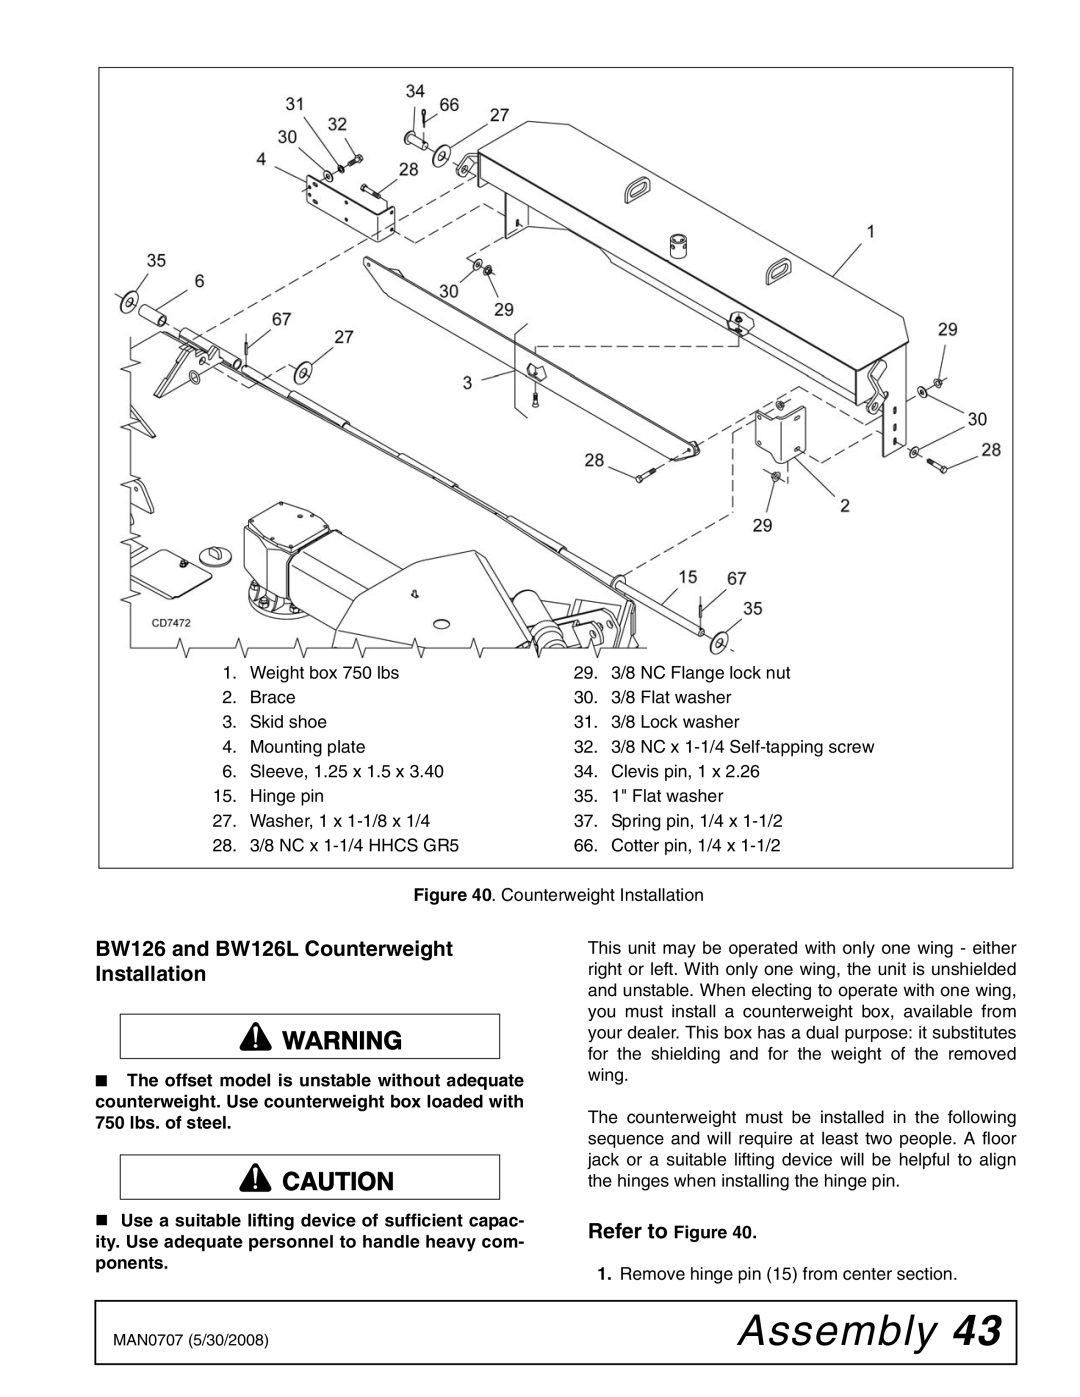
Figure 28. 3-Joint Drive Installation

36 Assembly

MAN0707 (5/30/2008)


Image 36
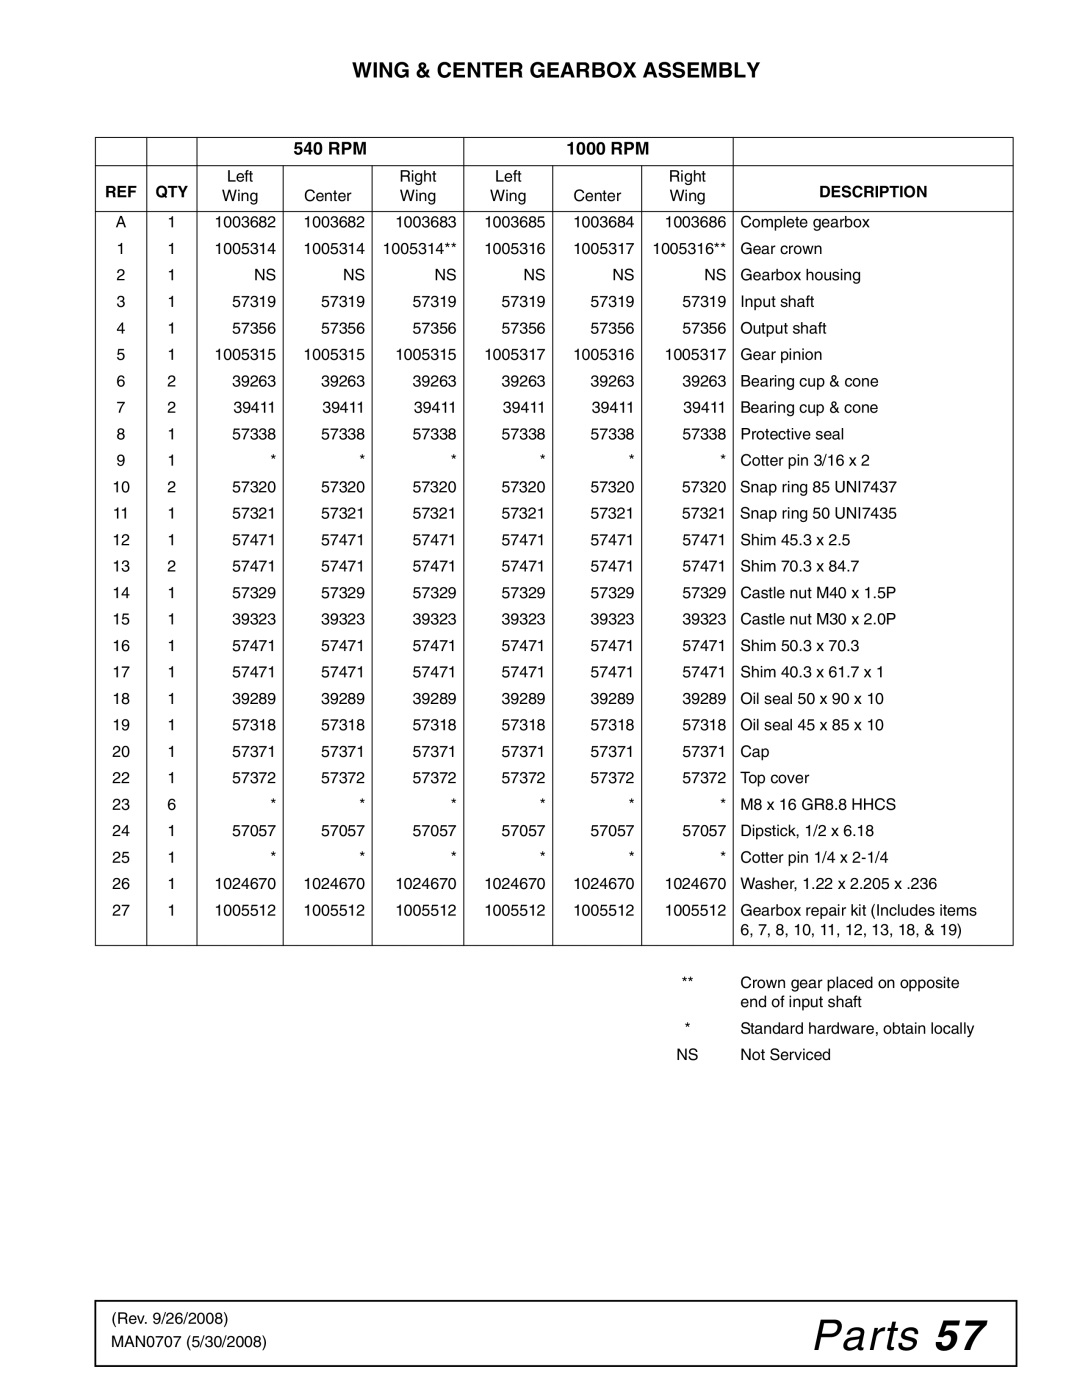
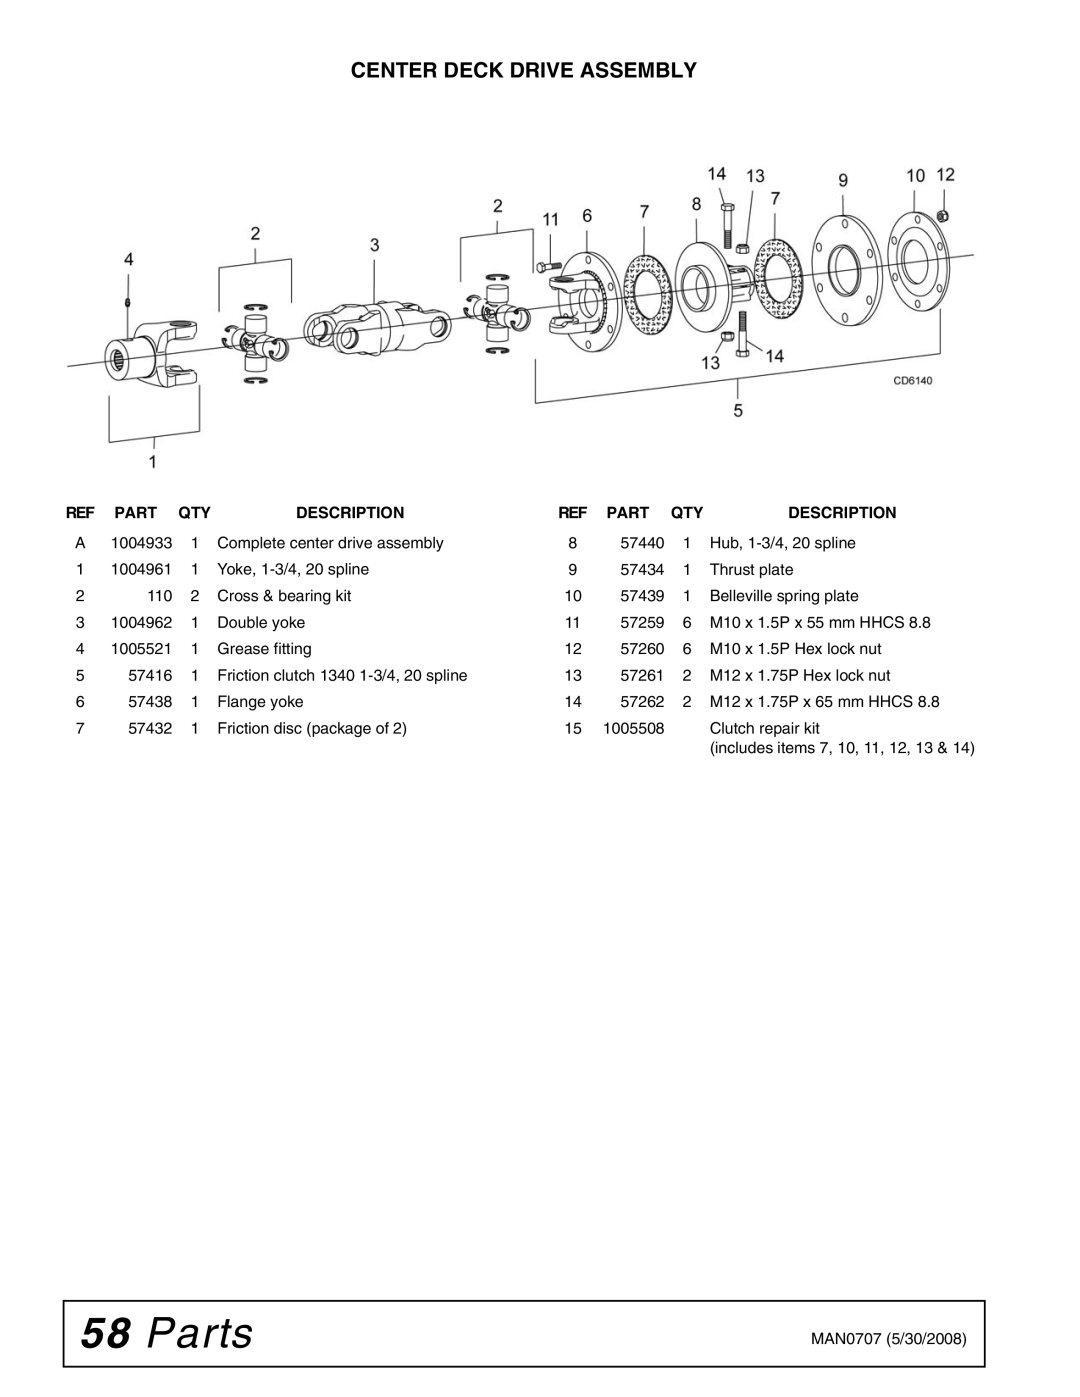
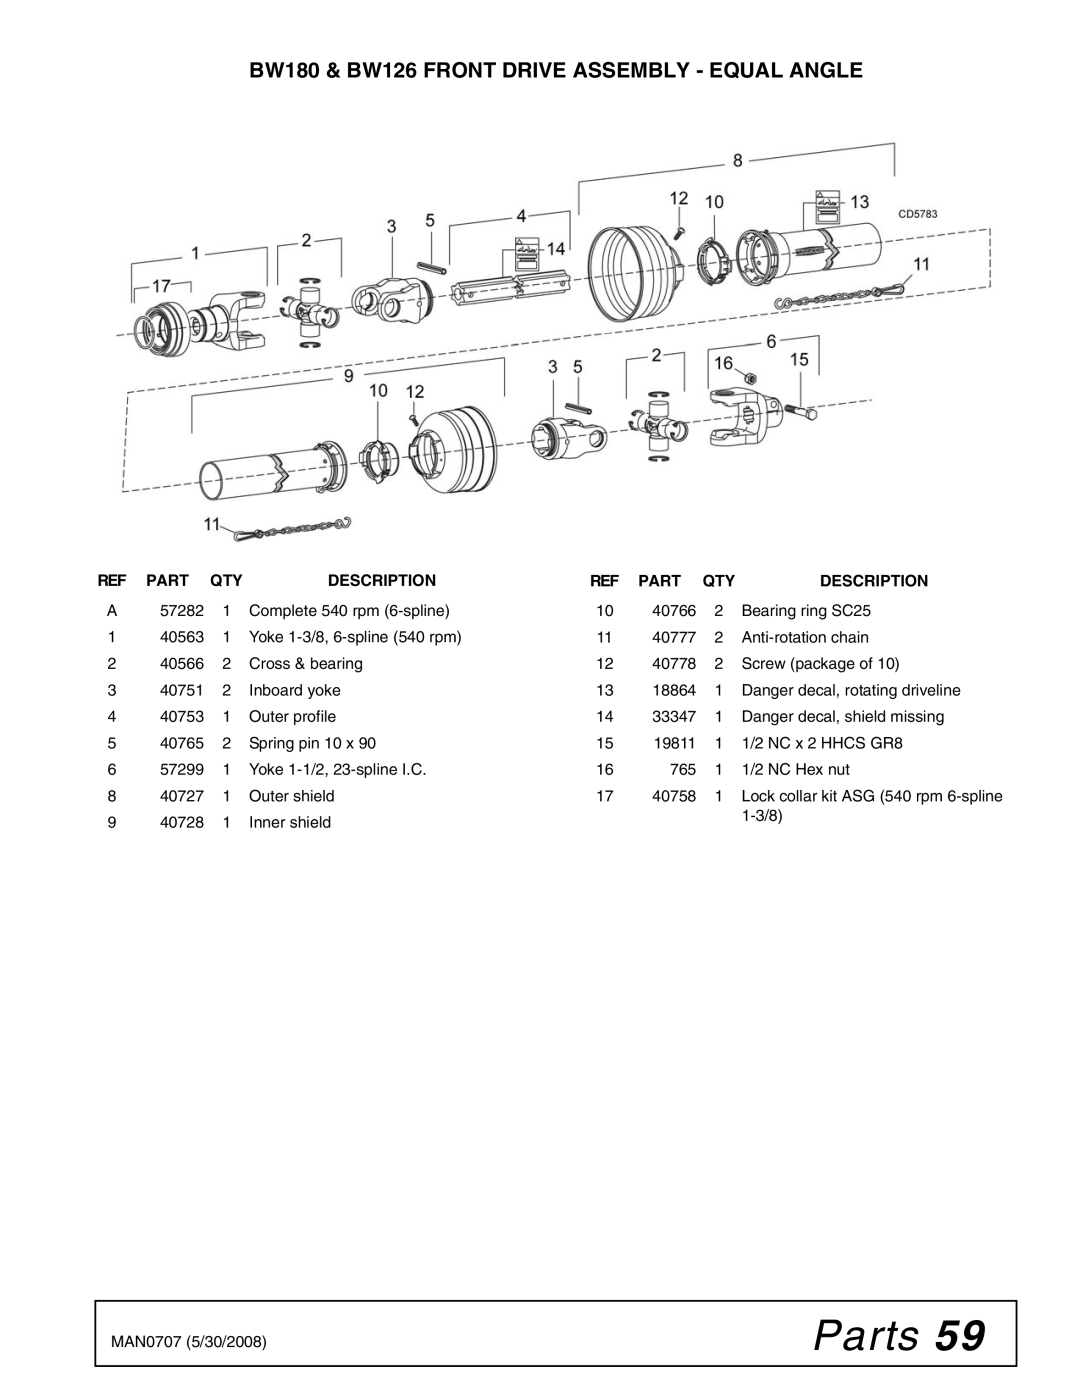
Contents Batwing Introduction To the DealerTable of Contents LEA EL InstructivoSpecifications General InformationBW180-3 / BW180Q-3 BW126-3 / BW126Q-3 BW180-3 BW180Q-3 BW126-3 BW126Q-3Free Mower Safety Video SafetyTraining Package for Rotary Mowers/Cutters-English Training Package for Rotary Mowers/Cutters-English/SpanishSafety Rules InstallationTraining PreparationTransportation OperationMaintenance Storage Safety & Instructional Decals Be CarefulPN 1006348 Located on Wheel Rims 1000 RPM PN 15922 1000 RPM PN 18866 540 RPMSafety Connecting Cutter to Tractor OperationOperation Hydraulic ConnectionCutting Height Adjustment Interference CheckCV Driveline Turning Limits Tractor OperationCutter Operation Mowing TipsShredding Transporting Lock-UpWing Lock-Up Center Section Lock-UpPRE-OPERATION Check List Owners ResponsibilityOwner Service Owner ServiceBlocking Method Lubrication Gearbox LubricationDriveline Lubrication Blade Installation Figure Seasonal LubricationBlades Blade Removal FigureSlip Clutch Adjustment Figure Blade SharpeningCleaning Shielding RepairServicing Tires Safely Troubleshooting TroubleshootingDealer Service Dealer ServiceGearbox Maintenance Seal Replacement FigureDisassembly Figure Gearbox RepairRemoval from Cutter Figure Reinstallation GearboxDisassembly AssemblySplitter Gearbox Repair Figure Removal from Cutter Reinstallation on Cutter Check GearboxCrossbar Removal Crossbar RemovalCrossbar Installation Joint DisassemblyUniversal Joint Repair Joint Assembly Assembly Assembly InstructionsDealer SET-UP Instructions Install Height Adjustment Cylinder Install SMV EmblemInstall Wheel and Hub Install TongueInstall 3-Joint Drive 540 RPM Only Joint Drive InstallationInstall CV Drive Optional Install WingInstall Wing Cylinder & Lock-up Bar Install Wing Wheel and Hub Figure Left Wing Lock-Up Bar InstalledInstall Wing Wheel Yoke Adjustment Link Install Wing DrivelineInstall Hose Kit Install Chain or Belt Shielding Chain Shielding Installation Center SectionChain Shielding Installation Right Wing Shown Belt Shielding Installation Right Wing BW126 and BW126L Counterweight Installation Refer to FigureWinch Kit Installation Optional Dealer Check Lists Dealer Check ListsPRE-DELIVERY Check List Delivery Check ListMAN0707 5/30/2008 Parts Index PartsMain Frame Assembly Front Section Part QTY Description Main Frame Assembly Rear Section Tire & hub see Wing Assembly See Splitter Gearbox Assembly Gear, 540 rpm Wing & Center Gearbox Assembly 540 RPM 1000 RPM Center Deck Drive Assembly BW180 & BW126 Front Drive Assembly Equal Angle BW180 & BW126 Rear Drive Assembly Equal Angle RPM & 1000 RPM Front CV Drive Wing Drive Assembly Bolt Wheel & Tire Assembly 1027468 1028590 Chain Shielding Center Section Front & Rear Single ROW Double ROWChain Shielding Wing Front & Rear Single ROWHydraulic Cylinders Crossbar Puller Optional Hydraulic Cylinder Stroke Control KITBW126 / BW126Q Weight BOX Assembly Optional Winch Kit Installation Winch KIT OptionalWinch Kit Operation Bolt Torque Chart SAE Series Torque ChartAppendix Metric SeriesBolt Size Chart AbbreviationsIndex IndexWarranty Warranty

BW180-3, BW126Q-3, BW126-3, BW180Q-3 specifications

Woods Equipment Company has long been a leader in manufacturing innovative agricultural and landscape maintenance products. Among its popular offerings are the BW180-3, BW180Q-3, BW126-3, and BW126Q-3 models, which are designed to meet the needs of both professional and amateur users.

The BW180-3 is an impressive rotary cutter with a cutting width of 60 inches, making it ideal for tackling overgrown fields, pastures, and other large mowing areas. It features a rugged, all-steel construction that ensures durability and longevity, even in the toughest of conditions. The cutter is equipped with a heavy-duty gearbox, ensuring efficient power transfer while minimizing wear and tear. The innovative design of the BW180-3 also includes an adjustable tail wheel that provides stability and ease of maneuverability.

For those seeking advanced functionality, the BW180Q-3 model introduces quick-attach capabilities, allowing users to easily connect and disconnect the cutter from the tractor without the need for additional tools. This feature not only saves time but also enhances user convenience, making it an excellent choice for busy farms and landscaping operations. With a similar cutting width as the BW180-3, this model maintains the robust construction and drivetrain specifications that make Woods Equipment cutters a trusted choice.

On the smaller side, the BW126-3 offers a 48-inch cutting width, perfect for maintaining smaller fields and lawn areas. Designed with the same enduring quality, it is lightweight yet powerful enough to handle tough mowing tasks. The BW126-3 comes with a versatile hitch design that makes it compatible with a wide range of tractors.

The BW126Q-3 shares the core features of the BW126-3 but incorporates the quick-attach technology for enhanced user efficiency. This model combines flexibility with reliability and is particularly suited for operators who need to switch quickly between attachments throughout their workday.

Overall, the Woods Equipment BW180-3, BW180Q-3, BW126-3, and BW126Q-3 models provide a variety of features and technologies that make them indispensable for anyone looking to efficiently manage land. Whether you need the extra cutting width and power of the BW180 series or the nimble ease of the BW126 series, Woods Equipment offers versatile solutions for diverse agricultural and landscaping needs.