7800 SERIES RELAY MODULES
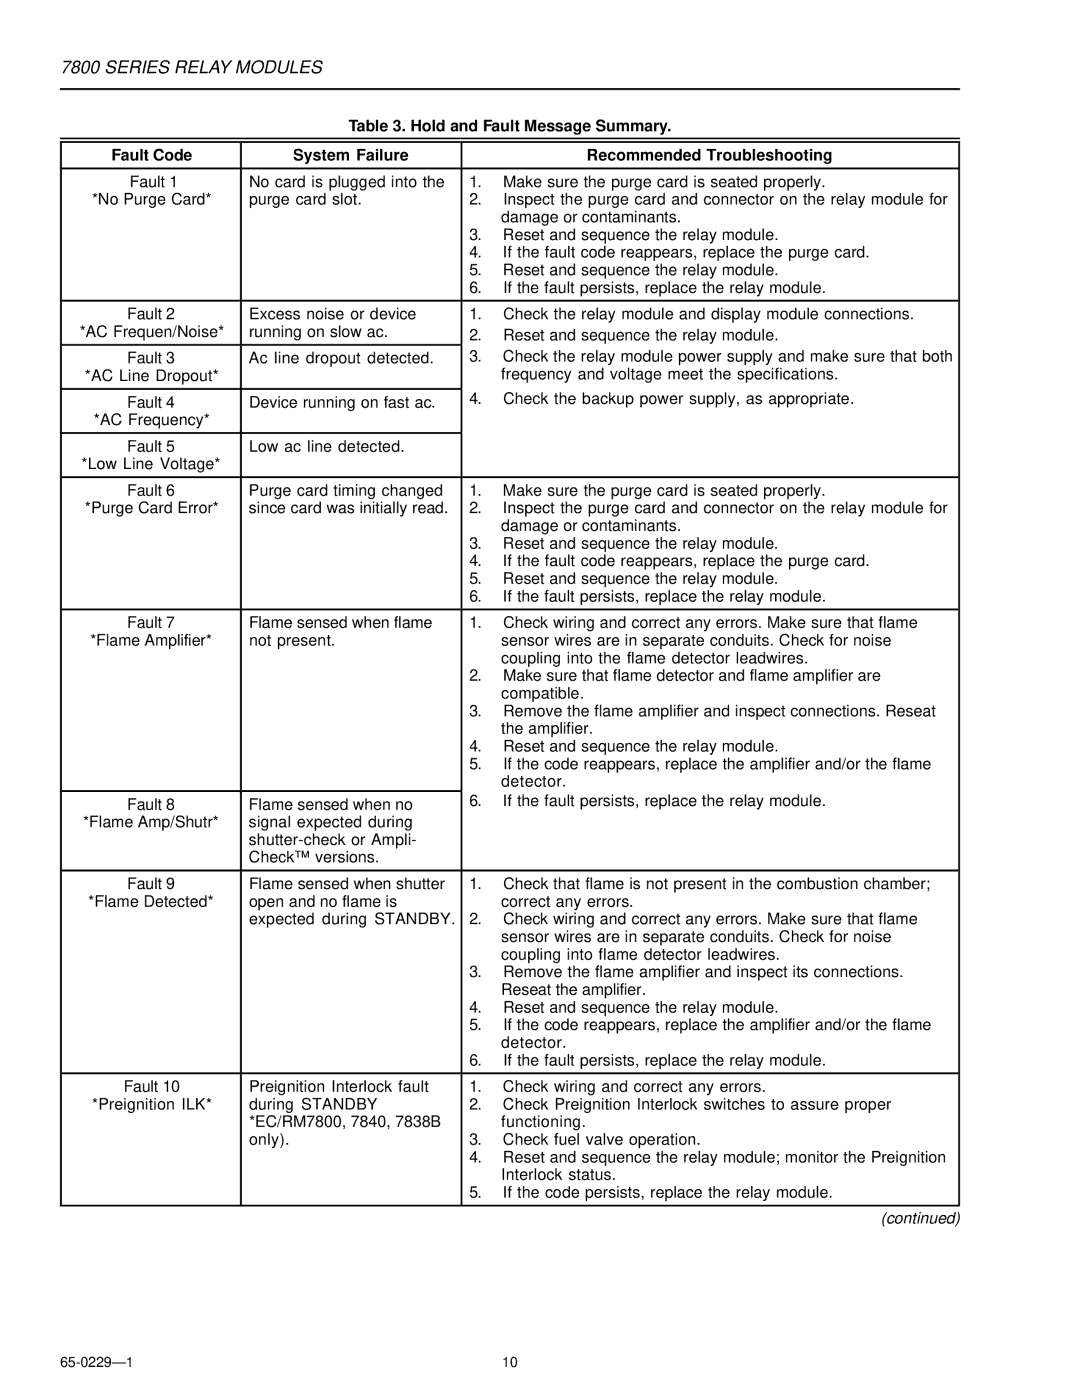
Table 3. Hold and Fault Message Summary.
Fault Code | System Failure |
| Recommended Troubleshooting |
|
|
|
|
Fault 1 | No card is plugged into the | 1. | Make sure the purge card is seated properly. |
*No Purge Card* | purge card slot. | 2. | Inspect the purge card and connector on the relay module for |
|
|
| damage or contaminants. |
|
| 3. | Reset and sequence the relay module. |
|
| 4. | If the fault code reappears, replace the purge card. |
|
| 5. | Reset and sequence the relay module. |
|
| 6. | If the fault persists, replace the relay module. |
|
|
|
|
Fault 2 | Excess noise or device | 1. | Check the relay module and display module connections. |
*AC Frequen/Noise* | running on slow ac. | 2. | Reset and sequence the relay module. |
Fault 3 | Ac line dropout detected. | 3. | Check the relay module power supply and make sure that both |
*AC Line Dropout* |
|
| frequency and voltage meet the specifications. |
|
|
|
|
Fault 4 | Device running on fast ac. | 4. | Check the backup power supply, as appropriate. |
*AC Frequency* |
|
|
|
|
|
|
|
Fault 5 | Low ac line detected. |
|
|
*Low Line Voltage* |
|
|
|
|
|
|
|
Fault 6 | Purge card timing changed | 1. | Make sure the purge card is seated properly. |
*Purge Card Error* | since card was initially read. | 2. | Inspect the purge card and connector on the relay module for |
|
|
| damage or contaminants. |
|
| 3. | Reset and sequence the relay module. |
|
| 4. | If the fault code reappears, replace the purge card. |
|
| 5. | Reset and sequence the relay module. |
|
| 6. | If the fault persists, replace the relay module. |
|
|
|
|
Fault 7 | Flame sensed when flame | 1. | Check wiring and correct any errors. Make sure that flame |
*Flame Amplifier* | not present. |
| sensor wires are in separate conduits. Check for noise |
|
|
| coupling into the flame detector leadwires. |
|
| 2. | Make sure that flame detector and flame amplifier are |
|
|
| compatible. |
|
| 3. | Remove the flame amplifier and inspect connections. Reseat |
|
|
| the amplifier. |
|
| 4. | Reset and sequence the relay module. |
|
| 5. | If the code reappears, replace the amplifier and/or the flame |
|
|
| detector. |
Fault 8 | Flame sensed when no | 6. | If the fault persists, replace the relay module. |
*Flame Amp/Shutr* | signal expected during |
|
|
|
|
| |
| Check™ versions. |
|
|
|
|
|
|
Fault 9 | Flame sensed when shutter | 1. | Check that flame is not present in the combustion chamber; |
*Flame Detected* | open and no flame is |
| correct any errors. |
| expected during STANDBY. | 2. Check wiring and correct any errors. Make sure that flame | |
|
|
| sensor wires are in separate conduits. Check for noise |
|
|
| coupling into flame detector leadwires. |
|
| 3. | Remove the flame amplifier and inspect its connections. |
|
|
| Reseat the amplifier. |
|
| 4. | Reset and sequence the relay module. |
|
| 5. | If the code reappears, replace the amplifier and/or the flame |
|
|
| detector. |
|
| 6. | If the fault persists, replace the relay module. |
|
|
|
|
Fault 10 | Preignition Interlock fault | 1. | Check wiring and correct any errors. |
*Preignition ILK* | during STANDBY | 2. | Check Preignition Interlock switches to assure proper |
| *EC/RM7800, 7840, 7838B |
| functioning. |
| only). | 3. | Check fuel valve operation. |
|
| 4. | Reset and sequence the relay module; monitor the Preignition |
|
|
| Interlock status. |
|
| 5. | If the code persists, replace the relay module. |
|
|
|
|
(continued)
10 |
