7800 SERIES RELAY MODULES
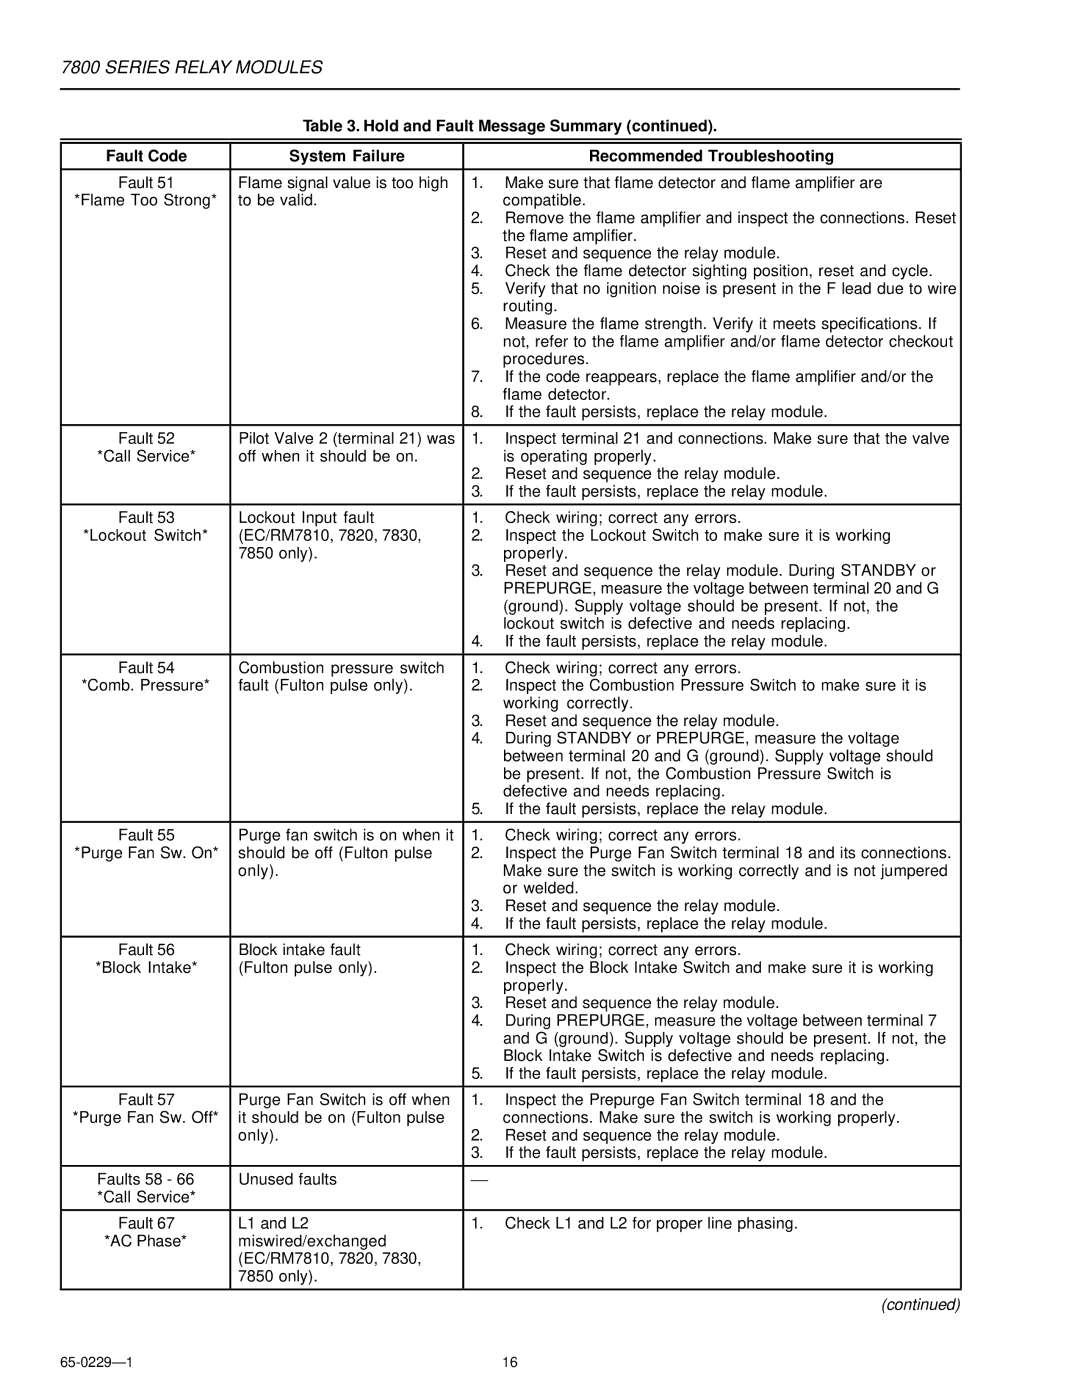
Table 3. Hold and Fault Message Summary (continued).
Fault Code | System Failure |
| Recommended Troubleshooting |
|
|
|
|
Fault 51 | Flame signal value is too high | 1. | Make sure that flame detector and flame amplifier are |
*Flame Too Strong* | to be valid. |
| compatible. |
|
| 2. | Remove the flame amplifier and inspect the connections. Reset |
|
|
| the flame amplifier. |
|
| 3. | Reset and sequence the relay module. |
|
| 4. | Check the flame detector sighting position, reset and cycle. |
|
| 5. | Verify that no ignition noise is present in the F lead due to wire |
|
|
| routing. |
|
| 6. | Measure the flame strength. Verify it meets specifications. If |
|
|
| not, refer to the flame amplifier and/or flame detector checkout |
|
|
| procedures. |
|
| 7. | If the code reappears, replace the flame amplifier and/or the |
|
|
| flame detector. |
|
| 8. | If the fault persists, replace the relay module. |
|
|
|
|
Fault 52 | Pilot Valve 2 (terminal 21) was | 1. | Inspect terminal 21 and connections. Make sure that the valve |
*Call Service* | off when it should be on. |
| is operating properly. |
|
| 2. | Reset and sequence the relay module. |
|
| 3. | If the fault persists, replace the relay module. |
|
|
|
|
Fault 53 | Lockout Input fault | 1. | Check wiring; correct any errors. |
*Lockout Switch* | (EC/RM7810, 7820, 7830, | 2. | Inspect the Lockout Switch to make sure it is working |
| 7850 only). |
| properly. |
|
| 3. | Reset and sequence the relay module. During STANDBY or |
|
|
| PREPURGE, measure the voltage between terminal 20 and G |
|
|
| (ground). Supply voltage should be present. If not, the |
|
|
| lockout switch is defective and needs replacing. |
|
| 4. | If the fault persists, replace the relay module. |
|
|
|
|
Fault 54 | Combustion pressure switch | 1. | Check wiring; correct any errors. |
*Comb. Pressure* | fault (Fulton pulse only). | 2. | Inspect the Combustion Pressure Switch to make sure it is |
|
|
| working correctly. |
|
| 3. | Reset and sequence the relay module. |
|
| 4. | During STANDBY or PREPURGE, measure the voltage |
|
|
| between terminal 20 and G (ground). Supply voltage should |
|
|
| be present. If not, the Combustion Pressure Switch is |
|
|
| defective and needs replacing. |
|
| 5. | If the fault persists, replace the relay module. |
|
|
|
|
Fault 55 | Purge fan switch is on when it | 1. | Check wiring; correct any errors. |
*Purge Fan Sw. On* | should be off (Fulton pulse | 2. | Inspect the Purge Fan Switch terminal 18 and its connections. |
| only). |
| Make sure the switch is working correctly and is not jumpered |
|
|
| or welded. |
|
| 3. | Reset and sequence the relay module. |
|
| 4. | If the fault persists, replace the relay module. |
|
|
|
|
Fault 56 | Block intake fault | 1. | Check wiring; correct any errors. |
*Block Intake* | (Fulton pulse only). | 2. | Inspect the Block Intake Switch and make sure it is working |
|
|
| properly. |
|
| 3. | Reset and sequence the relay module. |
|
| 4. | During PREPURGE, measure the voltage between terminal 7 |
|
|
| and G (ground). Supply voltage should be present. If not, the |
|
|
| Block Intake Switch is defective and needs replacing. |
|
| 5. | If the fault persists, replace the relay module. |
|
|
|
|
Fault 57 | Purge Fan Switch is off when | 1. | Inspect the Prepurge Fan Switch terminal 18 and the |
*Purge Fan Sw. Off* | it should be on (Fulton pulse |
| connections. Make sure the switch is working properly. |
| only). | 2. | Reset and sequence the relay module. |
|
| 3. | If the fault persists, replace the relay module. |
|
|
|
|
Faults 58 - 66 | Unused faults | |
|
*Call Service* |
|
|
|
|
|
|
|
Fault 67 | L1 and L2 | 1. | Check L1 and L2 for proper line phasing. |
*AC Phase* | miswired/exchanged |
|
|
| (EC/RM7810, 7820, 7830, |
|
|
| 7850 only). |
|
|
|
|
|
|
|
|
| (continued) |
16 |
