adjusting input sensitivity
The input sensitivity setting is important to ensure proper performance, low noise levels, and maxi- mum system reliability. As a general rule, components at the "front end" of the system should be set as high as possible with the input sensitivity of the amplifier set as low as possible while still pro- viding adequate volume levels. Using a high signal level from the source and a low input sensitivity setting on the amplifier will keep the background noise levels of the system low. The following pr o- cedure will help you get the widest dynamic range from your system:
1.Start with the input level controls of your PowerPlateTM at the minimum (counterclockwise) position.
2.Set the tone controls and any controls on any equalizers or other signal processors to their flat or bypassed positions.
3.Set the input and output level controls, if any, on any associated equipment such as equalizers or outboard electronic crossover as recommended by their manufacturers.
4.Select a well recorded CD or Tape containing material recorded at a fairly high level. Musical content is not important except that the music chosen should be recorded such that any system distortion can be clearly heard, not masked by musical content.
5.Increase the source unit volume control about halfway. Increase the PowerPlate TM level control associated with the front full range (or midrange in a
6.While listening carefully for any signs of distortion, slowly increase the source unit volume cont rol until you either hear the first signs of distortion or you can’t turn it up any more. Back down on the volume control slightly until the distortion goes away. You have just found the maximum undis- torted output level of your source unit. Do not exceed the level in normal operation, as doing so will just send a distorted signal to the rest of the system.
7.Returning to the PowerPlate TM level control associated with the front main speakers, slowly increase it until you reach the point where distortion just begins to appear. This will be at the point where either the amplifier reaches its maximum output level, or the speakers reach their output limits. Either way, you have just calibrated the system so that the maximum system out put occurs at the same point as the maximum output from the source. This will give you min- imum system noise yet the system will reach its maximum output capability.
8.Reduce the source unit volume to a comfortable listening level. With the balance and fader controls still centered, adjust the remaining level controls for the proper system balance. If you are adjusting a system with multiple amplifiers, it is easiest to adjust the controls in the fol- lowing order: 1. Front speakers 2. Rear speakers 3. Subwoofers
9.If using an AC502 remote level control, adjust the subwoofer level with the AC502 in the mid position. This will give you the ability to boost the subwoofer level approximately 6dB when the AC502 is turned fully clockwise.
10.Double check your system levels by increasing the source unit volume control to the previous ly determined maximum position. If you hear distortion from any of the channels, reduce the PowerPlateTM input level for those channels until the distortion goes away.
Adjusting the input levels in this way will get maximum undistorted output from your system and will make it unlikely that you will cause damage to any of the components of your system by overpowering them.
19
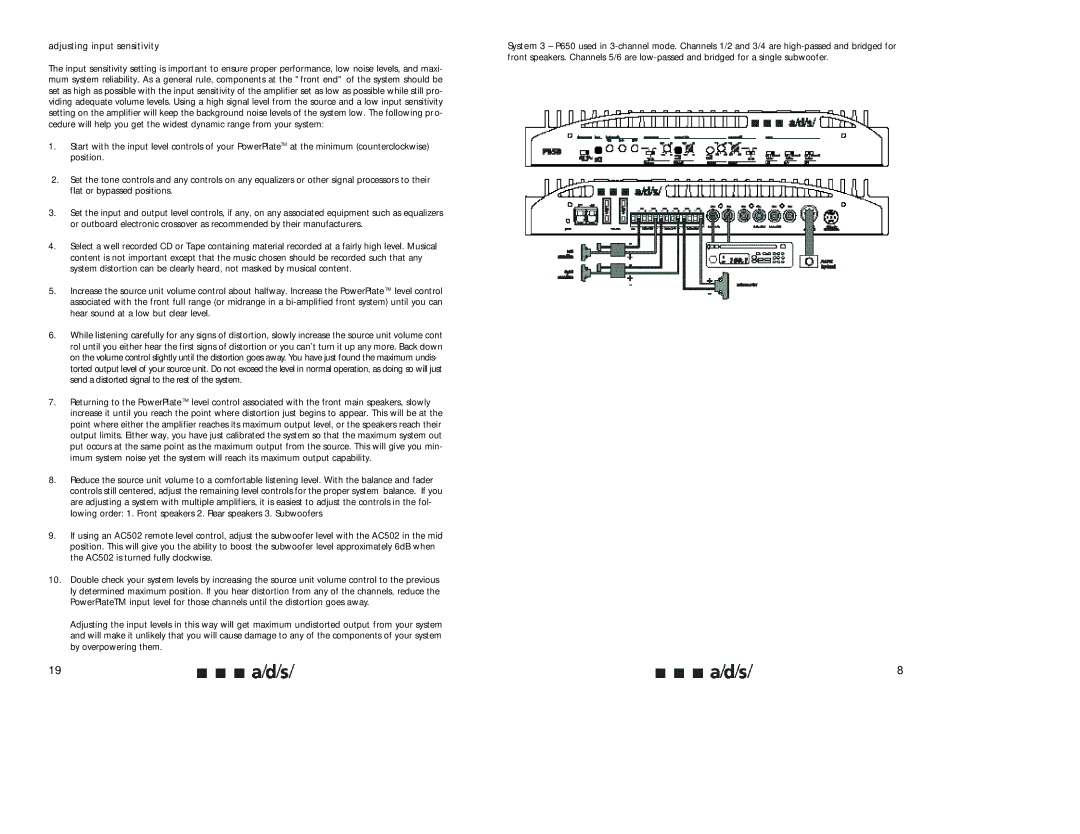
System 3 – P650 used in
8