Acer Aspire 4820T Service Guide
Revision History
Copyright
III
Conventions
Preface
Page
System Specifications
Troubleshooting
FRU Field Replaceable Unit List
Page
Table of Contents
Troubleshooting 103
Acer TBD Series
Microsoft Windows 7 Environment Test
Table of Contents
Features
Chapter
Storage
Mini Card
Audio
Optical Drive
Privacy control
Dimensions and weight
Power subsystem
Special keys and controls
Optional Items
Warranty
Environment
System Block Diagram
Intel
Front View
Your Acer Notebook tour
Icon Description
HDD
Left View
Closed Front View
Hdmi
Right View
Bottom View
Indicators
Icon Function Description
HDD
TouchPad Basics
Function Left Button Right Button Main TouchPad
Lock Keys and embedded numeric keypad
Using the Keyboard
Lock key Description
Windows Keys
Key Description
Hot Keys
Hotkey Icon Function Description
Bios
Hardware Specifications and Configurations
CPU
4GB
System Memory Specification
Wireless Module Specification Manufacturer Intel WiFi Link
Memory Combinations Slot Total Memory
LAN Module Specification
Bluetooth Specification
Hard Disk Drive Interface Specification
Super-Multi Drive Module
Audio Interface Specification
SANYO/SONY/PANASONIC/SAMSUNG/SIMPLO AS2009A
Power and Keyboard Controller Specification
Battery Specification Cell
LCD
Card Reader Specification
Chapter
Bios Setup Utility
Navigating the Bios Utility
Parameter Description
Aspire 4820T Bios
Information
Uuid
Main
Parameter Description Format/Option
Parameter Description Option
Disabled or
Security
Clear or Set
Setting a Password
Removing a Password
Changing a Password
Continue
Boot
USB Cdrom
Exit
Cmos
Bios Flash Utilities
DOS Flash Utility
USB HDD
Page
WinFlash Utility
Remove HDD/BIOS Password Utilities
Remove HDD Password
Removing Bios Passwords
Cleaning Bios Passwords
Using Boot Sequence Selector
Output
Using DMITools
Input
Input dmitools /wu
Using the LAN MAC Eeprom Utility
Chapter
Machine Disassembly and Replacement
Disassembly Requirements
General Information
Pre-disassembly Instructions
Disassembly Process
Main Screw List Quantity Part Number
External Modules Disassembly Flowchart
External Module Disassembly Process
Screw List Step Quantity
Removing the Battery Pack
Removing the SD dummy card
Removing the SIM card
Removing the Lower Cover
Removing the Optical Drive Module
Step Size Quantity Screw Type ODD Module M2.5*4L
Step Size Quantity Screw Type ODD Bracket M2.0*3L
Removing the Dimm Modules
Removing the Wlan Module
Step Size Quantity Screw Type Wlan Board M2.0*3
Removing the Hard Disk Drive Module
Step Size Quantity Screw Type HDD Carrier M3.0*4L
Main Unit Disassembly Process
Main Unit Disassembly Flowchart
Removing the Keyboard
Step Size Quantity Screw Type
Page
Removing the Upper Cover
Page
Remove the eight 8 screws from the top cover
Removing the Power Switch Board
Removing the Function Board
Step Size Quantity Screw Type Function Board M2.0*3widehead
Removing the Left Speaker Module
Step Size Quantity Screw Type Speaker Module M2.5*4L
Removing the USB Board
Step Size Quantity Screw Type USB Board M2.5*4L
Lift the USB Board upward away from the chassis Chapter
Removing the 3G Module
Step Size Quantity Screw Type 3G Module M2.5*4L
Removing the Bluetooth Module
Step Size Quantity Screw Type Bluetooth Board M2.3*3L
Removing the LCD Module
Step Size Quantity Screw Type LCD Module M2.5*6.5
Removing the Mainboard
Step Size Quantity Screw Type Mainboard M2.5*4L
Removing the Thermal Module
Removing the CPU
Removing the RTC Battery
Removing the WiFi Antenna Cable
Removing the Right Speaker
Removing the DC-In Cable
Step Size Quantity Screw Type DC-In Cable M2.5*4
LCD Module Disassembly Process
LCD Module Disassembly Flowchart
Removing the LCD Bezel
Step Size Quantity Screw Type LCD Bezel M2.5*4
Removing the Camera Module
Removing the LCD Panel
Step Size Quantity Screw Type LCD Panel M2.3*3
Removing the FPC Cable
Removing the Hinges
Removing the Microphone Module
Step Size Quantity Screw Type LCD Hinges M2.5*3
Removing the Antennas
Chapter
LCD Module Reassembly Procedure
Replacing the MIC and WiFi Antennas
Replacing the Microphone Module
Replacing the FPC Cable
Replacing the LCD Panel
Replacing the Webcam
Replacing the LCD Bezel
Replace the two screws and screw caps as shown
Main Module Reassembly Procedure
Replacing the DC-In Cable
Replacing the LCD Module
Replacing the Right Speaker
Replacing the RTC Battery
Replacing the CPU
Replacing the Thermal Module
Page
Replacing the Mainboard
Replacing the Bluetooth Module
Replacing the 3G Module
Replacing the USB Board
Replacing the Left Speaker Module
Replacing the Switch Board
Replacing the Function Board
Replacing the Upper Cover
Page
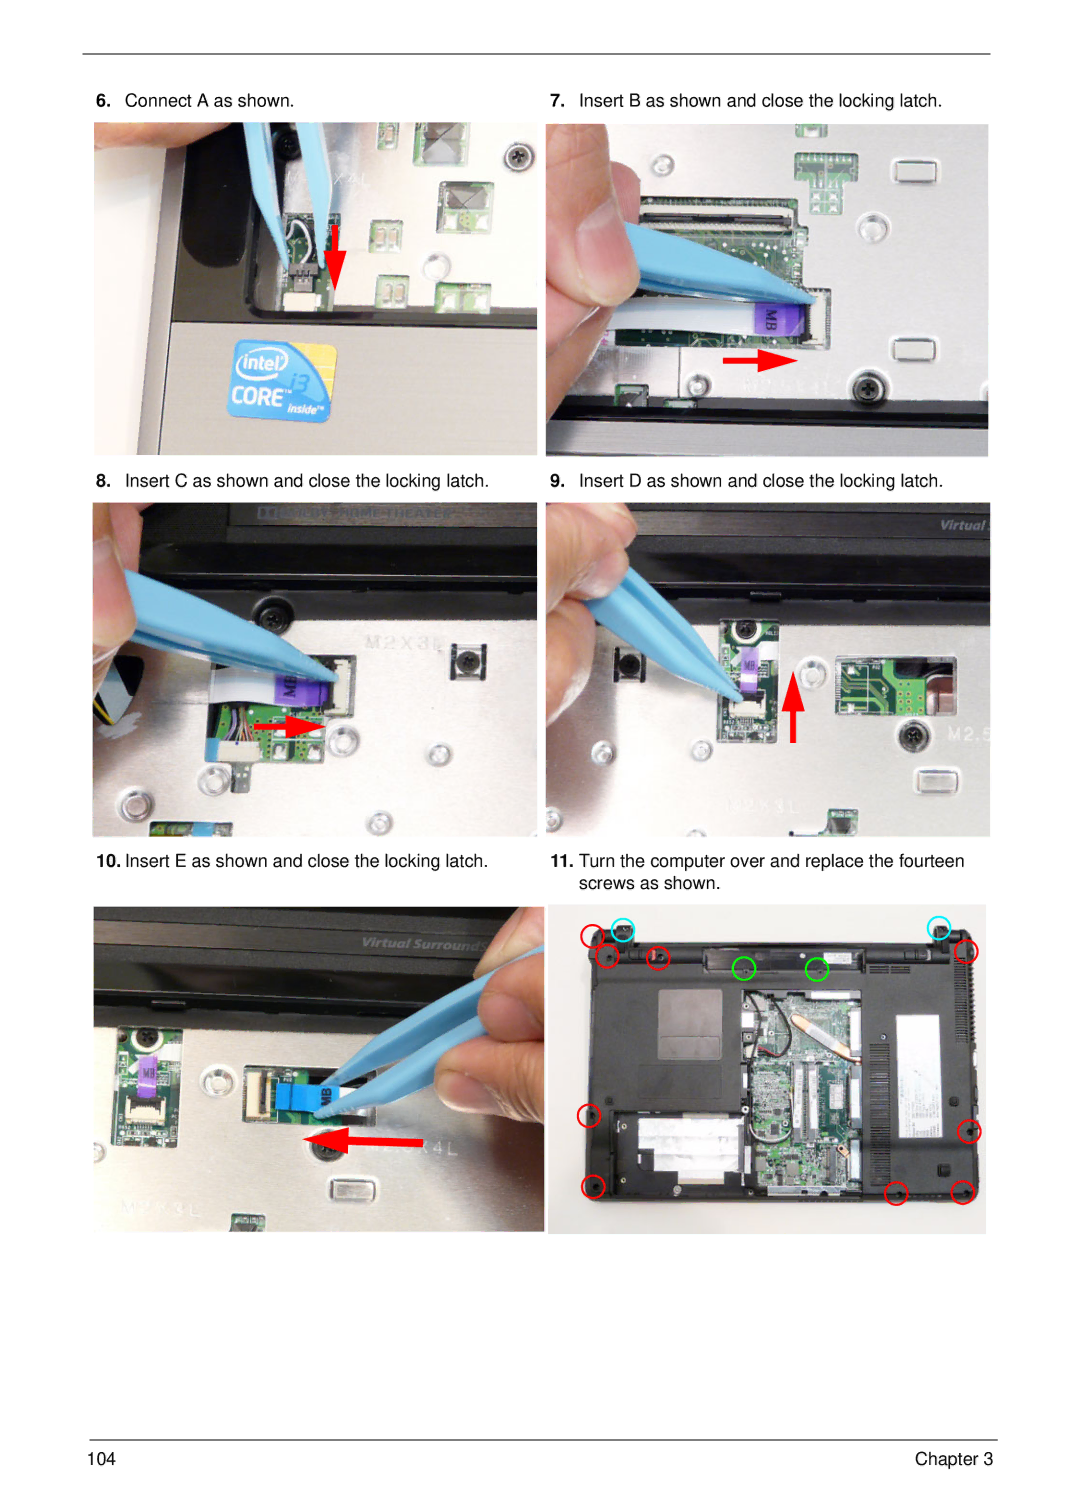
104 Chapter
Replacing the Keyboard
Replacing the Hard Disk Drive Module
106 Chapter
Replacing the Dimm Modules
Replacing the Wlan Board
Insert the Wlan board into the Wlan socket
Replacing the ODD Module
Replacing the Lower Covers
Replacing the Dummy Card
Replacing the SIM card
Replacing the Battery Pack
112 Chapter
Common Problems
Symptoms Verified Go To
Power On Issue
Computer Shutsdown Intermittently
No Display Issue
No Post or Video
Random Loss of Bios Settings
Abnormal Video Display
LCD Failure
Built-In Keyboard Failure
TouchPad Failure
Internal Speaker Failure
Microphone Problems
Sound Problems
Select Set up microphone
Select Repair your computer
HDD Not Operating Correctly
Select Startup Repair
ODD Failure
ODD Not Operating Correctly
Discs Do Not Play
Drive Not Detected
Wireless Function Failure
Thermal Unit Failure
External Mouse Failure
Other Failures
Undetermined Problems
Intermittent Problems
Dimm
Post Code Range Phase
Post Codes
Peienterrecoverymode PEI
Peimemoryinstall PEI
Peiswitchstack PEI
Peirecoverymediafound PEI
Dxesmmcontrolerinit DXE
Bdsinstallhotkey BDS
Bdsbeforepciioinstall BDS
Dxelegacyinterrupt DXE
Bdsentersetup BDS
Bdsenumerateallbootoption BDS
Bdsendofbootselection BDS
Bdsenterbootmanager BDS
Functionality Name Include\ PostCode.h Phase Description
132 Chapter
Top View
Description Desciption
RTC
Mini Card Wlan PJ2 Power Jack
LAN
FAN Conn
Steps for Clearing Bios Password Check
Clearing Password Check and Bios Recovery
Clearing Password Check
Description Location G1 / G2 Clear Cmos Jumpers WiFi Bay
Bios Recovery Hotkey
Bios Recovery by Crisis Disk
Bios Recovery Boot Block
Steps for Bios Recovery from USB Storage
FRU Field Replaceable Unit List
LCD Assembly
Acer Aspire 4820T Exploded Diagrams
Description Acer P/N
Chassis Assembly
Wwan Minicard BEVT-22A23T0 STN
HDD-BKT
ZQ1 ZR6FBZR6004,REV MBSG,PARK,SAM,BT WO Cpuassy
BSQ
Acer Aspire 4820T FRU List
Category Part Name Description Acer Part Number
SIM Board
26G SLBPNPGAS.P
MK2565GSX-EUL S.P Sata 8MB LF F/WGJ001J
Keyboard
ZQ1 K/BUI S.P
CABLE,ANTENNA*3, Hinge CAP
Mainboard Mainboard UMA HM55 W/CARD ZQ1B MB
Heatsink Thermal Module for 35W UMA ZQ1 Thermal Module
Screw List
Category Partname Description Acer Part Number
Chapter 151
Acer Aspire 4820T Series
Appendix a
Country Acer Description
Luxembour
Denmark
LX.PSE AAP
S2.PSE
AS4820TG-432G64Mn W7HP64ATTW1 MC
AS4820TG-436G64Mn EM W7HP64EMATZA1 MC
AS4820TG-436G64Mn W7HP64ATLV1 MC
AS4820TG-436G64Mn W7HP64ATFR1 MC
AS4820TG-434G64Mn W7HP64ATDE1 MC
AS4820TG-434G64Mn W7HP64ATEU7 MC
LX.PSG AAP
LX.PVL AAP
S2.PVL
LX.PSG Emea
AS4820TG-433G32Mn EM W7HP64EMATTR1 MC
AS4820TG-433G32Mn W7HP64ATBE1 MC
AS4820TG-433G32Mn W7HP64ATES1 MC
Gctwn LX.PSG TWN
02.034 PARKXT512Cks3V3 2*2G/500L/BT/6L3.0/5R Cbbgn1.3CALIT41
02.030 PARKXT512Cks3V3 2*2G/500L/BT/6L3.0/5R Cbbgn1.3CALLT11
LX.PSN AAP
S2.PSG
S2.PVM
LX.PSN
LX.PSN China
LX.PSN Emea
AS4820T-333G32Mn W7HP64ATNL1 MC UMACks3 2G+1G
AS4820T-333G32Mn W7HP64ATFR1 MC UMACks3 2G+1G
02.041 2G/320/BT/6L3.0/5R/cbbgn1.3CALAR11 South Africa
VGA Chip
Model Country Acer BOM Name
Vram
Gctwn LX.PSE AS4820TGMADISO
434G50Mn 02.147
S2.PSE AS4820TGMADISO
434G50Mn 02.099
436G64Mn 02.073
434G64Mn 02.049
LX.PVL AS4820TGMADISO
Parkxt
S2.PVL AS4820TGMADISO
LX.PS AS4820TGPARKX
DDR3
433G32Mn G02.10 T512Cks3V3
433G32Mn Europe G02.09 T512Cks3V3
Gctwn LX.PS AS4820TGPARKX
332G32Mn G0C.00 T512Cks3V3
434G50Mn Africa G02.04 T512Cks3V3
434G50Mn G02.02 T512Cks3V3
UMA
S2.PS AS4820TGPARKX
S2.PV AS4820TGPARKX
Acla LX.PS
354G32Mn Portuguese N02.10 AS4820T China
AS4820T Middle East
AS4820T Baltic
AS4820T Malaysia
AS4820T Algeria
AS4820T Holland
HDD 1GB
S2.PS
Model Country Acer Part No Memory
SO2GBIII10
AS4820TG Middle East LX.PSE02.166
SO4GBIII10 SO2GBIII10
SO2GBIII10 SO1GBIII10
SO4GBIII10
AS4820TG Middle East LX.PSE02.090
AS4820TG Eastern LX.PSE02.064
AS4820TG Germany LX.PSE02.039
AS4820TG Eastern LX.PSE02.013
AS4820TG South Africa LX.PSG02.117
AS4820TG Eastern LX.PSG02.091
AS4820TG Thailand LX.PSG02.068
AS4820TG Middle East LX.PSG02.045
Acla
AS4820T China LX.PSN0C.005
AS4820T Latvia LX.PSN02.081
AS4820T Malaysia LX.PSN02.059
AS4820T Luxembour LX.PSN02.035
AS4820T Eastern LX.PSN02.010
Appendix a 212
Test Compatible Components
Appendix B
UNDP-1
Microsoft Windows 7 Environment Test
Vendor Description
Cover
DB A, LV5 LED LF
Adapter
Delta
65JH DB A, LV5 LED LF
LITE-ON
Hipro
34AR, LV5 LED LF
Audio Codec
ALC271X
NIC
Battery
Panaso
IDAS10B5E
Samsun
Sanyo
Simplo
Bluetooth
Camera
222
Card Reader
Intel
Vendor Description
CPU Intel Core i7 620M PGA 2.66G KC.62001.DM
HDD
N320GB5.4
Vendor Description
230
Seagat
232
Toshiba
MK3265GSX Sata 8MB LF F/WGJ002J
HDD Toshiba 2.5 5400rpm 500GB
22A23T0,ML320S,WD Sata 8MB LF F/W01.01A01 Appendix B 235
N500GB5.4 HDD WD 2.5 5400rpm 500GB WD5000BEVT
22A23T0,ML320S,WD Sata 8MB LF F/W01.01A01 Appendix B 237
LAN
Keyboard
AC4TA10B Acer
NLED14WX AUO
NLED14WX CMO
NLED14WX LPL
SO1GBIII10 Elpida
NLED14WX Samsun
MEM
SO2GBIII10 Elpida
SO1GBIII10 Hynix
SO2GBIII10 Hynix
SO4GBIII10 None
SO1GBIII10 Samsun
SO2GBIII10 Samsun
Modem
NSM8XS9.5 Hlds
NB Chipset
ODD
NSM8XS9.5 Panaso
NSM8XS9.5 Toshiba
SB Chipset
Software
Madison AMD
WiFi Antenna
VGA Chip
Parkxt AMD
Wireless LAN
BGN
INT6300H
Online Support Information
Appendix C
216
Index
218