Note: The “ ” stays in Selectable Categories, even after setup.
Set the Time & Date
The clock and calendar are utilized to time stamp history records and other data, so it is important to set the time and date soon after you power on the display unit.
Set the Time
1. Press the up or down arrow buttons until
“SET CLOCK?” is displayed on the
Selectable Category part of the display
unit.

Display Unit Setup

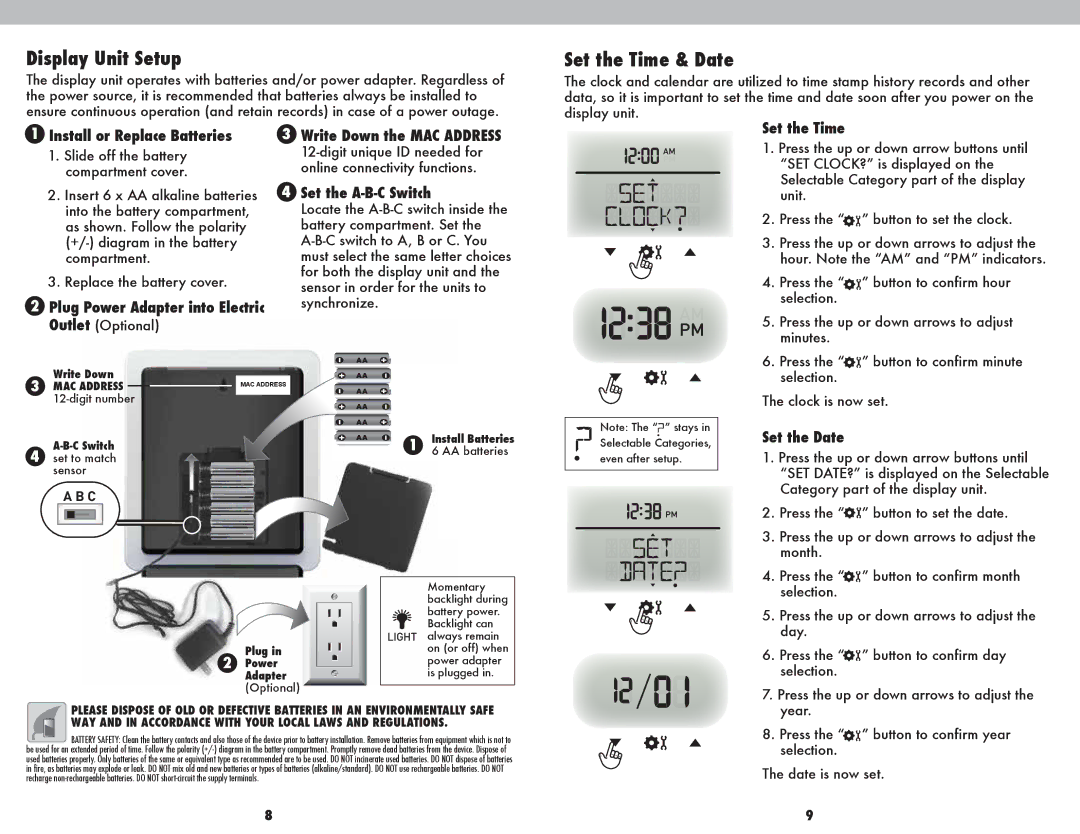
The display unit operates with batteries and/or power adapter. Regardless of the power source, it is recommended that batteries always be installed to ensure continuous operation (and retain records) in case of a power outage.

1Install or Replace Batteries

1.Slide off the battery compartment cover.

2.Insert 6 x AA alkaline batteries into the battery compartment, as shown. Follow the polarity (+/-) diagram in the battery compartment.

3.Replace the battery cover.

2Plug Power Adapter into Electric Outlet (Optional)

3Write Down the MAC ADDRESS

12-digit unique ID needed for online connectivity functions.

4Set the A-B-C Switch

Locate the A-B-C switch inside the battery compartment. Set the A-B-C switch to A, B or C. You must select the same letter choices for both the display unit and the sensor in order for the units to synchronize.

2.

Press the “ ” button to set the clock.

3.

Press the up or down arrows to adjust the


hour. Note the “AM” and “PM” indicators.

4.

Press the “ ” button to confirm hour


selection.

5.

Press the up or down arrows to adjust


minutes.

6.

Press the “ ” button to confirm minute

Write Down

3 MAC ADDRESSMAC ADDRESS

12-digit number


Install Batteries


A-B-C Switch


4


1 6 AA batteries

set to match


sensor

A B C

selection.

The clock is now set.

Set the Date

1. Press the up or down arrow buttons until


“SET DATE?” is displayed on the Selectable


Category part of the display unit.

2.

Press the “ ” button to set the date.

3.

Press the up or down arrows to adjust the


month.

4.

Press the “ ” button to confirm month

Plug in

2Power Adapter (Optional)

Momentary backlight during

battery power.

Backlight can

LIGHT always remain on (or off) when power adapter is plugged in.


selection.

5.

Press the up or down arrows to adjust the


day.

6.

Press the “ ” button to confirm day


selection.

7. Press the up or down arrows to adjust the

PLEASE DISPOSE OF OLD OR DEFECTIVE BATTERIES IN AN ENVIRONMENTALLY SAFE WAY AND IN ACCORDANCE WITH YOUR LOCAL LAWS AND REGULATIONS.

BATTERY SAFETY: Clean the battery contacts and also those of the device prior to battery installation. Remove batteries from equipment which is not to be used for an extended period of time. Follow the polarity (+/-) diagram in the battery compartment. Promptly remove dead batteries from the device. Dispose of used batteries properly. Only batteries of the same or equivalent type as recommended are to be used. DO NOT incinerate used batteries. DO NOT dispose of batteries in fire, as batteries may explode or leak. DO NOT mix old and new batteries or types of batteries (alkaline/standard). DO NOT use rechargeable batteries. DO NOT recharge non-rechargeable batteries. DO NOT short-circuit the supply terminals.

year.

8. Press the “ ” button to confirm year

selection.

The date is now set.

8

9

Page 5
Image 5
Acu-Rite 1025 instruction manual Display Unit Setup, Set the Date

1025 specifications

The Acu-Rite 1025 is a highly versatile digital thermometer and hygrometer that serves as a reliable home and garden weather station. Known for its precision and user-friendly features, this device has become popular among those who want to keep an eye on indoor and outdoor environmental conditions. One of its standout features is its large and easy-to-read LCD display, which shows real-time temperature and humidity readings. The display can toggle between Fahrenheit and Celsius, allowing users to choose their preferred temperature unit for convenience.

One of the key technologies integrated into the Acu-Rite 1025 is its advanced sensors. These sensors are designed to provide accurate indoor and outdoor temperature and humidity measurements, ensuring that users have reliable information at their fingertips. It features a wireless remote sensor that can be placed outdoors, enabling users to monitor external conditions without having to step outside. This remote sensor can transmit data up to 165 feet away, providing flexibility in sensor placement for optimal performance.

In terms of characteristics, the Acu-Rite 1025 boasts a built-in memory function that records high and low readings for both temperature and humidity. This feature allows users to track changes in their environment over time, which can be beneficial for gardening, climate control in the home, or monitoring seasonal variations. The device also includes a comfort level indicator, which visually represents the humidity level in terms of comfort, helping users make informed decisions regarding their indoor climate.

Another notable aspect of the Acu-Rite 1025 is its compact design, which allows for easy placement on desks, shelves, or countertops. The sleek build ensures that it complements a variety of home aesthetics while remaining functional. Additionally, it is powered by batteries, providing an advantage in terms of portability, making it suitable for different locations such as greenhouses, living rooms, or even offices.

Overall, the Acu-Rite 1025 combines modern technology with practicality, offering a comprehensive solution for monitoring temperature and humidity in various environments. Its accuracy, ease of use, and thoughtful features make it an essential tool for anyone interested in understanding and controlling their indoor climate. Whether you're a gardening enthusiast or simply want to maintain a comfortable living space, the Acu-Rite 1025 is a reliable choice.