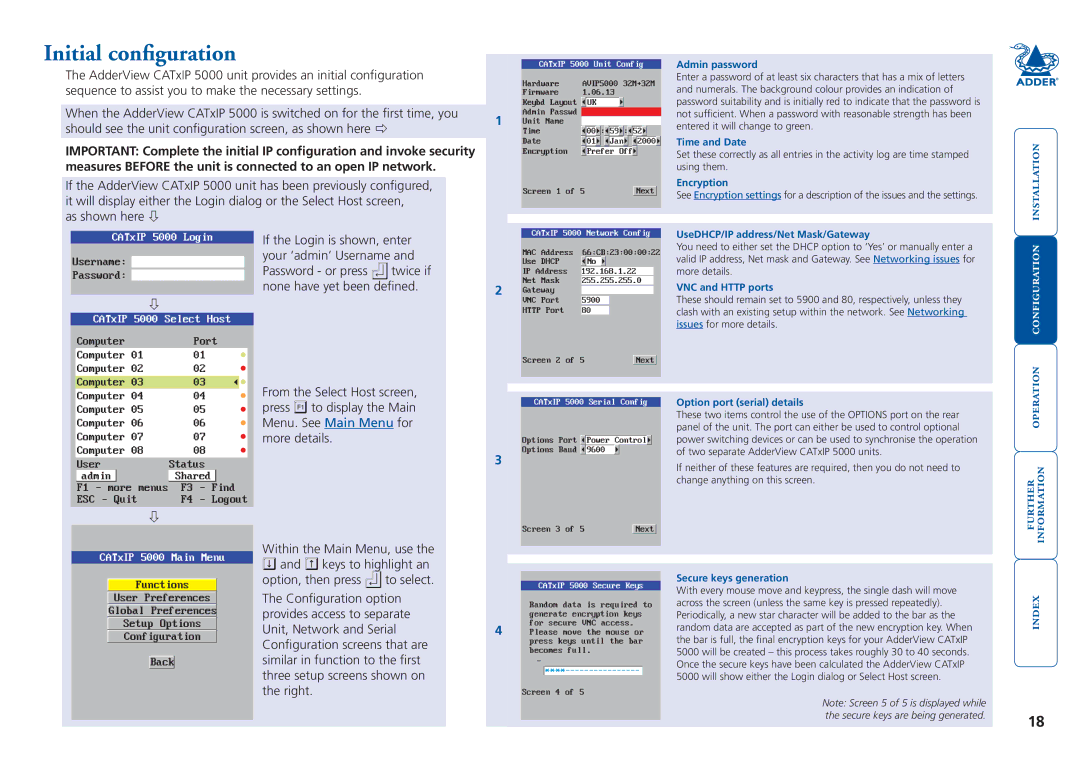
Initial configuration
The AdderView CATxIP 5000 unit provides an initial configuration sequence to assist you to make the necessary settings.
When the AdderView CATxIP 5000 is switched on for the first time, you should see the unit configuration screen, as shown here
IMPORTANT: Complete the initial IP configuration and invoke security measures BEFORE the unit is connected to an open IP network.
If the AdderView CATxIP 5000 unit has been previously configured, it will display either the Login dialog or the Select Host screen,
as shown here
| If the Login is shown, enter | |||
|
|
| ||
|
|
| your ‘admin’ Username and | |
|
| |||
|
| Password - or press | twice if | |
| ||||
none have yet been defined.
| | |||||||||||||
| |
| | | ||||||||||
| |
| |
|
|
|
|
|
| |||||
| | |
| |
|
|
|
|
|
|
|
|
| |
1 | | |
|
|
|
|
|
|
|
|
|
|
| |
| |
|
|
|
|
|
|
|
|
|
|
| ||
| |
|
|
| | |
| | | |
|
|
|
|
| |
|
|
| |
|
| |
| |
| |||
| |
| | |
|
|
|
|
| |||||
| | | |
|
|
|
|
|
|
|
|
| ||
|
|
|
|
| |
| ||||||||
|
|
|
|
|
|
|
|
|
|
|
|
|
|
|
|
|
|
|
|
|
|
| |||||||
| | | | |||||||||||
| | | ||||||||||||
| |
|
| |
|
|
|
|
|
|
|
|
| |
| | |
|
|
|
|
| |||||||
2 | |
| |
|
| |||||||||
|
|
|
|
|
|
|
|
|
|
|
|
| ||
Admin password
Enter a password of at least six characters that has a mix of letters and numerals. The background colour provides an indication of password suitability and is initially red to indicate that the password is not sufficient. When a password with reasonable strength has been entered it will change to green.
Time and Date
Set these correctly as all entries in the activity log are time stamped using them.
Encryption
See Encryption settings for a description of the issues and the settings.
UseDHCP/IP address/Net Mask/Gateway
You need to either set the DHCP option to ‘Yes’ or manually enter a valid IP address, Net mask and Gateway. See Networking issues for more details.
VNC and HTTP ports
| |
|
| | |
|
| |
| | |
| |
|
| |
|
| | |
These should remain set to 5900 and 80, respectively, unless they clash with an existing setup within the network. See Networking issues for more details.
| | |||
| |
| ||
| | |||
| | |||
| | |||
| | |||
| | |||
| | |||
|
| | | |
| | |||
| | |||
From the Select Host screen, press ![]() to display the Main Menu. See Main Menu for more details.
to display the Main Menu. See Main Menu for more details.
![]()
![]()
![]()
![]()
3
Option port (serial) details
These two items control the use of the OPTIONS port on the rear panel of the unit. The port can either be used to control optional power switching devices or can be used to synchronise the operation of two separate AdderView CATxIP 5000 units.
If neither of these features are required, then you do not need to change anything on this screen.
Within the Main Menu, use the ![]() and
and ![]() keys to highlight an option, then press
keys to highlight an option, then press ![]() to select.
to select.
The Configuration option provides access to separate Unit, Network and Serial Configuration screens that are similar in function to the first three setup screens shown on the right.
| |
4
Secure keys generation
With every mouse move and keypress, the single dash will move across the screen (unless the same key is pressed repeatedly). Periodically, a new star character will be added to the bar as the random data are accepted as part of the new encryption key. When the bar is full, the final encryption keys for your AdderView CATxIP 5000 will be created – this process takes roughly 30 to 40 seconds. Once the secure keys have been calculated the AdderView CATxIP 5000 will show either the Login dialog or Select Host screen.
Note: Screen 5 of 5 is displayed while |
|
the secure keys are being generated. | 18 |
|