Image controls - sharpness and brightness (continued)

To use the image controls

1 Simultaneously, press the hotkeys (by default, and ) along with to enter configuration mode.

The three keyboard indicators (‘Num Lock’, ‘Caps Lock’ and ‘Scroll Lock’) will now begin to flash in sequence. The speed of the sequence indicates the

level of the sharpness adjustment currently applied: the slower the rate, the lower the level of sharpness being applied.

2[OPTIONAL STEP] By default, your sharpness and brightness adjustments are applied equally to all of the video channels. However, if required, you can select individual channels and adjust them separately.

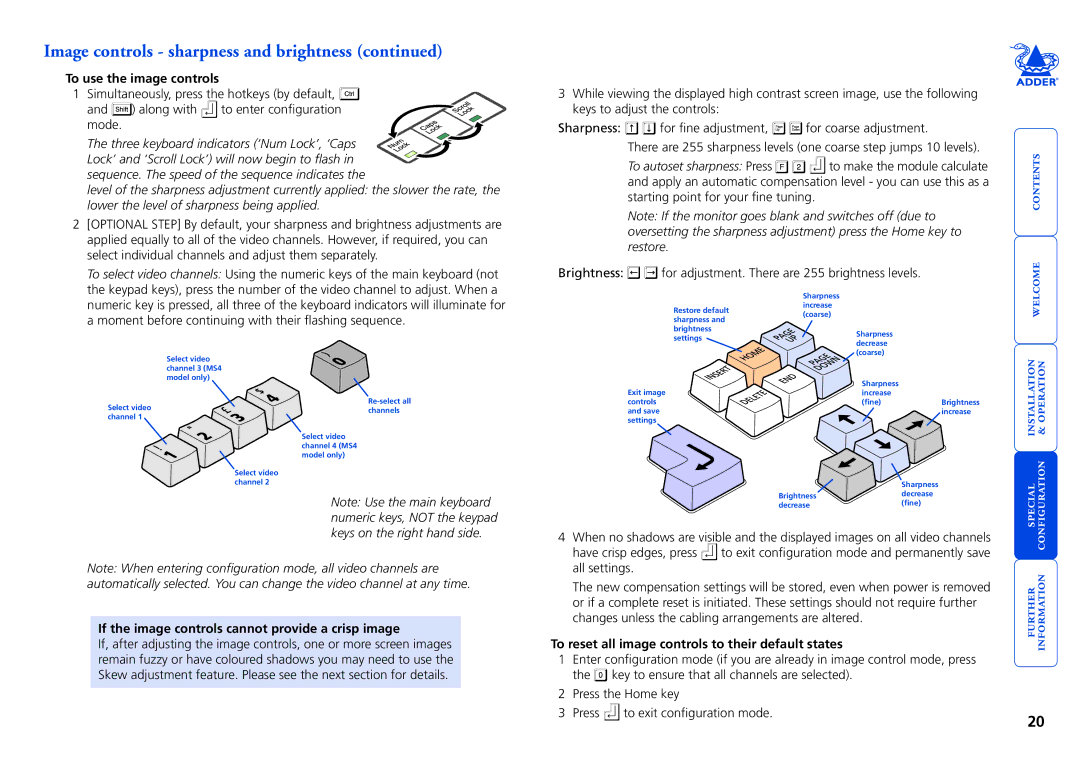
To select video channels: Using the numeric keys of the main keyboard (not the keypad keys), press the number of the video channel to adjust. When a numeric key is pressed, all three of the keyboard indicators will illuminate for a moment before continuing with their flashing sequence.

3While viewing the displayed high contrast screen image, use the following keys to adjust the controls:

Sharpness: for fine adjustment, for coarse adjustment.

There are 255 sharpness levels (one coarse step jumps 10 levels).

To autoset sharpness: Press to make the module calculate and apply an automatic compensation level - you can use this as a starting point for your fine tuning.

Note: If the monitor goes blank and switches off (due to oversetting the sharpness adjustment) press the Home key to restore.

Brightness: for adjustment. There are 255 brightness levels.


Sharpness

Restore default

increase

(coarse)

sharpness and


brightness

Sharpness

settings

decrease


(coarse)

 

Select video channel 1

Select video channel 3 (MS4 model only)

Re-select all channels

Select video channel 4 (MS4 model only)

Select video channel 2

Note: Use the main keyboard numeric keys, NOT the keypad keys on the right hand side.

Exit image

Sharpness


increase


controls

(fine)

Brightness

and save


increase

settings


Sharpness

Brightness

decrease

decrease

(fine)

4 When no shadows are visible and the displayed images on all video channels

have crisp edges, press

to exit configuration mode and permanently save

    

Note: When entering configuration mode, all video channels are automatically selected. You can change the video channel at any time.

If the image controls cannot provide a crisp image

If, after adjusting the image controls, one or more screen images remain fuzzy or have coloured shadows you may need to use the Skew adjustment feature. Please see the next section for details.

all settings.

The new compensation settings will be stored, even when power is removed

or if a complete reset is initiated. These settings should not require further

changes unless the cabling arrangements are altered.

To reset all image controls to their default states

1Enter configuration mode (if you are already in image control mode, press the key to ensure that all channels are selected).

2 Press the Home key

3 Press to exit configuration mode.

 

20

Page 21
Image 21
Adder Technology X2 manual To use the image controls, If the image controls cannot provide a crisp image

X2 specifications

Adder Technology X2 is a cutting-edge solution designed to enhance the user experience in KVM (Keyboard, Video, Mouse) extension and switching. This innovative device stands out due to its seamless integration capabilities, providing users a versatile platform to manage multiple computer sources effortlessly. It caters to industries that demand high-performance and reliable KVM solutions, including broadcast, control room applications, and data center operations.

One of the main features of the Adder X2 is its impressive video performance. It supports high-resolution video up to 4K at 60Hz, ensuring that users experience crystal-clear imagery without compromising on quality. This is particularly advantageous for sectors that rely on detailed visuals, such as graphic design and video production. The device also integrates advanced compression technologies, enabling efficient transmission over various distances without lag or degradation of quality.

The Adder X2 is equipped with a robust and flexible architecture, allowing for easy scalability. It can accommodate a wide range of configurations, whether a single workstation or a complex multi-user environment. This means that as a company's needs evolve, the system can be upgraded or modified without requiring a complete overhaul.

Furthermore, its support for various input and output connections, including HDMI, DVI, and DisplayPort, ensures compatibility with a wide array of devices. This flexibility is essential in a fast-evolving tech landscape, where businesses often utilize numerous types of equipment.

Another significant characteristic of the Adder X2 is its user-friendly interface. It features intuitive controls that make switching between devices simple and efficient, minimizing downtime during operations. The device is also designed with security in mind, providing effective measures to safeguard sensitive data from unauthorized access.

In terms of installation, the Adder X2 is designed to be straightforward. Its compact design means it can easily fit into existing infrastructure without taking up additional space. The device can be deployed in both small and large setups, making it an ideal choice for businesses of all sizes.

Overall, the Adder Technology X2 is a powerful and adaptable KVM solution that emphasizes performance, flexibility, and security. Its advanced features and user-centric design make it a preferred choice for professionals in need of reliable and high-quality KVM extension and switching solutions.