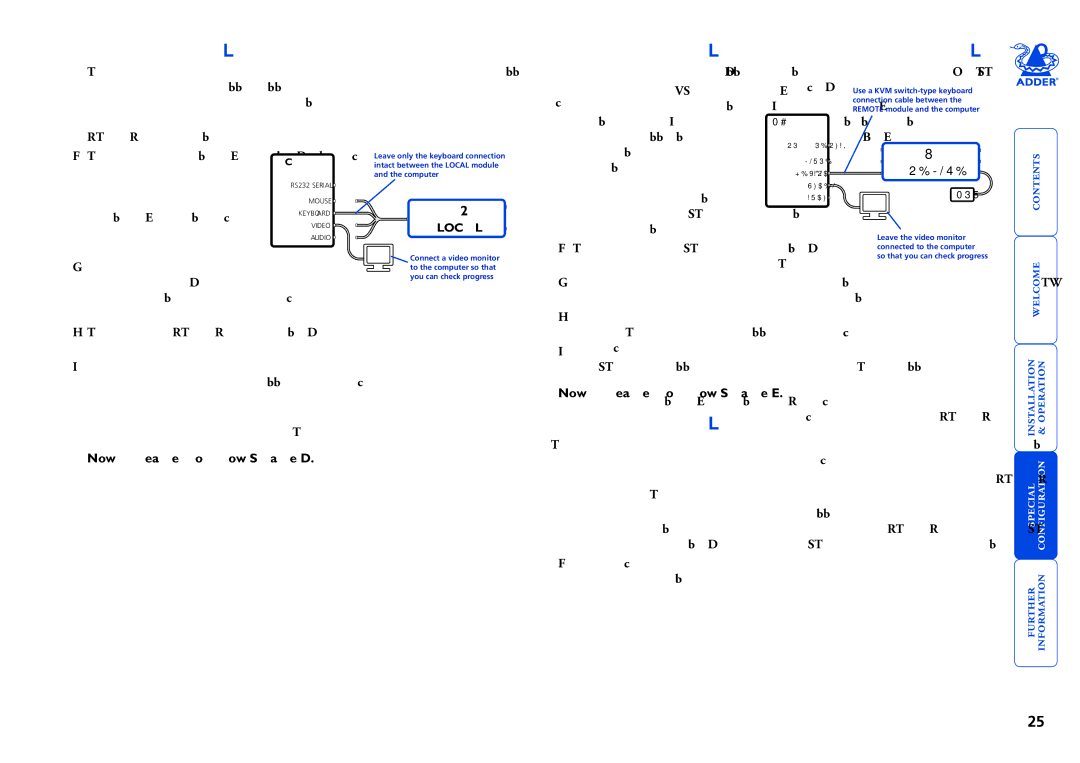
Stage C - Reconfigure the LOCAL connections and begin

1 On the computer from which you will run the upgrade, ensure that its BIOS

Stage D - Reconfigure the REMOTE connections and begin

1 Disconnect all cables from the REMOTE module and take it to the computer.

settings will allow it to boot from the floppy diskette drive, rather than

booting immediately from the hard drive.

2Switch off the computer and disconnect the twisted pair cable from the LOCAL module.

2 Use a ‘KVM switch-type’

keyboard cable (6pin mini-DIN

male to 6pin mini-DIN male plugs

with all lines connected) - not

PC

RS232 SERIAL

Use a KVM switch-type keyboard connection cable between the REMOTE module and the computer

3On the multi-cable, leave the keyboard connector attached to the keyboard port of the computer. Disconnect the multi-cable video and mouse connectors from the ports on the computer.

4 So that you can check upgrade

PC

RS232 SERIAL

MOUSE

KEYBOARD

VIDEO

AUDIO

Leave only the keyboard connection intact between the LOCAL module and the computer

X2

LOCAL

Connect a video monitor to the computer so that

supplied. Attach one end of the

cable to the keyboard port of the

computer. Connect the other end

of the cable to the keyboard port

of the REMOTE module. This is

the only connection required.

3On the REMOTE module, change switch 1 to the ON position.

MOUSE KEYBOARD VIDEO AUDIO

X2

REMOTE

PSU

Leave the video monitor connected to the computer so that you can check progress



progress, connect a monitor

directly to the video port of the

computer.

you can check progress

4Attach the power supply unit to the POWER input of the REMOTE module and connect the mains lead to a nearby wall socket.

5 Switch on the computer. The upgrade process will start automatically and



5On the LOCAL module, change switch 1 to the ON position. Ensure that the upgrade diskette is in the floppy disk drive of the computer.

6Switch on the computer. The upgrade process will start automatically and confirmation will be given on screen.

7Switch off the computer and disconnect the multi-cable. Leave the monitor connected and the upgrade diskette in the floppy disk drive. Return LOCAL switch 1 to the OFF position.

Now please follow Stage D.

confirmation will be given on screen.

6Switch off the computer and disconnect the REMOTE module. Return REMOTE switch 1 to the OFF position.

Now please follow Stage E.

Stage E - Return all connections to their usual states

Once the upgrade process has been completed, perform the following to return the system to its previous state.

1Ensure that switch 1 on both the LOCAL and REMOTE modules are set to their OFF positions.

2Refer to the ‘Installation and operation’ chapter for detailed instructions on correctly connecting the LOCAL and REMOTE modules to the computer, its peripherals, the REMOTE power supply and the twisted pair cable.

3Remove the diskette from the system and reboot. The upgrade process is now complete.

      

25

Page 26
Image 26
Adder Technology X2 manual Stage D Reconfigure the Remote connections and begin

X2 specifications

Adder Technology X2 is a cutting-edge solution designed to enhance the user experience in KVM (Keyboard, Video, Mouse) extension and switching. This innovative device stands out due to its seamless integration capabilities, providing users a versatile platform to manage multiple computer sources effortlessly. It caters to industries that demand high-performance and reliable KVM solutions, including broadcast, control room applications, and data center operations.

One of the main features of the Adder X2 is its impressive video performance. It supports high-resolution video up to 4K at 60Hz, ensuring that users experience crystal-clear imagery without compromising on quality. This is particularly advantageous for sectors that rely on detailed visuals, such as graphic design and video production. The device also integrates advanced compression technologies, enabling efficient transmission over various distances without lag or degradation of quality.

The Adder X2 is equipped with a robust and flexible architecture, allowing for easy scalability. It can accommodate a wide range of configurations, whether a single workstation or a complex multi-user environment. This means that as a company's needs evolve, the system can be upgraded or modified without requiring a complete overhaul.

Furthermore, its support for various input and output connections, including HDMI, DVI, and DisplayPort, ensures compatibility with a wide array of devices. This flexibility is essential in a fast-evolving tech landscape, where businesses often utilize numerous types of equipment.

Another significant characteristic of the Adder X2 is its user-friendly interface. It features intuitive controls that make switching between devices simple and efficient, minimizing downtime during operations. The device is also designed with security in mind, providing effective measures to safeguard sensitive data from unauthorized access.

In terms of installation, the Adder X2 is designed to be straightforward. Its compact design means it can easily fit into existing infrastructure without taking up additional space. The device can be deployed in both small and large setups, making it an ideal choice for businesses of all sizes.

Overall, the Adder Technology X2 is a powerful and adaptable KVM solution that emphasizes performance, flexibility, and security. Its advanced features and user-centric design make it a preferred choice for professionals in need of reliable and high-quality KVM extension and switching solutions.