C: INSTALLING THE OPERATOR

WARNING

FRONT MOUNTING BRACKET MUST BE INSTALLED TO A STRUCTURAL SUPPORT (STUD) ON THE HEADER WALL. FAILURE TO DO SO COULD CAUSE SENSING SYSTEM TO MALFUNCTION, RESULTING IN ENTRAPMENT, INJURY OR DEATH. REINFORCE HEADER USING 2 x 6 WOOD STUDS AND LAG SCREW OR ANGLE IRON AND LAG SCREWS AS NECESSARY (NOT PROVIDED).

10437

Header Bracket

Bracket Distance Above Floor

(See Chart)

Highest Point

of Travel


Measure

Door

Distance

to Floor


Garage


Floor

HIGH ARC RISE

HIGH ARC RISE


HORIZONTAL LINE

4 INCHES

8 INCHES

4 TO 8 INCHES

13 INCHES

8 TO 12 INCHES

18 INCHES

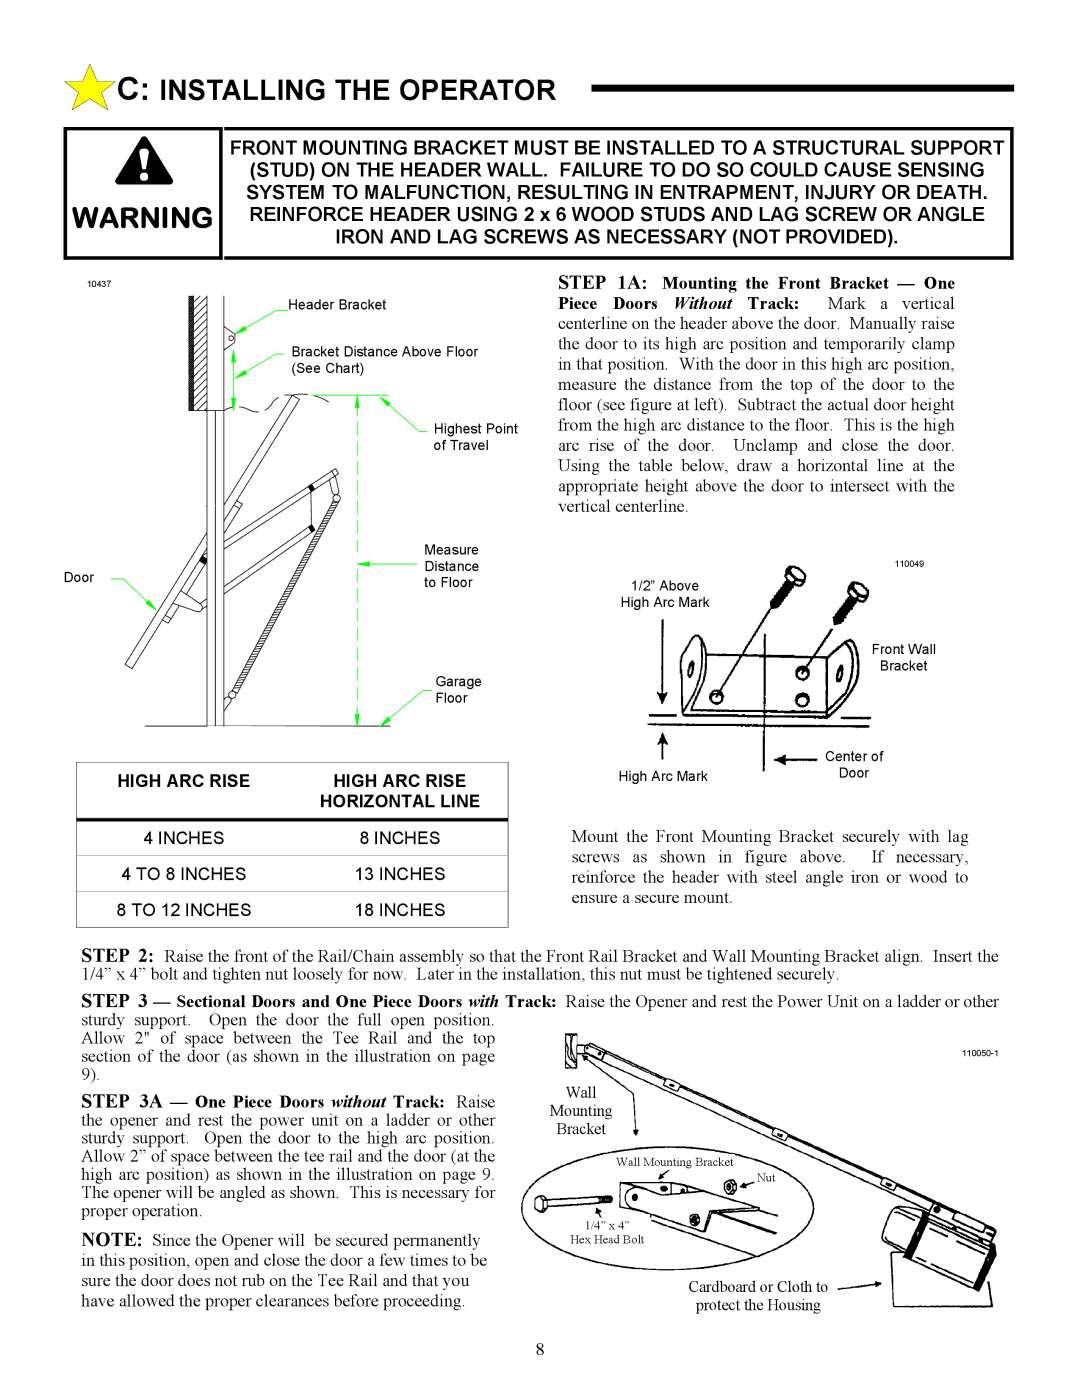
STEP 1A: Mounting the Front Bracket — One

Piece Doors Without Track: Mark a vertical centerline on the header above the door. Manually raise the door to its high arc position and temporarily clamp in that position. With the door in this high arc position, measure the distance from the top of the door to the floor (see figure at left). Subtract the actual door height from the high arc distance to the floor. This is the high arc rise of the door. Unclamp and close the door. Using the table below, draw a horizontal line at the appropriate height above the door to intersect with the vertical centerline.

110049

1/2” Above

High Arc Mark

Front Wall

Bracket


Center of


Door

High Arc Mark


Mount the Front Mounting Bracket securely with lag screws as shown in figure above. If necessary, reinforce the header with steel angle iron or wood to ensure a secure mount.

STEP 2: Raise the front of the Rail/Chain assembly so that the Front Rail Bracket and Wall Mounting Bracket align. Insert the 1/4” x 4” bolt and tighten nut loosely for now. Later in the installation, this nut must be tightened securely.

STEP 3 — Sectional Doors and One Piece Doors with Track: Raise the Opener and rest the Power Unit on a ladder or other sturdy support. Open the door the full open position.

Allow 2" of space between the Tee Rail and the top


section of the door (as shown in the illustration on page


110050-1

9).


STEP 3A — One Piece Doors without Track: Raise

Wall


Mounting


the opener and rest the power unit on a ladder or other


Bracket


sturdy support. Open the door to the high arc position.


Allow 2” of space between the tee rail and the door (at the


Wall Mounting Bracket

high arc position) as shown in the illustration on page 9.


Nut

The opener will be angled as shown. This is necessary for


proper operation.

NOTE: Since the Opener will be secured permanently

1/4” x 4”


Hex Head Bolt


in this position, open and close the door a few times to be


sure the door does not rub on the Tee Rail and that you


Cardboard or Cloth to

have allowed the proper clearances before proceeding.


protect the Housing


8

Page 8
Image 8
Allstar Products Group AC9500, AC9300, ACJ9500 owner manual High ARC Rise Horizontal Line

AC9300, AC9500, ACJ9500 specifications

Allstar Products Group has established a strong reputation in the field of automotive accessories, and their line of ACJ9500, AC9500, and AC9300 models exemplifies this commitment to quality and functionality. These units are designed to cater to a wide range of needs, enhancing vehicle performance and user convenience.

The ACJ9500 is particularly noteworthy for its impressive power output and versatility. It is equipped with a robust motor that delivers efficient performance, making it suitable for various applications, from automotive work to home improvement tasks. One of its standout features is the adjustable speed setting, allowing users to customize the airflow according to their specific needs. This model also includes a durable construction that ensures longevity, even under demanding conditions.

Moving on to the AC9500, this unit is celebrated for its compact design, which does not compromise on power or efficiency. It is lightweight and portable, making it an ideal choice for individuals who require a reliable tool that can be easily transported. The AC9500 is equipped with user-friendly controls that simplify operation, ensuring that even those with minimal experience can quickly get the hang of it. Its noiseless operation is another significant advantage, perfect for environments where quiet is essential.

The AC9300 model rounds out the lineup with its emphasis on energy efficiency. This unit utilizes cutting-edge technology, which minimizes power consumption while maintaining optimal performance. It is specifically designed to reduce energy waste, making it an environmentally friendly option for customers who are conscious of their ecological footprint. The AC9300 also features a unique ventilation system that enhances airflow, promoting better circulation and cooling, which is especially valuable in automotive applications.

In summary, the Allstar Products Group models ACJ9500, AC9500, and AC9300 deliver a combination of power, efficiency, and user-friendly features that cater to diverse needs. Their innovative technologies and durable designs showcase Allstar’s commitment to providing high-quality automotive accessories. Each model stands out for its specific strengths, making them suitable for different tasks and environments. Whether for professional or personal use, these models continue to meet the demands of consumers looking for reliability and performance in automotive tools. The combination of functionality and practicality ensures that Allstar's offerings remain competitive in the market.