ALLOW 2” BETWEEN HIGH ARC
TOP OF
DOOR IN
HIGH ARC
POSITION
ALLOW 2” BETWEEN TOP OF DOOR AND RAIL
ONE PIECE DOORS WITHOUT TRACKS
SECTIONAL DOORS AND ONE- PIECE DOORS WITH TRACKS

C:INSTALLING THE OPERATOR

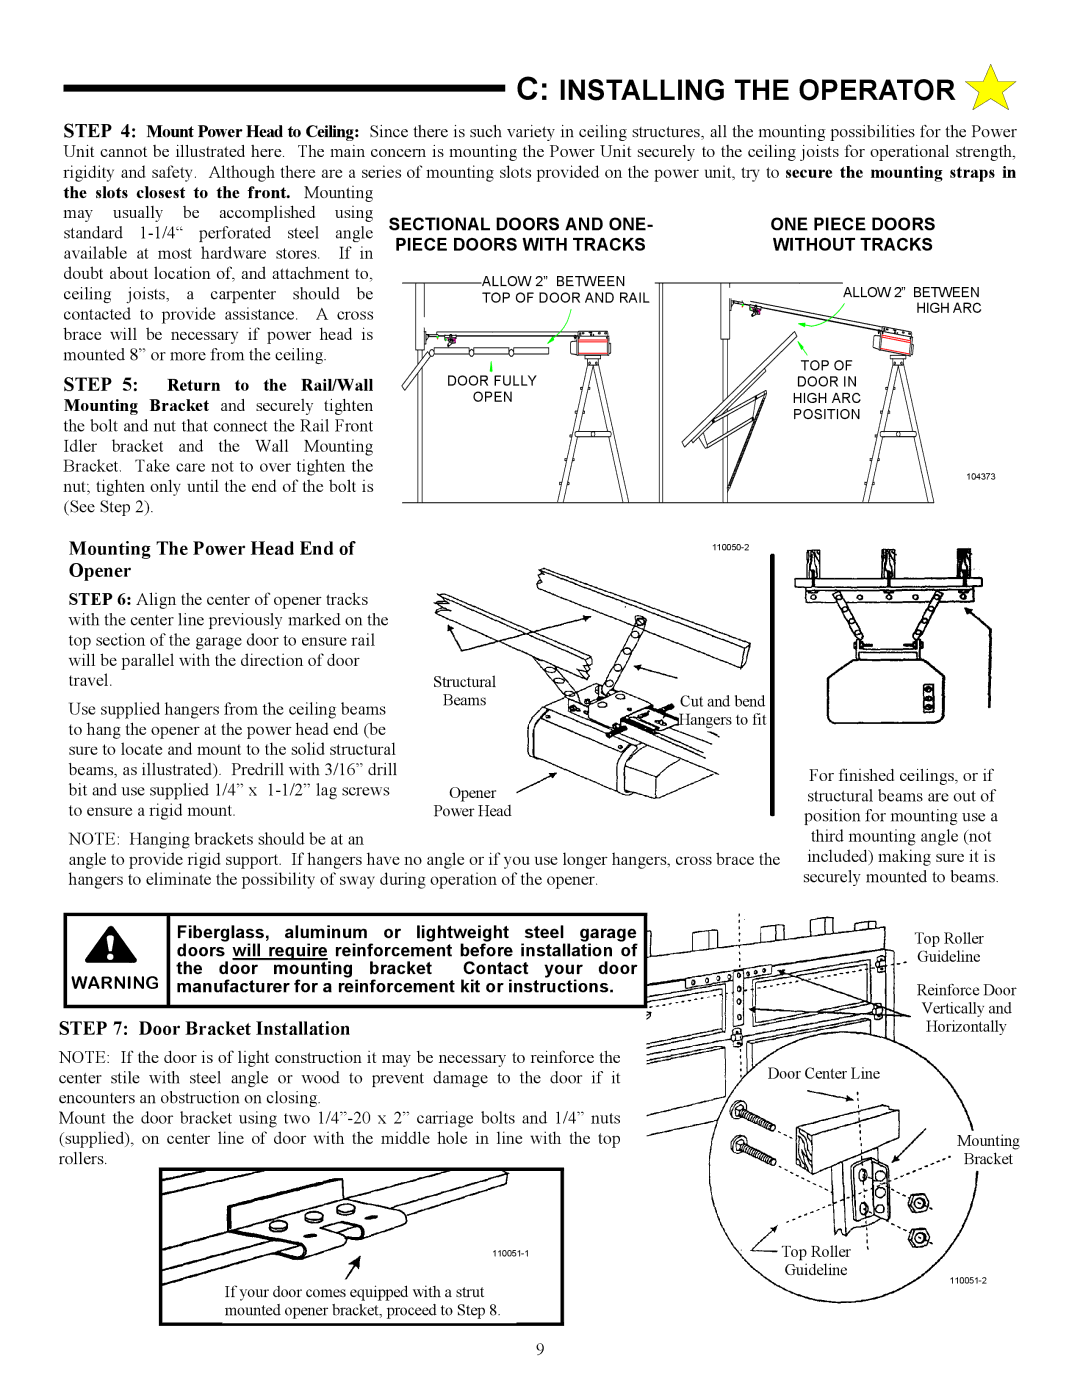
STEP 4: Mount Power Head to Ceiling: Since there is such variety in ceiling structures, all the mounting possibilities for the Power Unit cannot be illustrated here. The main concern is mounting the Power Unit securely to the ceiling joists for operational strength, rigidity and safety. Although there are a series of mounting slots provided on the power unit, try to secure the mounting straps in the slots closest to the front. Mounting

may usually be accomplished using standard 1-1/4“ perforated steel angle available at most hardware stores. If in doubt about location of, and attachment to,

ceiling joists, a carpenter should be contacted to provide assistance. A cross brace will be necessary if power head is

mounted 8” or more from the ceiling.

STEP 5:

Return to the Rail/Wall

DOOR FULLY

Mounting Bracket and securely tighten

OPEN


the bolt and nut that connect the Rail Front


Idler bracket and the Wall Mounting


Bracket. Take care not to over tighten the


nut; tighten only until the end of the bolt is


(See Step 2).


Mounting The Power Head End of


110050-2

Opener


104373

STEP 6: Align the center of opener tracks with the center line previously marked on the top section of the garage door to ensure rail will be parallel with the direction of door travel.

Use supplied hangers from the ceiling beams to hang the opener at the power head end (be sure to locate and mount to the solid structural beams, as illustrated). Predrill with 3/16” drill bit and use supplied 1/4” x 1-1/2” lag screws to ensure a rigid mount.

Structural

Beams

Opener

Power Head

Cut and bend Hangers to fit

For finished ceilings, or if structural beams are out of position for mounting use a

NOTE: Hanging brackets should be at an

angle to provide rigid support. If hangers have no angle or if you use longer hangers, cross brace the hangers to eliminate the possibility of sway during operation of the opener.

third mounting angle (not included) making sure it is securely mounted to beams.


Fiberglass, aluminum or lightweight steel garage


doors will require reinforcement before installation of

WARNING

the door mounting bracket

Contact your door

manufacturer for a reinforcement kit or instructions.

STEP 7: Door Bracket Installation

NOTE: If the door is of light construction it may be necessary to reinforce the center stile with steel angle or wood to prevent damage to the door if it encounters an obstruction on closing.

Mount the door bracket using two 1/4”-20 x 2” carriage bolts and 1/4” nuts (supplied), on center line of door with the middle hole in line with the top rollers.

110051-1

If your door comes equipped with a strut mounted opener bracket, proceed to Step 8.

Top Roller

Guideline

Reinforce Door

Vertically and

Horizontally

Door Center Line

Mounting

Bracket

Top Roller

Guideline

110051-2

9

Page 9
Image 9
Allstar Products Group AC9300, ACJ9500, AC9500 owner manual Step, Return to the Rail/Wall

AC9300, AC9500, ACJ9500 specifications

Allstar Products Group has established a strong reputation in the field of automotive accessories, and their line of ACJ9500, AC9500, and AC9300 models exemplifies this commitment to quality and functionality. These units are designed to cater to a wide range of needs, enhancing vehicle performance and user convenience.

The ACJ9500 is particularly noteworthy for its impressive power output and versatility. It is equipped with a robust motor that delivers efficient performance, making it suitable for various applications, from automotive work to home improvement tasks. One of its standout features is the adjustable speed setting, allowing users to customize the airflow according to their specific needs. This model also includes a durable construction that ensures longevity, even under demanding conditions.

Moving on to the AC9500, this unit is celebrated for its compact design, which does not compromise on power or efficiency. It is lightweight and portable, making it an ideal choice for individuals who require a reliable tool that can be easily transported. The AC9500 is equipped with user-friendly controls that simplify operation, ensuring that even those with minimal experience can quickly get the hang of it. Its noiseless operation is another significant advantage, perfect for environments where quiet is essential.

The AC9300 model rounds out the lineup with its emphasis on energy efficiency. This unit utilizes cutting-edge technology, which minimizes power consumption while maintaining optimal performance. It is specifically designed to reduce energy waste, making it an environmentally friendly option for customers who are conscious of their ecological footprint. The AC9300 also features a unique ventilation system that enhances airflow, promoting better circulation and cooling, which is especially valuable in automotive applications.

In summary, the Allstar Products Group models ACJ9500, AC9500, and AC9300 deliver a combination of power, efficiency, and user-friendly features that cater to diverse needs. Their innovative technologies and durable designs showcase Allstar’s commitment to providing high-quality automotive accessories. Each model stands out for its specific strengths, making them suitable for different tasks and environments. Whether for professional or personal use, these models continue to meet the demands of consumers looking for reliability and performance in automotive tools. The combination of functionality and practicality ensures that Allstar's offerings remain competitive in the market.