installation
cT Express™ checklist
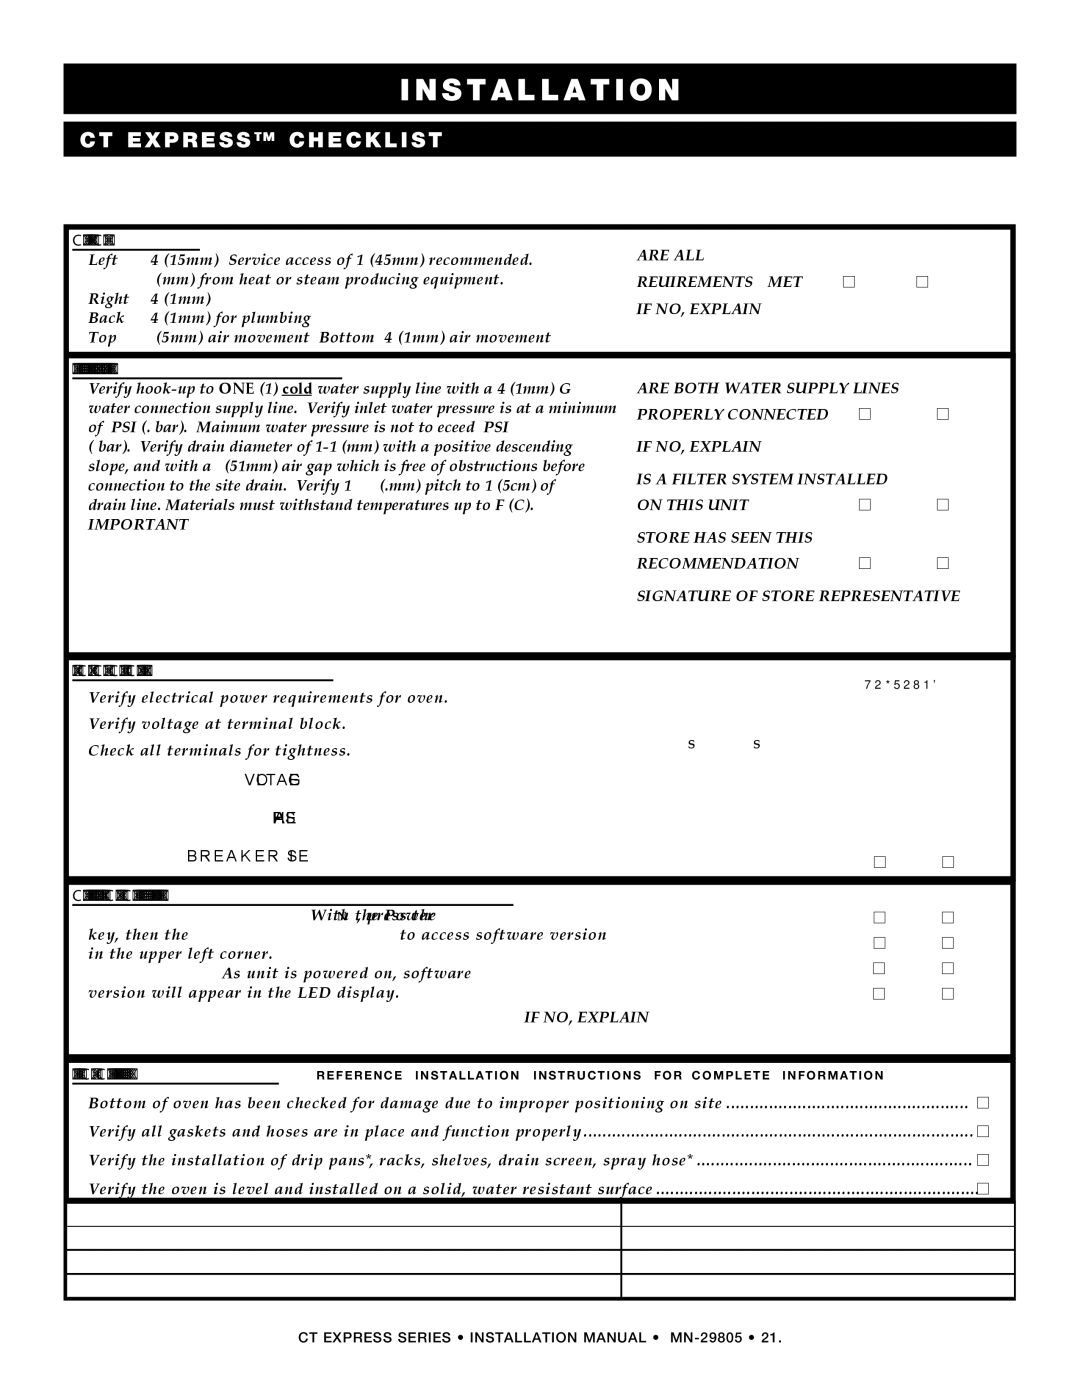
Use this list as a final check of oven installation conformance.
Damage directly attributed to improper set up, installation, or cleaning can invalidate warranty claims.
CLEARANCES: | are all CLEARANCE |
|
| ||
Left: | 4" (152mm) — Service access of 18" (457mm) recommended. |
|
| ||
Right: | 8" (203mm) from heat or steam producing equipment. | requirements met? | YES | NO | |
4" (102mm) | if no, explain:________________________ | ||||
Back: | 4" (102mm) for plumbing | ||||
________________________________________ | |||||
Top: | 20" (508mm) air movement Bottom: 4" (102mm) air movement | ||||
|
|
|
| ||
water supply and drains: | are both water supply lines |
| |||
Verify |
| ||||
water connection supply line. Verify inlet water pressure is at a minimum | properly connected? | YES | NO | ||
of 30 PSI (2.8 bar). Maximum water pressure is not to exceed 90 PSI | |||||
if no, explain:___________________________ | |||||
(6 bar). Verify drain diameter of | |||||
slope, and with a 2" (51mm) air gap which is free of obstructions before | is a filter system installed |
| |||
connection to the site drain. Verify 1/8" (3.2mm) pitch to 10' (305cm) of |
| ||||
drain line. Materials must withstand temperatures up to 200°F (93°C). | on this unit? | YES | NO | ||
important: | store has seen this |
|
| ||
installation manual for this equipment. It is the responsibility of the end |
|
| |||
user to have the water connected to this appliance tested to ensure these | recommendation: | YES | NO | ||
standards are met before putting the oven into use. Failure to meet these | Signature of Store Representative: | ||||
standards will void the warranty if damage to the oven is found to be | |||||
related to water quality. | ___________________________________________ | ||||
|
|
|
|
| |
|
|
|
|
| |
ELECTRICAL CONNECTIONS: | LINE VOLTAGE AT TERMINAL BLOCK (to ground): |
| |
Verify electrical power requirements for oven. |
| ||
LINE 1: _________ LINE 2:_________ LINE 3: _________ | |||
Verify voltage at terminal block. | |||
LINE VOLTAGE (phase to phase): LINE 1 to 2: __________ | |||
Check all terminals for tightness. | |||
LINE 2 to 3: __________ | |||
VOLTAGE: ______________ | |||
PHASE: ______________ | LINE 3 to 1: __________ | ||
ELECTRICAL SUPPLY LINE SIZE: ______________ | |||
br e ake r s i z e : ______________ | |||
ALL ELECTRICAL TERMINALS TIGHT: YES | NO | ||
| |||
control board connections & operation: ExpressTouch: With the Power on, press the Tool Box key, then the Settings Key to access software version in the upper left corner.
Simple Control: As unit is powered on, software version will appear in the LED display.
RB_____________
record SOFTWARE VERSION: DB_____________
ALL BOARD CONNECTIONS TIGHT: | YES | NO |
ALL FUNCTIONS ARE DISPLAYED: | YES | NO |
ALL FUNCTIONS on control OPERATE: | YES | NO |
unit OPERATEs in all modes: | YES | NO |
if no, explain:_________________________________________
PHYSICAL CONDITION: *reference installation instructions for complete information | 4 |
Bottom of oven has been checked for damage due to improper positioning on site |
|
Verify all gaskets and hoses are in place and function properly |
|
Verify the installation of drip pans*, racks, shelves, drain screen, spray hose* |
|
Verify the oven is level and installed on a solid, water resistant surface |
|
service agency:
model no.:
tech signature:
installation name:
serial no.:
customer signature:
CT Express series • INSTALLATION MANUAL •