How to Connect Your Player To A Television
The AD 1118 is ready for use simply by connecting to your TV using the composite or
Good - Composite | Better - |
Yellow |
| Yellow |
|
Red | White | Red | White |
To Tv Video Input | To TV Audio L, R Input | To | To TV Audio L, R Input |
|
|
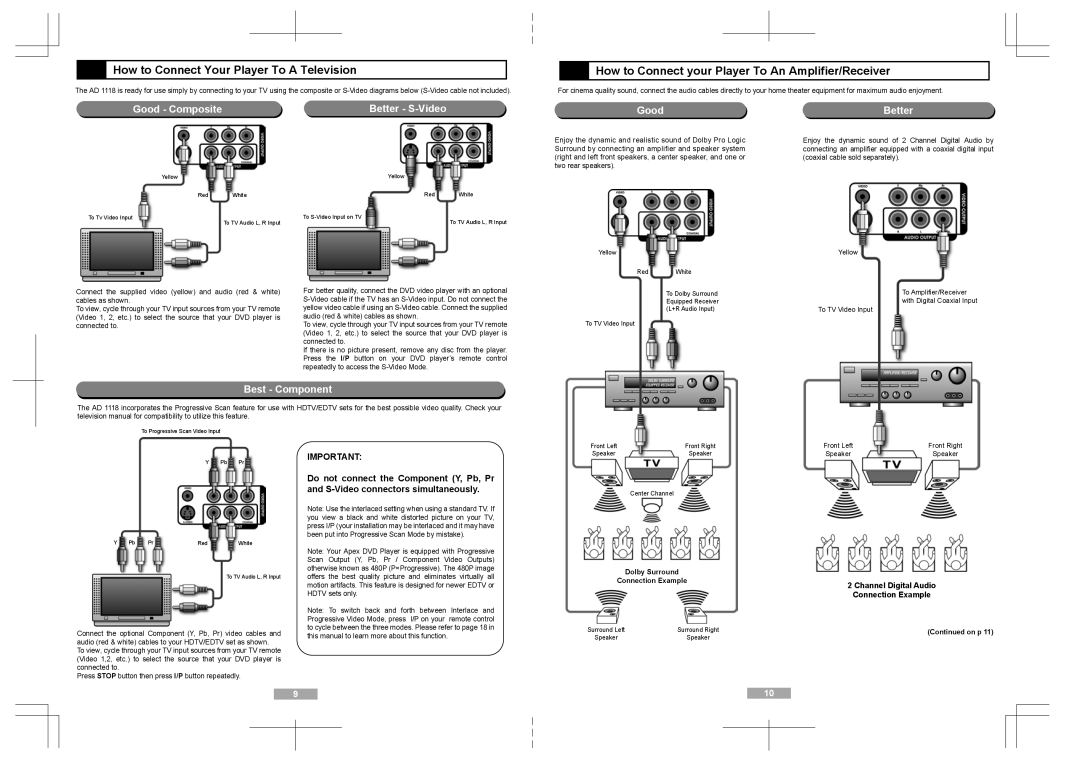
 How to Connect your Player To An Amplifier/Receiver
For cinema quality sound, connect the audio cables directly to your home theater equipment for maximum audio enjoyment.
Good | Better |
Enjoy the dynamic and realistic sound of Dolby Pro Logic | Enjoy the dynamic sound of 2 Channel Digital Audio by |
Surround by connecting an amplifier and speaker system | connecting an amplifier equipped with a coaxial digital input |
(right and left front speakers, a center speaker, and one or | (coaxial cable sold separately). |
two rear speakers). |
|
Connect the supplied video (yellow) and audio (red & white) cables as shown.
To view, cycle through your TV input sources from your TV remote (Video 1, 2, etc.) to select the source that your DVD player is connected to.
For better quality, connect the DVD video player with an optional
To view, cycle through your TV input sources from your TV remote (Video 1, 2, etc.) to select the source that your DVD player is connected to.
If there is no picture present, remove any disc from the player. Press the I/P button on your DVD player’s remote control repeatedly to access the
Yellow |
| Yellow |
Red | White |
|
| To Dolby Surround | To Amplifier/Receiver |
| Equipped Receiver | with Digital Coaxial Input |
| (L+R Audio Input) | To TV Video Input |
To TV Video Input |
|
|
Best - Component
The AD 1118 incorporates the Progressive Scan feature for use with HDTV/EDTV sets for the best possible video quality. Check your television manual for compatibility to utilize this feature.
To Progressive Scan Video Input
Y Pb Pr
Y | Pb | Pr | Red | White |
To TV Audio L, R Input
Connect the optional Component (Y, Pb, Pr) video cables and audio (red & white) cables to your HDTV/EDTV set as shown.
To view, cycle through your TV input sources from your TV remote (Video 1,2, etc.) to select the source that your DVD player is connected to.
Press STOP button then press I/P button repeatedly.
IMPORTANT:
Do not connect the Component (Y, Pb, Pr and
Note: Use the interlaced setting when using a standard TV. If you view a black and white distorted picture on your TV, press I/P (your installation may be interlaced and it may have been put into Progressive Scan Mode by mistake).
Note: Your Apex DVD Player is equipped with Progressive Scan Output (Y, Pb, Pr / Component Video Outputs) otherwise known as 480P (P=Progressive). The 480P image offers the best quality picture and eliminates virtually all motion artifacts. This feature is designed for newer EDTV or HDTV sets only.
Note: To switch back and forth between Interlace and Progressive Video Mode, press I/P on your remote control to cycle between the three modes. Please refer to page 18 in this manual to learn more about this function.
Front Left | Front Right | Front Left | Front Right |
Speaker | Speaker | Speaker | Speaker |
| Center Channel |
|
|
Dolby Surround
Connection Example
2 Channel Digital Audio
Connection Example
Surround Left | Surround Right | (Continued on p 11) |
Speaker | Speaker |
|
9 | 10 | |||
|
|
|
|
|
|
|
|
|
|
|
|
|
|
|