Manuals
/
ASRock
/
Computer Equipment
/
Personal Computer
ASRock
ION 3D Series manual Connecting Center / Subwoofer Speakers Center/LEF Port
Models:
ION 3D Series
1
16
48
48
Download
48 pages
54.91 Kb
13
14
15
16
17
18
19
20
<
>
Specs
Install
CPU Configuration
Connecting USB Devices USB2.0 Ports
Setting up your system
To load optimal default values for all the settings
PCI Latency Timer
RTC Alarm Power On
PowerBackup
Load CPU EZ OC Setting
Page 16
Image 16
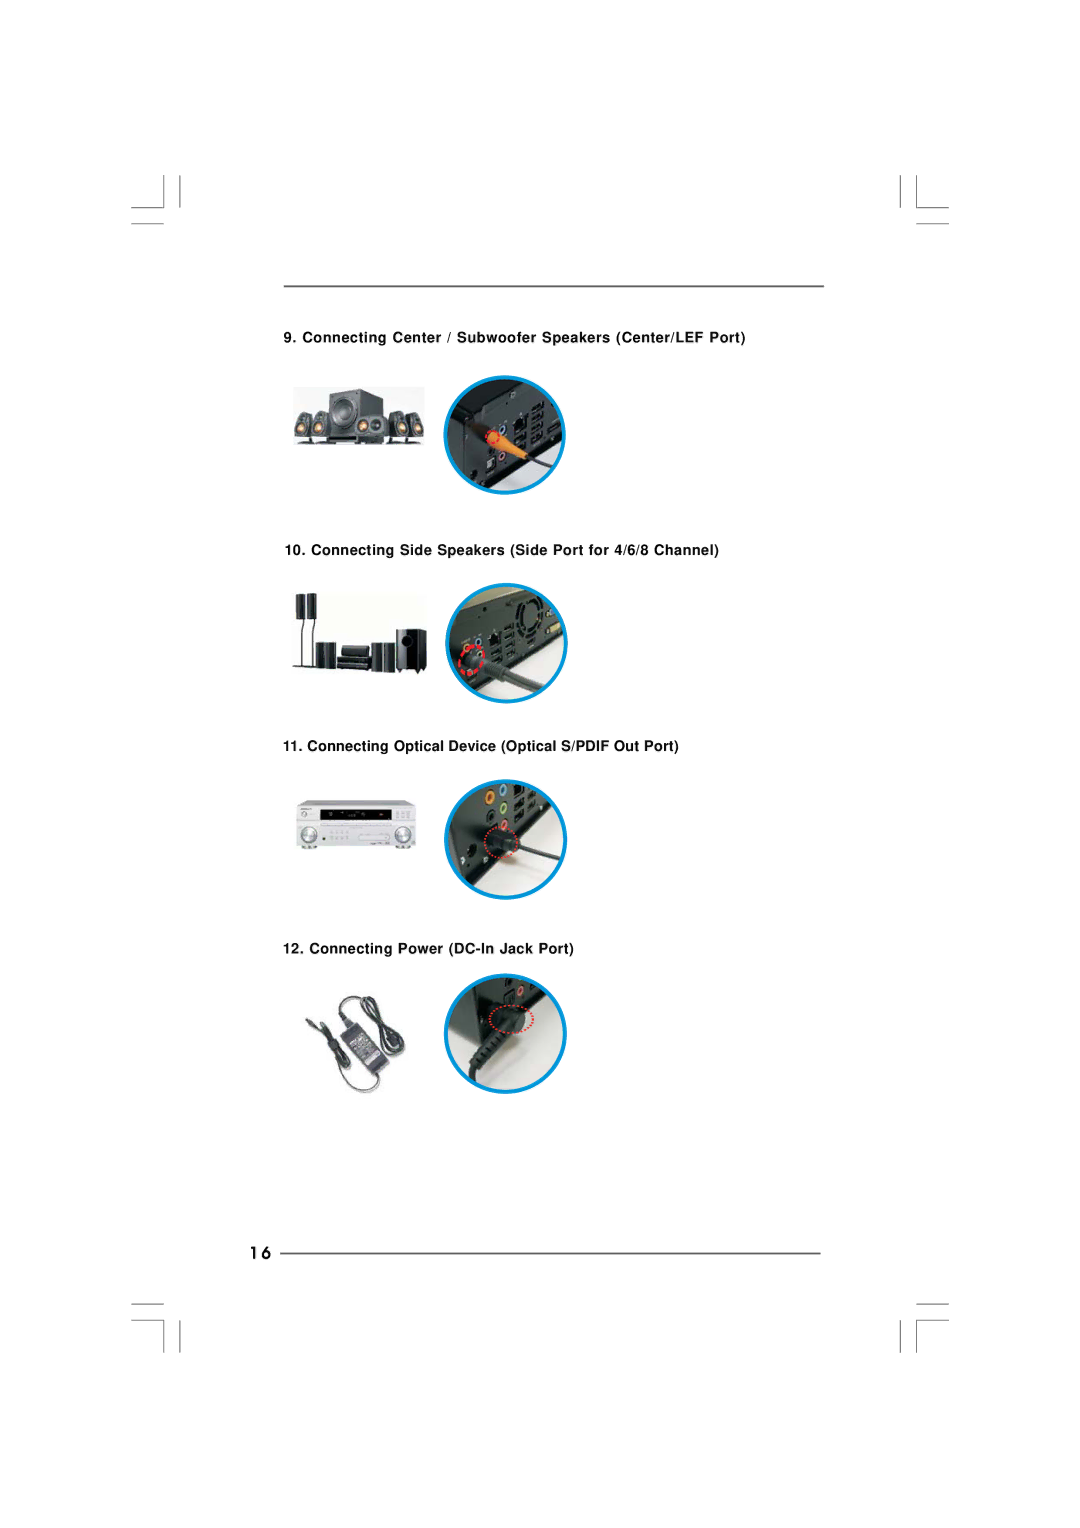
9. Connecting Center / Subwoofer Speakers (Center/LEF Port)
10. Connecting Side Speakers (Side Port for 4/6/8 Channel)
11. Connecting Optical Device (Optical S/PDIF Out Port)
12. Connecting Power
(DC-In
Jack Port)
1 6
Page 15
Page 17
Page 16
Image 16
Page 15
Page 17
Contents
Version Published September
ION 3D Series User Manual
Copyright2010 ASRock INC. All rights reserved
Disclaimer
Copyright Notice
CALIFORNIA, USA ONLY
Safety instructions
Setting up your system
No disassembly
Care during use
Safety cautions and warnings
Optical Drive Safety Information
Installation Notices
Product disposal notice
Contents
2 System Quick Installation
3 Reinstalling System Components
4 Driver Installation
7 Software Support
1.1 Package Contents
Chapter 1 Introduction
1.2 Specifications
WiFi
1T2R 802.11b/g/n wireless LAN
Power
1.3 System Motherboard Components
1. Southbridge heatsink 2. Clear CMOS jumper 3. Fan connector
4. Fan connector 5. Memory socket 6. Infrared module header
9. Mini-PCI Express expansion slot USB interface only For WiFi module
1. SATA and Power Connections
2. Fan Connection
SATA & Power Connections
Fan connector
1.4 Rear Panel Connectinos
Opening the system chassis
1.5 System Chassis
1. Remove the screws on the backside 2. Slide the top panel backwards
1.6 Remote Controller
Chapter 2 System Quick Installation
1. Connecting USB Devices USB2.0 Ports
2. Connecting VGA Monitor Display VGA Port
3. Connecting the Network LAN RJ-45 Port
5. Connecting DVI Device DVI Port 6. Connecting External Audio Device
7. Connecting Stereo Speakers or Headphones Front L/R Out Port
8. Connecting Microphone Mic In Port
Line In Port for 2/4/6 Channel Rear Port for 8 Channel
9. Connecting Center / Subwoofer Speakers Center/LEF Port
10. Connecting Side Speakers Side Port for 4/6/8 Channel
11. Connecting Optical Device Optical S/PDIF Out Port
12. Connecting Power DC-In Jack Port
13. Power on the System Power Switch
14. Connecting Headphone / Microphone / USB3.0 Devices
1. Remove the cover screws on the rear panel
Chapter 3 Reinstalling System Components
4. Pull ODD / HDD rack backwards and take it out from the bay
Page
Chapter 4 Driver Installation
5.1 Instant Boot 5.1.1 Introduction
Chapter 5 Utility Menu
5.1.2 Installation
d. Click “Install” to begin installing Instant Boot driver
e. Click “Finish” to complete and exit the setup
5.2.2 Installation
5.2 ASRock OC Tuner 5.2.1 Introduction
d. Click “Install” to begin installing ASRock OC Tuner driver
e. Click “Finish” to complete and exit the setup
Auto run when Windows starts
Auto apply when program starts
Good Night LED
Overclocking - In the Overclocking section, there is a CPU chapter
PowerDVD
PowerBackup
Power2Go
PowerDirector
MediaShow
5.4 Symantec Norton AntiVirus Software free bundle Trial version
5.5 ASRock AIWI Utility
5.6 The best Apple charge companion - ASRock APP Charger
Fast Charge & Charge Anytime
Chapter 6 BIOS SETUP UTILITY
6.1.1 BIOS Menu Bar
Boot
6.1 Introduction
To load optimal default values for all the settings
To save changes and exit the BIOS SETUP UTILITY
6.1.2 Navigation Keys
6.2 Main Screen
Load CPU EZ OC Setting
Load GPU EZ OC Setting
Turbo Mode
Overclock Mode
DRAM Frequency
DRAM Timing Control
DRAM tCL
DRAM tRCD
Would you like to save current setting user defaults?
DRAM tRRD
DRAM tRTP
CPU Voltage
6.4 Advanced Screen
ASRock Instant Flash
Advanced Settings
BIOS Update Utility
6.4.1 CPU Configuration
Execute-Disable Bit Capability
CPU Thermal Throttling
Hyper Threading Technology
6.4.2 Chipset Configuration
WiFi Radio
Onboard HD Audio
OnBoard Lan
6.4.3 ACPI Configuration
PCI Devices Power On
RTC Alarm Power On
Suspend to RAM
6.4.4 SATA Configuration
6.4.5 PCIPnP Configuration
Configure SATA as
PCI Latency Timer
6.4.6 USB Configuration
USB Keyboard/Remote Power On
USB Mouse Power On
USB 2.0 Support
6.6 Boot Screen
CPU Fan Mode Setting
Chassis Fan Mode Setting
6.5 Hardware Health Event Monitoring Screen
6.6.1 Boot Settings Configuration
Boot From Onboard LAN
Boot Up Num-Lock
Full Screen Logo
6.7 Security Screen
BIOS SETUP UTILITY
Main OC Tweaker Advanced H/W Monitor Boot Security Exit
Security Settings
Load BIOS Defaults
Load Performance Setup Default IDE/SATA
Load Performance Setup AHCI Mode
Load Power Saving Setup Default
7 . 1 Install Operating System
Chapter 7 Software Support
7 . 2 Support CD Information
7.2.1 Running The Support CD