Motherboard
E8041 Revised Edition January
Copyright 2013 ASUSTeK Computer INC. All Rights Reserved
Contents
10.1
Chapter Bios setup
Chapter Software support
10.2
Chapter RAID support
Chapter Multiple GPU support
Appendices
Safety information
Electrical safety
Operation safety
Where to find more information
About this guide
How this guide is organized
Conventions used in this guide
Typography
Bold text
ASMedia Sata 6Gb/s controllers
Sabertooth 990FX/GEN3 R2.0 specifications summary
AMD SB950 Chipset
Realtek ALC892 8-channel high definition audio
ASMedia USB 3.0 controllers
Ultimate Cool Thermal Solution
TUF ENGINE! Digital Power Design
Safe & Stable! Guardian Angel
Manageability
Package contents
Installation tools and components
Special features
Product highlights
Ultimate COOL! Thermal Solution
TUF ENGINE! Power Design
Safe & Stable! Guardian Angel
Other special features
Motherboard overview
Before you proceed
Motherboard layout
Layout contents
Central Processing Unit CPU
Recommended memory configurations
System memory
Memory configurations
DDR3 2200 MHz capability
Chip Timing no
DDR3 2133 MHz capability
DDR3 2000 MHz capability
Brand Support Optional
DDR3 1866 MHz capability
DDR3 1800 MHz capability
DDR3 1600 MHz capability
Brand Socket Support
Asus Sabertooth 990FX/GEN3 R2.0
Dimm
DDR3 1333 MHz capability
Buffalo
Vendors Size Chip Brand Chip no Timing Voltage
Visit the Asus website for the latest QVL
Expansion slots
Slot No. Slot Description
IRQ assignments for this motherboard
Onboard buttons
MemOK! button
DirectKey button
Jumpers
Clear RTC RAM 3-pin Clrtc
Standby Power LED
Onboard LEDs
Post State LEDs
Internal connectors
AMD Serial ATA 6.0 Gb/s connectors 7-pin SATA6G1-6 brown
ASMedia Serial ATA 6.0 Gb/s connectors 7-pin SATA6GE1-2 gray
USB 3.0 connector 20-1 pin USB356
Digital audio connector 4-1 pin Spdifout
USB 2.0 connectors 10-1 pin USB1314, USB1112
MBps connection speed
Serial port connector 10-1 pin COM1
Chapter
Front panel audio connector 10-1 pin Aafp
ATX power connectors 24-pin EATXPWR, 8-pin EATX12V
ATX power button/soft-off button 2-pin Pwrsw
System panel connector 20-8 pin Panel
System power LED 2-pin Pled
Reset button 2-pin Reset
TPM connector 20-1 pin TPM
Direct Connector 2-pin Drct
Motherboard installation
Install the Asus Q-Shield to the chassis rear I/O panel
Building your PC system
Getting started
Chapter
CPU installation
CPU heatsink and fan assembly installation
To install the CPU heatsink and fan assembly
Chapter
Dimm installation
To remove a Dimm
ATX Power connection
Sata device connection
To install USB 2.0 connector
Front I/O Connector
To install Asus Q-Connector
To install USB 3.0 connector
Expansion Card installation
To install PCIe x16 cards To install PCIe x1 cards
Bios update utility
USB Bios Flashback
To use USB Bios Flashback
Motherboard rear and audio connections
Rear I/O connection
Audio 2, 4, 6, or 8-channel configuration
LAN ports LED indications
Audio I/O connections
Chapter
Starting up for the first time
Connect to 7.1 channel Speakers
Turning off the computer
One short beep
VGA detected
Bios setup
Knowing Bios
Entering Bios Setup after Post
Bios setup program
Entering Bios at startup
Bios menu screen
EZ Mode
Uefi Bios
Advanced Mode
Menu bar
Back button
Configuration fields
Menu items
Submenu items
Main menu
Security
To set an administrator password
Administrator Password
User Password
To change an administrator password
To change a user password
Scroll down to display other Bios items
Ai Tweaker menu
AMD Turbo Core technology Auto
Ai Overclock Tuner Auto
CPU Ratio Auto
Memory Frequency Auto
CPU Spread Spectrum Auto
EPU Power Saving Mode Disabled
OC Tuner Cancel
PCIe Spread Spectrum Auto
Dram Write Recovery Time Auto
Dram RAS# to RAS# Delay Auto
Dram Write to Read Delay Auto
Dram Read to Write Delay Auto
Dram Driving Control
CPU/NB Load Line Calibration Auto
DIGI+ Power Control CPU Load-Line Calibration Auto
CPU Power Phase Control Standard
CPU Current Capability Auto
CPU/NB Power Response Control Auto
CPU Power Duty Control T.Probe
CPU Power Response Control Auto
CPU Voltage Frequency Auto
CPU & NB Voltage Offset Mode
CPU Power Thermal Control
Dram Power Phase Control Optimized
Offset Mode Sign +
Dram Voltage Auto
Asus Enhancement Mode
CPU Vdda Voltage Auto
NB Voltage Auto
CPU Configuration
Advanced menu
SVM Enabled
Cool‘n’Quiet Disabled
C1E Disabled
Core C6 State Enabled
North Bridge Configuration
Iommu Disabled
Memory Configuration
Initiate Graphic Adapter PEG/PCI
Asus Graphic Card Optimization Auto
South Bridge Configuration
Sata Configuration
Hpet Enabled
SB Sata Configuration
OnChip Sata Channel Enabled
Legacy USB3.0 Support Enabled
USB Configuration
Legacy USB Support Enabled
Ehci Hand-off Disabled
Scroll down to view the other Bios items
Onboard Devices Configuration
3rd Core 4th Core Enabled
CPU Core On/Off Function
ASmedia USB 3.0 Controller USB312/USB334/Front Enabled
ASM1061 Storage Controller Rear Enabled
ASM1061 Storage Controller Front Enabled
ASmedia USB 3.0 Battery Charging Support Disabled
Restore AC Power Loss Power Off
SB HD Azalia Configuration
ErP Ready Disabled
HD Audio Azalia Device Enabled
Power On By RTC Disabled
Power On By PME Device Disabled
Power On By Ring Disabled
Network Stack Disabled
CPU Temperature / MB Temperature xxxºC/xxxºF
CPU Q-Fan Control Enabled
Monitor menu
CPU Fan Profile Standard
Chassis Q-Fan Control 1-3 Disabled
CPU Fan Speed Low Limit 600 RPM
Chassis Fan Speed Low Limit 1/4 600 RPM
Depending on the chassis temperature
Displays the lower limit of the chassis temperature
Chassis Fan 1/4 Profile Standard
Boot menu
Fast Boot Enabled
USB Support Partial Initialization
DirectKey Go to Bios
Full Screen Logo Enabled
CSM Compatibility Support Module
Driver add-on devices or the Windows Uefi mode
Security Boot
On devices
Secure Boot Mode Standard
Secure Boot
OS Type Windows Uefi mode
Manage the Secure Boot Keys PK, KEK, db, dbx
PK Management
KEK Management
Db Management
Dbx Management
Allows you to store the dbx to a USB storage device
Tools menu
Asus EZ Flash 2 Utility
Asus SPD Information
Allows you to view the Dram SPD information
Asus O.C. Profile
Save to Profile
Load from Profile
Exit menu
Updating Bios
Asus Update
To update the Bios through the Internet
Launching Asus Update
Updating the Bios through the Internet
Automatically backup my current Bios
From the Asus Update screen, select
Updating the Bios through a Bios file
To update the Bios through a Bios file
Update Bios from file, and then click Next
To update the Bios using EZ Flash
Asus EZ Flash
Asus Bios Updater
Before updating Bios
To update the Bios file using Bios Updater
Booting the system in DOS environment
Updating the Bios file
At the FreeDOS prompt, type bupdater /pc /g and press Enter
Bios Updater screen appears as below
Flash Type MX1C 25L1065A
Chapter
Installing an operating system
Support DVD information
Running the support DVD
Obtaining the software manuals
Software information
Installing AI Suite
Using AI Suite
AI Suite
Using the Thermal Radar main screen
Asus TUF Thermal Radar
Launching Thermal Radar
Configuring system fan settings
Loading the preset fan profiles
Configuring user-customizable fan settings
Click Apply
Configuring Chassis Fan 4 settings
Using Remote GO
Remote GO
Remote GO! functions
Wi-Fi GO! Remote
Launching Wi-Fi GO! Remote
Wi-Fi GO! Remote menu
Using the Dlna Media Hub
Dlna Media Hub
From the main screen, click Dlna Media Hub
Tick Library
Tick Playlist
Save
Click OK To edit the video playlist
Click OK To edit the image playlist
Remote Desktop
Using the Dlna Media Hub via Wi-Fi GO! Remote
Using the Remote Desktop
Tap Dlna Media Hub
Using the Remote Desktop via Wi-Fi GO! Remote
Using File Transfer
Using File Transfer via Wi-Fi GO! Remote
File Transfer
Securing your computer for Wi-Fi GO! Remote functions
TurboV EVO
TurboV
Using the Advanced Mode
Allows you to manually adjust the CPU ratio
CPU Ratio
DIGI+ Power Control
CPU Power
CPU Power Duty Control
CPU Power Response Control
CPU Power Thermal Control
10 CPU/NB Power Response Control
Dram Current Capability
Dram Power
Dram Power Phase Control
Dram Voltage Frequency
Using Sensor Recorder
Sensor Recorder
Launching Sensor Recorder
Using History Record
Ai Charger+
Launching USB 3.0 Boost
Configuring USB 3.0 Boost
USB 3.0 Boost
Connect a USB 3.0 device to the USB 3.0 port
USB Bios Flashback Wizard
Scheduling the latest Bios download
Downloading the updated Bios
Download
To use EZ Start
Using EZ Start
Network iControl
Select a profile and click Apply
Using Quick Connection
Configuring the PPPoE connection settings
To configure the PPPoE settings
Chapter
Configuring the Quick Connection
Click Apply to enable the PPPoE automatic network connection
Using EZ Profile
To use the EZ Profile
Using Asus Update
Select any of these options to update the Bios
Save Bios to file
Using MyLogo
MyLogo2
Audio configurations
Realtek HD Audio Manager for Windows XP
Realtek HD Audio Manager for Windows
Chapter
RAID definitions
RAID configurations
Three new drives for this setup
Same size or larger than the existing drive
Installing Serial ATA hard disks
Setting the RAID item in Bios
To install the Sata hard disks for a RAID configuration
AMD Option ROM Utility
To enter the AMD Option ROM utility
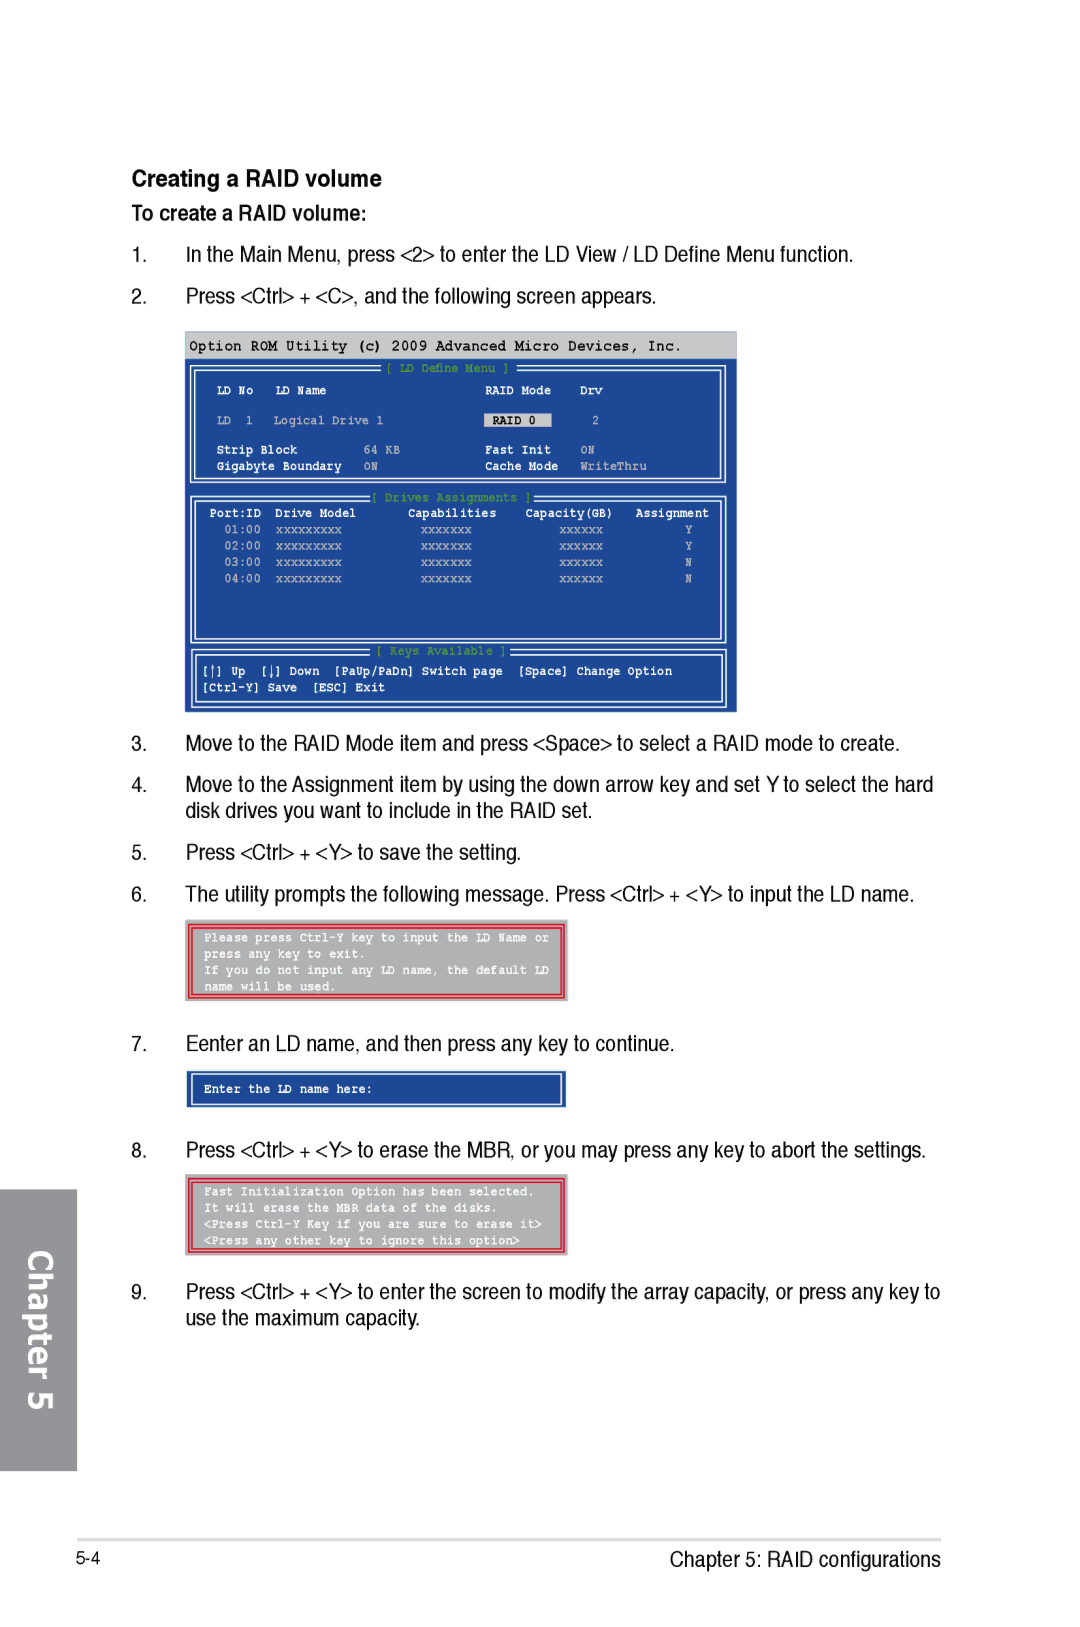
Creating a RAID volume
To create a RAID volume
Eenter an LD name, and then press any key to continue
Press Ctrl + Y to delete the RAID volume
Deleting a RAID configuration
To delete a RAID volume
Utility prompts the following messages
Displaying a RAID set information
To display a RAID set information
Creating a RAID driver disk in Windows
Creating a RAID driver disk
Creating a RAID driver disk without entering the OS
To create a RAID driver disk without entering the OS
Installing the RAID driver during Windows OS installation
To install the RAID driver in Windows XP
To install the RAID driver for Windows 7 or later OS
Using a USB floppy disk drive
Use Notepad to open the file
Save and exit the file
Requirements
To uninstall existing graphics card drivers
AMD CrossFireX technology
Before you begin
Installing two CrossFireX graphics cards
Prepare two CrossFireX-ready graphics cards
Ensure that the cards are properly seated on the slots
Connect a VGA or a DVI cable to the graphics card
Launching the AMD Catalyst Control Center
Installing the device drivers
Enabling the AMD CrossFireX technology
To launch the AMD Catalyst Control Center
Select Enable CrossFireXTM
Enabling Dual CrossFireX technology
Installing two SLI-ready graphics cards
Nvidia SLI technology
SLI bridge Goldfingers
Enabling the Nvidia SLI technology
Launching the Nvidia Control Panel
Enabling SLI settings
B3. The Nvidia Control Panel window appears
Chapter
Appendices
Federal Communications Commission Statement
IC Canadian Compliance Statement
Canadian Department of Communications Statement
Asus Recycling/Takeback Services
Reach
Asus Computer International America
Asus contact information
ASUSTeK Computer INC
Asus Computer GmbH Germany and Austria
EC Declaration of Conformity
Appendices