Setup Menu
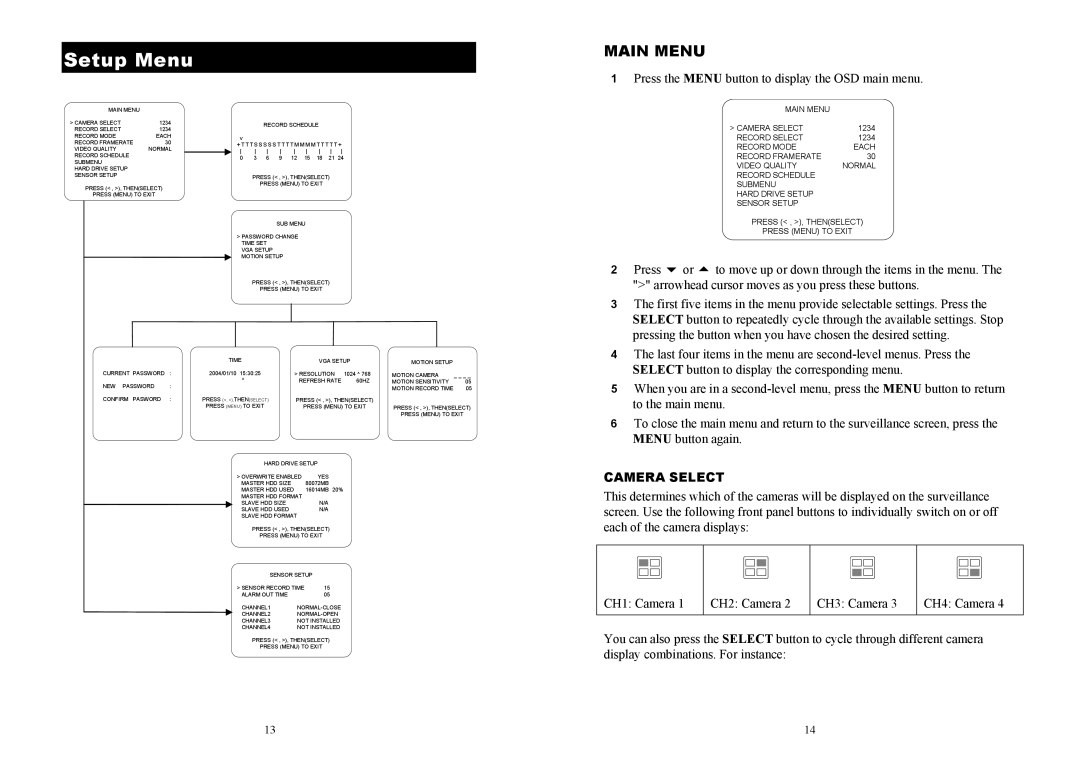
MAIN MENU |
|
|
|
|
|
|
|
|
|
| |
> CAMERA SELECT | 1234 |
|
| RECORD SCHEDULE |
|
| |||||
RECORD SELECT | 1234 |
|
|
|
| ||||||
|
|
|
|
|
|
|
|
| |||
RECORD MODE | EACH | v |
|
|
|
|
|
|
|
| |
RECORD FRAMERATE | 30 |
|
|
|
|
|
|
|
| ||
+ T T T S S S S S T T T T M M M M T T T T T + | |||||||||||
VIDEO QUALITY | NORMAL | ||||||||||
RECORD SCHEDULE |
| ||||||||||
| 0 | 3 | 6 | 9 | 12 | 15 | 18 | 21 | 24 | ||
SUBMENU |
| ||||||||||
|
|
|
|
|
|
|
|
|
| ||
HARD DRIVE SETUP |
|
SENSOR SETUP | PRESS (< , >), THEN(SELECT) |
PRESS (< , >), THEN(SELECT) | PRESS (MENU) TO EXIT |
| |
PRESS (MENU) TO EXIT |
|
SUB MENU
>PASSWORD CHANGE TIME SET
VGA SETUP
MOTION SETUP
PRESS (< , >), THEN(SELECT)
PRESS (MENU) TO EXIT
|
| TIME |
| VGA SETUP | MOTION SETUP |
| |
CURRENT PASSWORD | : | 2004/01/10 15:30:25 | > RESOLUTION | 1024 ^ 768 | MOTION CAMERA | _ _ _ _ | |
NEW PASSWORD | : | ^ | REFRESH RATE | 60HZ | MOTION SENSITIVITY | 05 | |
|
|
|
| MOTION RECORD TIME | 05 | ||
|
|
|
|
|
| ||
CONFIRM PASWORD | : | PRESS (<, >),THEN(SELECT) | PRESS (< , >), THEN(SELECT) |
|
| ||
|
| PRESS (MENU) TO EXIT | PRESS (MENU) TO EXIT | PRESS (< , >), THEN(SELECT) | |||
|
|
|
|
|
| PRESS (MENU) TO EXIT | |
|
| HARD DRIVE SETUP |
|
|
| ||
|
| > OVERWRITE ENABLED | YES |
|
|
| |
|
| MASTER HDD SIZE |
| 80072MB |
|
|
|
|
| MASTER HDD USED |
| 16014MB 20% |
|
|
|
|
| MASTER HDD FORMAT |
|
|
|
| |
|
| SLAVE HDD SIZE |
| N/A |
|
|
|
|
| SLAVE HDD USED |
| N/A |
|
|
|
|
| SLAVE HDD FORMAT |
|
|
|
| |
|
| PRESS (< , >), THEN(SELECT) |
|
|
| ||
|
| PRESS (MENU) TO EXIT |
|
|
| ||
|
| SENSOR SETUP |
|
|
| ||
|
| > SENSOR RECORD TIME | 15 |
|
|
| |
|
| ALARM OUT TIME |
| 05 |
|
|
|
|
| CHANNEL1 |
|
|
| ||
|
| CHANNEL2 |
|
|
| ||
|
| CHANNEL3 | NOT INSTALLED |
|
|
| |
|
| CHANNEL4 | NOT INSTALLED |
|
|
| |
PRESS (< , >), THEN(SELECT)
PRESS (MENU) TO EXIT
13
MAIN MENU
1Press the MENU button to display the OSD main menu.
MAIN MENU |
|
> CAMERA SELECT | 1234 |
RECORD SELECT | 1234 |
RECORD MODE | EACH |
RECORD FRAMERATE | 30 |
VIDEO QUALITY | NORMAL |
RECORD SCHEDULE |
|
SUBMENU |
|
HARD DRIVE SETUP
SENSOR SETUP
|
| PRESS (< , >), THEN(SELECT) |
|
| PRESS (MENU) TO EXIT |
2 Press | or | to move up or down through the items in the menu. The |
">" arrowhead cursor moves as you press these buttons.
3The first five items in the menu provide selectable settings. Press the SELECT button to repeatedly cycle through the available settings. Stop pressing the button when you have chosen the desired setting.
4The last four items in the menu are
5When you are in a
6To close the main menu and return to the surveillance screen, press the MENU button again.
CAMERA SELECT
This determines which of the cameras will be displayed on the surveillance screen. Use the following front panel buttons to individually switch on or off each of the camera displays:
|
|
|
|
|
|
|
|
|
|
|
|
|
|
|
|
|
|
|
|
|
|
|
|
|
|
|
|
|
|
|
|
|
|
|
|
|
|
|
|
|
|
|
|
|
|
|
|
CH1: Camera 1 | CH2: Camera 2 | CH3: Camera 3 | CH4: Camera 4 | ||||||||
|
|
|
|
|
|
|
|
|
|
|
|
You can also press the SELECT button to cycle through different camera display combinations. For instance:
14