AXIS 209FD/FD-R/FD-R M12 35
Symptoms, Possible Causes and Remedial Actions
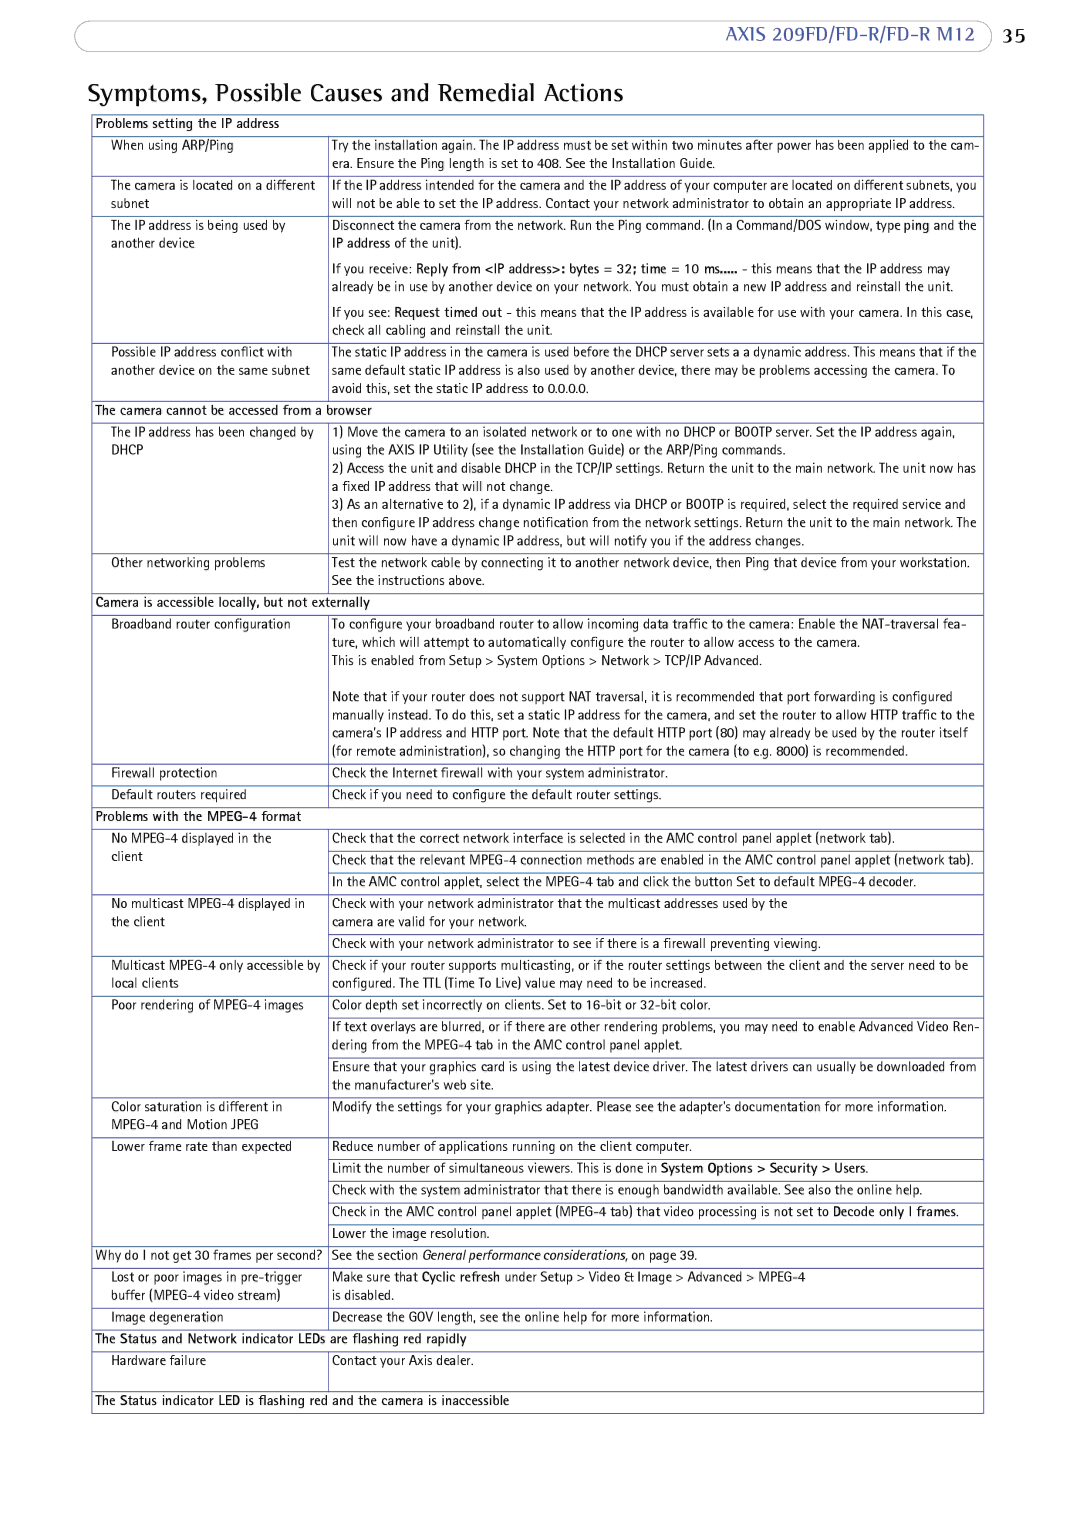
Problems setting the IP address |
|
|
|
When using ARP/Ping | Try the installation again. The IP address must be set within two minutes after power has been applied to the cam- |
| era. Ensure the Ping length is set to 408. See the Installation Guide. |
|
|
The camera is located on a different | If the IP address intended for the camera and the IP address of your computer are located on different subnets, you |
subnet | will not be able to set the IP address. Contact your network administrator to obtain an appropriate IP address. |
|
|
The IP address is being used by | Disconnect the camera from the network. Run the Ping command. (In a Command/DOS window, type ping and the |
another device | IP address of the unit). |
| If you receive: Reply from <IP address>: bytes = 32; time = 10 ms..... - this means that the IP address may |
| already be in use by another device on your network. You must obtain a new IP address and reinstall the unit. |
| If you see: Request timed out - this means that the IP address is available for use with your camera. In this case, |
| check all cabling and reinstall the unit. |
|
|
Possible IP address conflict with | The static IP address in the camera is used before the DHCP server sets a a dynamic address. This means that if the |
another device on the same subnet | same default static IP address is also used by another device, there may be problems accessing the camera. To |
| avoid this, set the static IP address to 0.0.0.0. |
|
|
The camera cannot be accessed from a | browser |
|
|
The IP address has been changed by | 1) Move the camera to an isolated network or to one with no DHCP or BOOTP server. Set the IP address again, |
DHCP | using the AXIS IP Utility (see the Installation Guide) or the ARP/Ping commands. |
| 2) Access the unit and disable DHCP in the TCP/IP settings. Return the unit to the main network. The unit now has |
| a fixed IP address that will not change. |
| 3) As an alternative to 2), if a dynamic IP address via DHCP or BOOTP is required, select the required service and |
| then configure IP address change notification from the network settings. Return the unit to the main network. The |
| unit will now have a dynamic IP address, but will notify you if the address changes. |
|
|
Other networking problems | Test the network cable by connecting it to another network device, then Ping that device from your workstation. |
| See the instructions above. |
|
|
Camera is accessible locally, but not externally | |
|
|
Broadband router configuration | To configure your broadband router to allow incoming data traffic to the camera: Enable the |
| ture, which will attempt to automatically configure the router to allow access to the camera. |
| This is enabled from Setup > System Options > Network > TCP/IP Advanced. |
| Note that if your router does not support NAT traversal, it is recommended that port forwarding is configured |
| manually instead. To do this, set a static IP address for the camera, and set the router to allow HTTP traffic to the |
| camera’s IP address and HTTP port. Note that the default HTTP port (80) may already be used by the router itself |
| (for remote administration), so changing the HTTP port for the camera (to e.g. 8000) is recommended. |
|
|
Firewall protection | Check the Internet firewall with your system administrator. |
|
|
Default routers required | Check if you need to configure the default router settings. |
|
|
Problems with the |
|
|
|
No | Check that the correct network interface is selected in the AMC control panel applet (network tab). |
client |
|
Check that the relevant | |
|
|
| In the AMC control applet, select the |
|
|
No multicast | Check with your network administrator that the multicast addresses used by the |
the client | camera are valid for your network. |
|
|
| Check with your network administrator to see if there is a firewall preventing viewing. |
|
|
Multicast | Check if your router supports multicasting, or if the router settings between the client and the server need to be |
local clients | configured. The TTL (Time To Live) value may need to be increased. |
|
|
Poor rendering of | Color depth set incorrectly on clients. Set to |
|
|
| If text overlays are blurred, or if there are other rendering problems, you may need to enable Advanced Video Ren- |
| dering from the |
|
|
| Ensure that your graphics card is using the latest device driver. The latest drivers can usually be downloaded from |
| the manufacturer's web site. |
|
|
Color saturation is different in | Modify the settings for your graphics adapter. Please see the adapter's documentation for more information. |
| |
|
|
Lower frame rate than expected | Reduce number of applications running on the client computer. |
|
|
| Limit the number of simultaneous viewers. This is done in System Options > Security > Users. |
|
|
| Check with the system administrator that there is enough bandwidth available. See also the online help. |
|
|
| Check in the AMC control panel applet |
|
|
| Lower the image resolution. |
|
|
Why do I not get 30 frames per second? | See the section General performance considerations, on page 39. |
|
|
Lost or poor images in | Make sure that Cyclic refresh under Setup > Video & Image > Advanced > |
buffer | is disabled. |
|
|
Image degeneration | Decrease the GOV length, see the online help for more information. |
|
|
The Status and Network indicator LEDs | are flashing red rapidly |
|
|
Hardware failure | Contact your Axis dealer. |
|
|
The Status indicator LED is flashing red | and the camera is inaccessible |
|
|