+Press and keep the keys FILTER SELECT and STORE before powering up the FEEDBACK DESTROYER PRO. Then switch on the FEEDBACK DESTROYER PRO and keep the two keys pressed for about one second. The program numbers are counted up and reset to their original default settings.
16Use the POWER switch to switch the FEEDBACK DESTROYER PRO on or off.
1.4.2 Rear panel
E
17
18
19
20
21
22
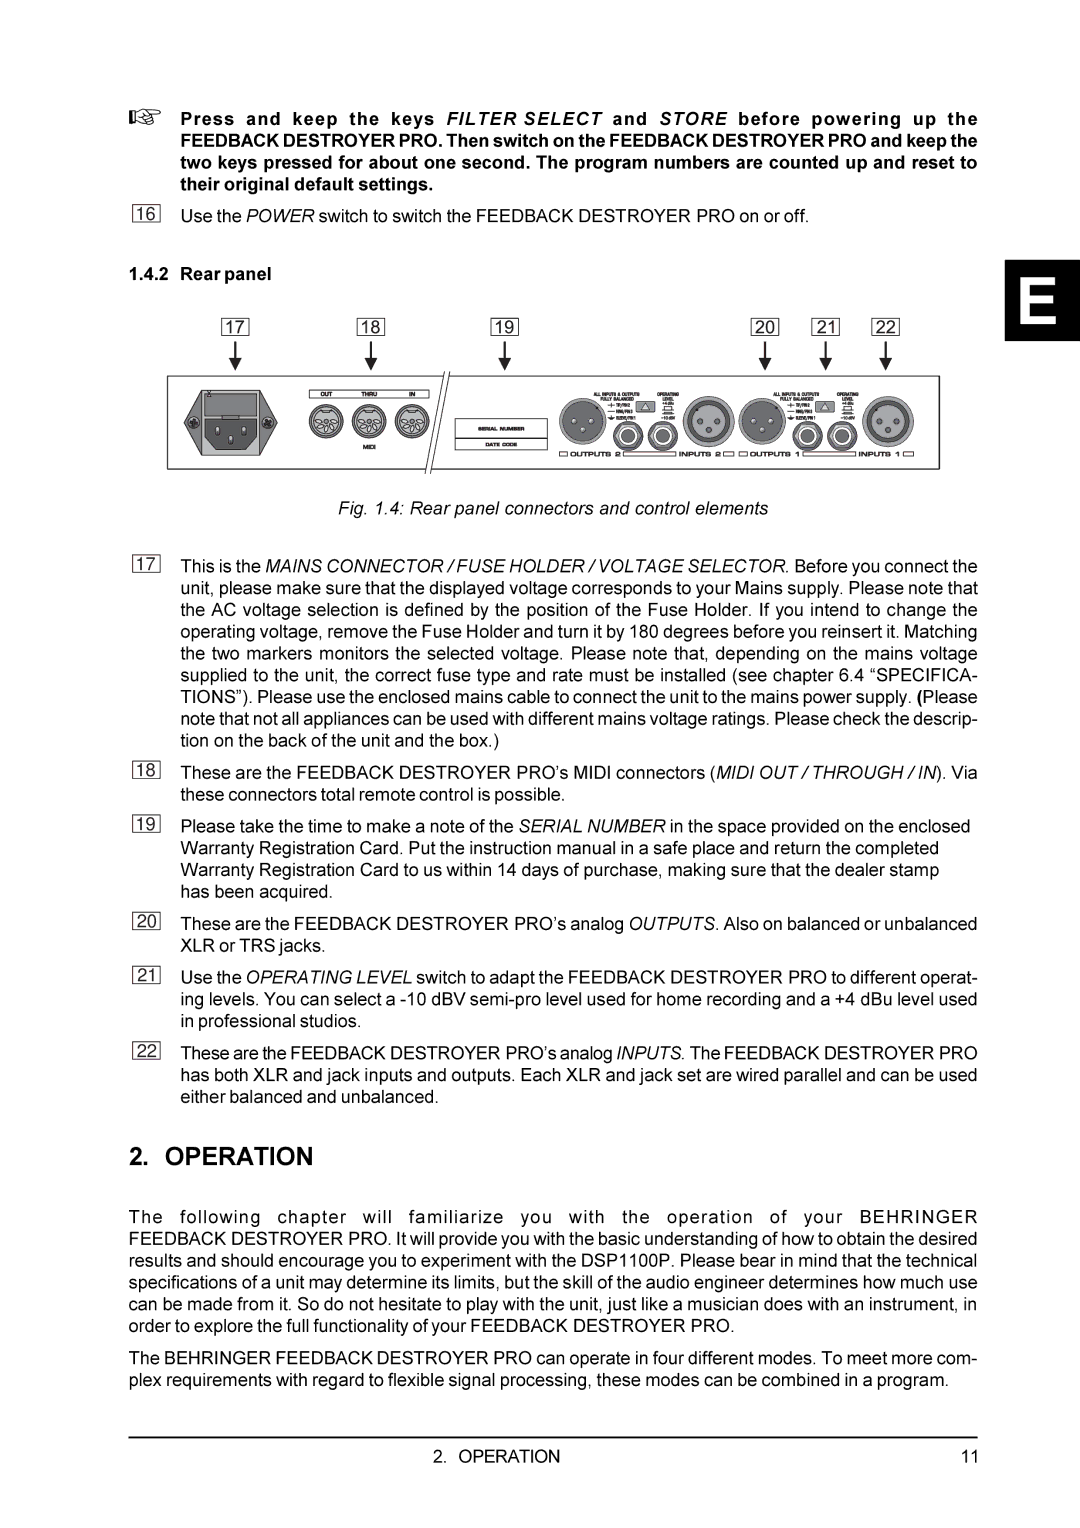
Fig. 1.4: Rear panel connectors and control elements
This is the MAINS CONNECTOR / FUSE HOLDER / VOLTAGE SELECTOR. Before you connect the unit, please make sure that the displayed voltage corresponds to your Mains supply. Please note that the AC voltage selection is defined by the position of the Fuse Holder. If you intend to change the operating voltage, remove the Fuse Holder and turn it by 180 degrees before you reinsert it. Matching the two markers monitors the selected voltage. Please note that, depending on the mains voltage supplied to the unit, the correct fuse type and rate must be installed (see chapter 6.4 “SPECIFICA- TIONS”). Please use the enclosed mains cable to connect the unit to the mains power supply. (Please note that not all appliances can be used with different mains voltage ratings. Please check the descrip- tion on the back of the unit and the box.)
These are the FEEDBACK DESTROYER PRO’s MIDI connectors (MIDI OUT / THROUGH / IN). Via these connectors total remote control is possible.
Please take the time to make a note of the SERIAL NUMBER in the space provided on the enclosed Warranty Registration Card. Put the instruction manual in a safe place and return the completed Warranty Registration Card to us within 14 days of purchase, making sure that the dealer stamp has been acquired.
These are the FEEDBACK DESTROYER PRO’s analog OUTPUTS. Also on balanced or unbalanced XLR or TRS jacks.
Use the OPERATING LEVEL switch to adapt the FEEDBACK DESTROYER PRO to different operat- ing levels. You can select a
These are the FEEDBACK DESTROYER PRO’s analog INPUTS. The FEEDBACK DESTROYER PRO has both XLR and jack inputs and outputs. Each XLR and jack set are wired parallel and can be used either balanced and unbalanced.
2. OPERATION
The following chapter will familiarize you with the operation of your BEHRINGER FEEDBACK DESTROYER PRO. It will provide you with the basic understanding of how to obtain the desired results and should encourage you to experiment with the DSP1100P. Please bear in mind that the technical specifications of a unit may determine its limits, but the skill of the audio engineer determines how much use can be made from it. So do not hesitate to play with the unit, just like a musician does with an instrument, in order to explore the full functionality of your FEEDBACK DESTROYER PRO.
The BEHRINGER FEEDBACK DESTROYER PRO can operate in four different modes. To meet more com- plex requirements with regard to flexible signal processing, these modes can be combined in a program.
2. OPERATION | 11 |
