How To Use

NOTE: The rubberized grip is free of natural rubber and latex. It is safe for use by individuals allergic or sensitive to these materials.

CHARGING PROCEDURES

IMPORTANT: Before first use, place the unit in the Charging Base so that the Tab on the Handle fits into the notch on the Base ( ). Push all the way down to assure proper charging. Leave it plugged in for 24 hours for best operating capability.

1.Plug the Charging Base into a standard outlet. While charging, it is normal for the Charging Base to feel warm.

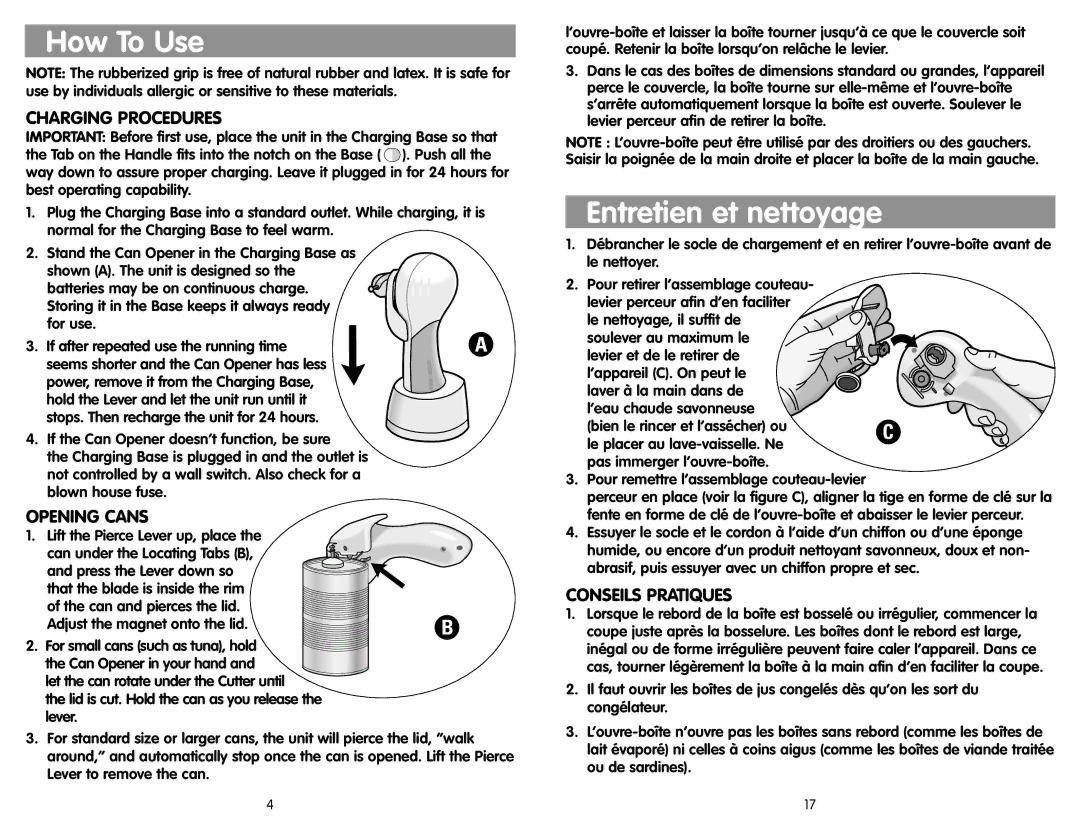
2.Stand the Can Opener in the Charging Base as

shown (A). The unit is designed so the batteries may be on continuous charge. Storing it in the Base keeps it always ready for use.

3. If after repeated use the running time

A

seems shorter and the Can Opener has less


power, remove it from the Charging Base,


hold the Lever and let the unit run until it


stops. Then recharge the unit for 24 hours.


4.If the Can Opener doesn’t function, be sure

the Charging Base is plugged in and the outlet is not controlled by a wall switch. Also check for a blown house fuse.

OPENING CANS

1. Lift the Pierce Lever up, place the


can under the Locating Tabs (B),


and press the Lever down so


that the blade is inside the rim


of the can and pierces the lid.

B

Adjust the magnet onto the lid.

2.For small cans (such as tuna), hold the Can Opener in your hand and

let the can rotate under the Cutter until

the lid is cut. Hold the can as you release the lever.

3.For standard size or larger cans, the unit will pierce the lid, “walk around,” and automatically stop once the can is opened. Lift the Pierce Lever to remove the can.

l’ouvre-boîte et laisser la boîte tourner jusqu’à ce que le couvercle soit coupé. Retenir la boîte lorsqu’on relâche le levier.

3.Dans le cas des boîtes de dimensions standard ou grandes, l’appareil perce le couvercle, la boîte tourne sur elle-même et l’ouvre-boîte s’arrête automatiquement lorsque la boîte est ouverte. Soulever le levier perceur afin de retirer la boîte.

NOTE : L’ouvre-boîte peut être utilisé par des droitiers ou des gauchers. Saisir la poignée de la main droite et placer la boîte de la main gauche.

Entretien et nettoyage

1.Débrancher le socle de chargement et en retirer l’ouvre-boîte avant de le nettoyer.

2.Pour retirer l’assemblage couteau-

levier perceur afin d’en faciliter


le nettoyage, il suffit de


soulever au maximum le


levier et de le retirer de


l’appareil (C). On peut le


laver à la main dans de


l’eau chaude savonneuse


(bien le rincer et l’assécher) ou

C

le placer au lave-vaisselle. Ne


pas immerger l’ouvre-boîte.


3.Pour remettre l’assemblage couteau-levier

perceur en place (voir la figure C), aligner la tige en forme de clé sur la fente en forme de clé de l’ouvre-boîte et abaisser le levier perceur.

4.Essuyer le socle et le cordon à l’aide d’un chiffon ou d’une éponge humide, ou encore d’un produit nettoyant savonneux, doux et non- abrasif, puis essuyer avec un chiffon propre et sec.

CONSEILS PRATIQUES

1.Lorsque le rebord de la boîte est bosselé ou irrégulier, commencer la coupe juste après la bosselure. Les boîtes dont le rebord est large, inégal ou de forme irrégulière peuvent faire caler l’appareil. Dans ce cas, tourner légèrement la boîte à la main afin d’en faciliter la coupe.

2.Il faut ouvrir les boîtes de jus congelés dès qu’on les sort du congélateur.

3.L’ouvre-boîte n’ouvre pas les boîtes sans rebord (comme les boîtes de lait évaporé) ni celles à coins aigus (comme les boîtes de viande traitée ou de sardines).

4

17

Page 3
Image 3
Black & Decker KEC600 manual How To Use, Entretien et nettoyage, Charging Procedures, Opening Cans, Conseils Pratiques

KEC600 specifications

The Black & Decker KEC600 is an innovative and versatile oscillating multi-tool designed for a variety of applications in home improvement, renovation, and DIY projects. With its powerful performance and user-friendly design, the KEC600 stands out as a must-have tool for both amateurs and professionals alike.

One of its most notable features is the 3.2-degree oscillation angle, allowing for efficient cutting, sanding, and scraping. This angle strikes a perfect balance between speed and control, enabling users to tackle intricate tasks with precision. It also comes equipped with a powerful 600-watt motor that ensures consistent performance across various materials, from wood and drywall to metal and plastic.

The Black & Decker KEC600 utilizes a tool-free accessory change system, making it easy to switch between tasks without requiring additional tools. This feature enhances productivity and saves time, enabling users to complete projects more efficiently. The multi-tool is compatible with a wide range of attachments, including blades for cutting and scraping, sanding sheets, and grout removal tools, making it incredibly adaptable for diverse applications.

Another standout characteristic of the KEC600 is its ergonomic design. The tool is lightweight and features a comfortable grip, reducing fatigue during prolonged use. This design consideration is particularly beneficial for users working on extensive projects or those that require intricate detail.

The oscillating mechanism allows for flush cutting, which is ideal for reaching tight spaces. This capability makes the KEC600 perfect for tasks like trimming door frames or cutting in corners where conventional tools may struggle. Additionally, the variable speed function allows users to adjust the speed according to the specific material and task at hand, further enhancing its versatility.

Safety features are also prominent in the KEC600's design. The tool includes a protective blade guard to prevent accidental cuts and injuries, ensuring a safer working environment. Overall, the Black & Decker KEC600 is a powerful and dependable oscillating multi-tool that combines advanced technology with user-centric design. Whether you're sanding, cutting, or scraping, this tool is designed to make your projects easier, faster, and more enjoyable, establishing itself as a reliable companion for any DIY enthusiast or professional tradesperson.