b. Check to see if receptacle is connected to a light switch which turns power off when you turn out the lights.

c. Move charger and battery pack to a location where the surrounding air temperature is approximately 60°F - 80°F (16° - 27°C).

d. If charging problems persist, take the tool, battery pack and charger to your local service center.

4. The battery pack should be recharged when it fails to produce sufficient power on jobs which were easily done previously. DO NOT CONTINUE to use under these conditions. Follow the charging procedure. You may also charge a partially used pack whenever you desire with no adverse affect on the battery pack.

5. Foreign materials of a conductive nature such as, but not limited to, steel wool, aluminum foil, or any buildup of metallic particles should be kept away from charger cavities. Always unplug the charger from the power supply when there is no battery pack in the cavity. Unplug charger before attempting to clean.

6. Do not freeze or immerse charger in water or any other liquid.

WARNING: Shock hazard. Do not allow any liquid to get inside charger. Never attempt to open the battery pack for any reason. If the plastic housing of the battery pack breaks or cracks, return to a service center for recycling.

Installing and Removing the Battery Pack

WARNING: Make certain the lock-off button is engaged to prevent 2 switch actuation before removing or installing battery.

To install battery pack: Insert battery pack into tool until fully seated and an audible click is heard (figure 2).

To remove battery

pack: Depress the battery release button in the back of the battery pack and pull battery pack out of tool.

ASSEMBLY & ADJUSTMENT

ASSEMBLY TOOLS REQUIRED (NOT SUPPLIED): - Phillips Screwdriver

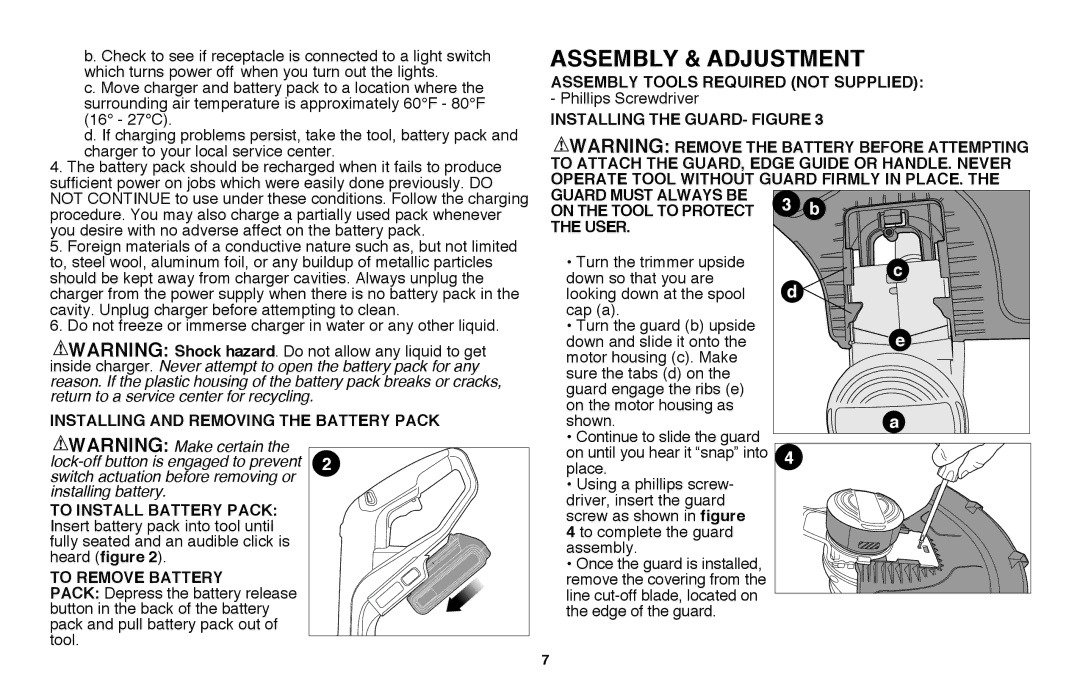
installing the guard- FIgure 3

WARNING: remove the battery before Attempting

to attach the guard, edge guide or handle. NEVER

OPERATE TOOL WITHOUT GUARD FIRMLY IN PLACE. The

guard must always be

3 b

on the tool to protect

the user.


• Turn the trimmer upside

c

down so that you are

looking down at the spool

d

cap (a).


• Turn the guard (b) upside

e

down and slide it onto the

motor housing (c). Make


sure the tabs (d) on the


guard engage the ribs (e)


on the motor housing as

a

shown.

• Continue to slide the guard


on until you hear it “snap” into

4

place.

• Using a phillips screw-


driver, insert the guard


screw as shown in figure


4 to complete the guard


assembly.


• Once the guard is installed,


remove the covering from the


line cut-off blade, located on


the edge of the guard.


7

Page 7
Image 7
Black & Decker LST220R instruction manual Assembly & Adjustment

LST220R, LST220 specifications

The Black & Decker LST220R and LST220 are two innovative and powerful cordless string trimmers designed to make yard work easier and more efficient. These models cater to homeowners who want a flexible and lightweight solution for maintaining their lawns and gardens. Both trimmers share many features, making them reliable choices for tackling grass, weeds, and overgrown areas.

One of the standout features of the LST220R and LST220 is their 20-volt lithium-ion battery, which provides ample power and runtime needed for various trimming tasks. This battery technology ensures longer battery life and minimal self-discharge, allowing users to recharge and get back to work quickly. The trimmers come equipped with a 12-inch cutting swath, allowing for a wide trimming path that is efficient for medium to small-sized yards.

The innovative automatic feed spool system is another highlight, eliminating the hassle of manual line adjustments. This feature automatically feeds the cutting line as needed, ensuring a continuous, hassle-free operation while trimming. The dual-line design offers enhanced cutting performance, making it even easier to tackle tougher vegetation without compromising efficiency.

Ergonomics are a significant focus in the design of the LST220R and LST220. With their lightweight construction, these trimmers are easy to maneuver, reducing user fatigue during extended use. The adjustable height feature allows users to customize the trimmer's length, accommodating different user preferences and providing comfort while operating.

Moreover, both models come with the capability to convert from a trimmer to an edger, giving users greater versatility and functionality in one compact tool. The easy-to-use conversion feature allows for seamless switching between trimming and edging tasks, making it an excellent choice for those who want to ensure a neat and tidy lawn.

In summary, the Black & Decker LST220R and LST220 are excellent cordless trimmers that combine power, convenience, and versatility. With their efficient lithium-ion battery, automatic feed spool, lightweight design, and easy conversion to an edger, these trimmers make yard maintenance tasks less daunting. Homeowners can rely on these tools to keep their outdoor spaces looking pristine throughout the growing season.