Manuals
/
BOXLIGHT
/
Computer Equipment
/
Projector
BOXLIGHT
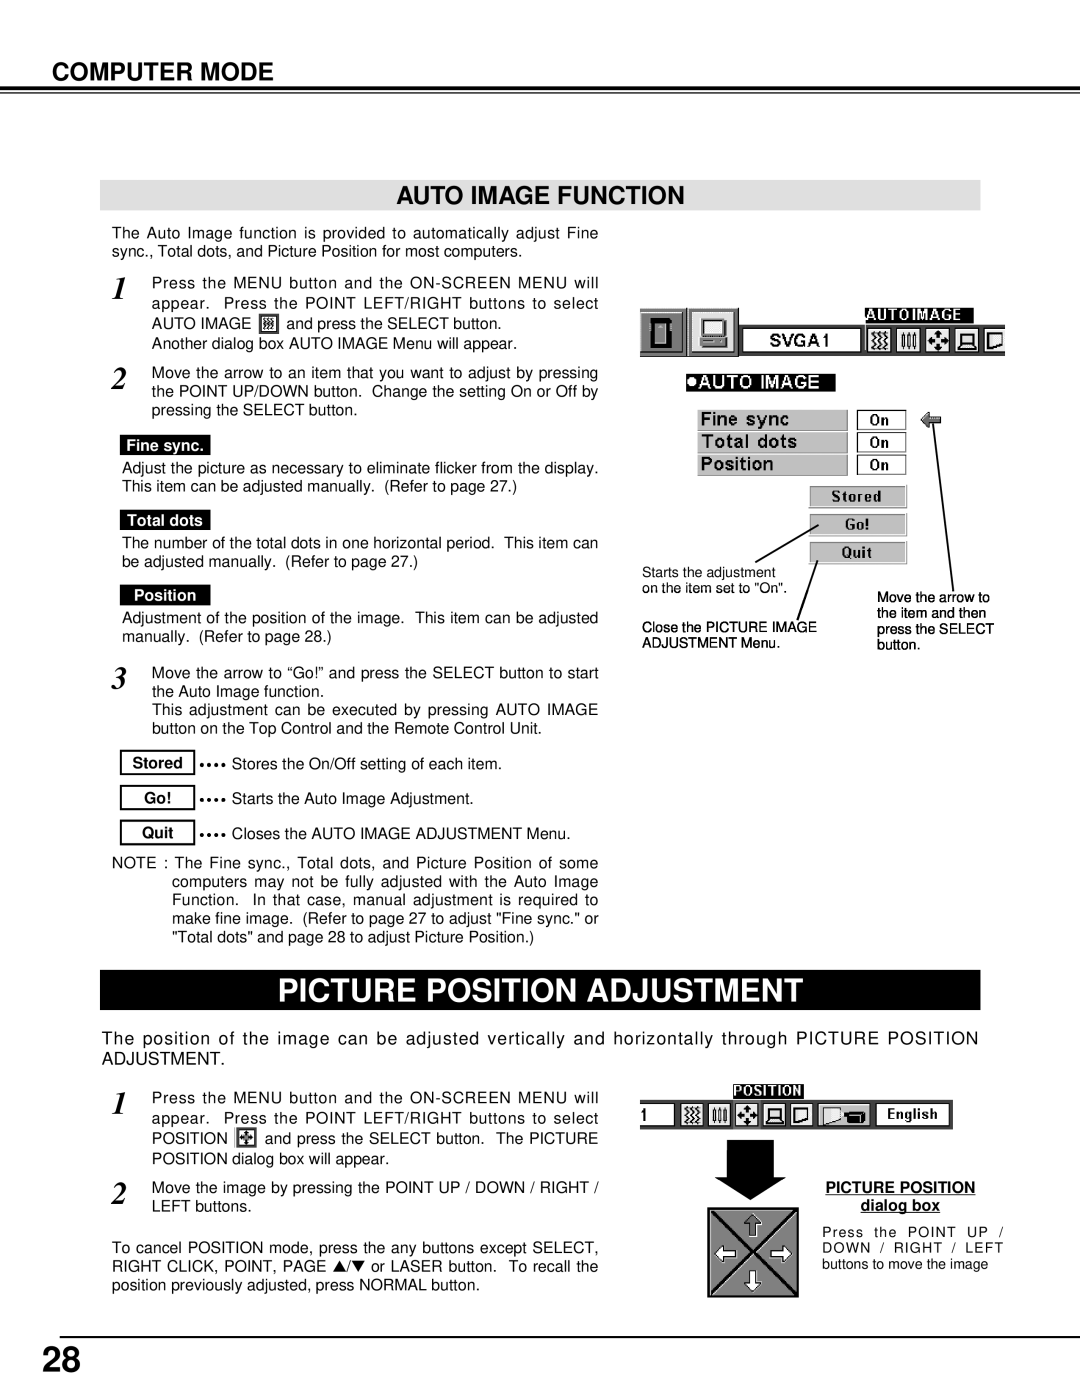
CP-33t Picture Position Adjustment, Computer Mode Auto Image Function, Fine sync, Quit
Models:
CP-33t
1
28
48
48
Download
48 pages
9.06 Kb
25
26
27
28
29
30
31
32
Troubleshooting
Specs
Install
Lamp Replacement Monitor Timer
Top Controls And Indicators
Connecting The Projector
Warranty
Maintenance
Reset
Accessories
Page 28
Image 28
Page 27
Page 29
Page 28
Image 28
Page 27
Page 29
Contents
BOXLIGHT CP-33t
BOXLIGHT
USER’S GUIDE
SAFETY PRECAUTIONS
TO THE OWNER
INFORMATION TO THE USER
RISK OF ELECTRIC SHOCK DO NOT OPEN
IMPORTANT SAFETY INSTRUCTIONS
TABLE OF CONTENTS
FEATURES AND DESIGN
SETTING
5 COMPUTER MODE
FEATURES AND DESIGN
Image Resolution
Other Features
Accessories
POWER CORD CONNECTOR
ADJUSTABLE FEET AND FEET LOCK LATCHES
PREPARATION
NAME OF EACH PART OF THE PROJECTOR
SETTING-UP THE PROJECTOR
ADJUSTABLE FEET
POSITIONING THE PROJECTOR
ROOM LIGHT
PREPARATION CONNECTING THE AC POWER CORD
VENTILATION
CAUTION WHEN CARRYING OR TRANSPORTING THE PROJECTOR
PREPARATION MOVING THE PROJECTOR
CONNECTING THE PROJECTOR
CONTROL PORT CONNECTOR
TERMINALS OF THE PROJECTOR
S-VIDEO INPUT JACK VIDEO INPUT JACK
CONNECTING THE PROJECTOR
CONNECTING TO THE VIDEO EQUIPMENT
Terminals of the Projector
CONNECTING TO THE COMPUTER
To connect to the computer, refer to the figure below
Terminal Terminal
Terminal
ing on the RESOLUTION
MAC ADAPTER Not supplied
in the table below depend
MODE that you want to
OPERATION OF THE REMOTE CONTROL
BEFORE OPERATION
Left Side
LASER POINTER FUNCTION
REMOTE CONTROL BATTERIES INSTALLATION
Operating Range
16.4’ 5 m 16.4’ 5 m
VOLUME BUTTON
TOP CONTROLS AND INDICATORS
POWER ON-OFF BUTTON
LAMP INDICATOR
READY INDICATOR
HOW TO OPERATE ON-SCREEN MENU
OPERATING ON-SCREEN MENU
FLOW OF ON-SCREEN MENU
WIRELESS REMOTE CONTROL
SETTING MENU
BEFORE OPERATION MENU BAR
MENU BAR IN COMPUTER MODE Press MENU BUTTON while in Computer mode
MODE MENU
Press MENU BUTTON while in MCI mode
MENU BAR IN MCI MODE
VIEW MENU
Power off?
BASIC OPERATIONS
TURNING ON / OFF THE PROJECTOR
TURNING ON THE PROJECTOR
ADJUSTING THE IMAGE
ZOOM ADJUSTMENT
FOCUS ADJUSTMENT
KEYSTONE ADJUSTMENT
SOUND ADJUSTMENT
SOUND VOLUME ADJUSTMENT
SOUND MUTE ADJUSTMENT
BASIC OPERATION NO SHOW FUNCTION
COMPUTER MODE
SELECTING COMPUTER MODE
SELECTING COMPUTER SYSTEM
DIRECT OPERATION
PC ADJUSTMENT
COMPUTER MODE
Reset
Closes the PC ADJUST Menu
Total lines
Total dots
NOTE Specifications are subject to change without notice
COMPUTER MODE COMPATIBLE COMPUTER SPECIFICATIONS
MAC LC13
PICTURE IMAGE ADJUSTMENT
ADJUST PICTURE IMAGE MANUALLY
NORMAL FUNCTION
Normal
PICTURE POSITION ADJUSTMENT
COMPUTER MODE AUTO IMAGE FUNCTION
Starts the Auto Image Adjustment
Closes the AUTO IMAGE ADJUSTMENT Menu
PICTURE SCREEN ADJUSTMENT
True
Keystone
Digital Zoom
VIDEO MODE
SELECTING VIDEO MODE
SELECTING COLOR SYSTEM
Regular
ADJUSTING THE PICTURE IMAGE
Closes the PICTURE IMAGE ADJUSTMENT Menu
Color
Tint
MCI MODE
HOW TO LOAD THE MEMORY CARD INTO THE PROJECTOR
OPERATING THE PC CARD SLOT
SELECTING MCI MODE
AVAILABLE DATA
AVAILABLE CARD
Media Card Imager
SHOW THE DATA IN THE MEMORY CARD
INDEX SELECTION
PAGE SELECTION
Index and Page
ACCESS TO THE MEMORY CARD THROUGH THE PROJECTOR
WRITE DATA INTO THE MEMORY CARD
PICTURE IMAGE ADJUSTMENT
ADJUST THE PICTURE IMAGE MANUALLY
Recalls the data previously adjusted
Stores the adjusted data in the memory
PICTURE SCREEN ADJUSTMENT
SMARTMEDIA AND PC CARD ADAPTER
INSTALL / REMOVE THE SMARTMEDIA
IMPORTANT NOTE
MCI MODE PRECAUTIONS AND SPECIFICATIONS OF THE SMARTMEDIA
PRECAUTIONS AND SPECIFICATIONS OF THE PC CARD ADAPTER
SETTING
SETTING MENU
SELECTING LANGUAGE
Blue back
OPERATING WIRELESS MOUSE
INSTALLATION
OPERATING WIRELESS MOUSE
APPENDIX
MAINTENANCE
TEMPERATURE WARNING INDICATOR
AIR FILTER CARE AND CLEANING
CLEANING THE PROJECTION LENS
APPENDIX LAMP REPLACEMENT INDICATOR
LAMP REPLACEMENT
LAMP REPLACEMENT MONITOR TIMER
ORDER REPLACEMENT LAMP
Problem
TROUBLESHOOTING
Try these Solution
Remote Control Unit
TECHNICAL SPECIFICATIONS
OPTIONAL PARTS
Control Cable for Serial Port
Type No. POA-MCSRL
Control Cable for ADB Port
LIMITED WARRANTY
WARRANTY LIMITATION AND EXCLUSION
DISCLAIMER OR UNSTATED WARRANTIES
LIMITATION OR LIABILITY
Top
Page
Image
Contents