OPERATING INSTRUCTIONS

RECETTES

Assembling the Ice Cream Maker NOTE: Do not plug the power cord into an electrical outlet until the unit is fully assembled and freezer canisters have been frozen.

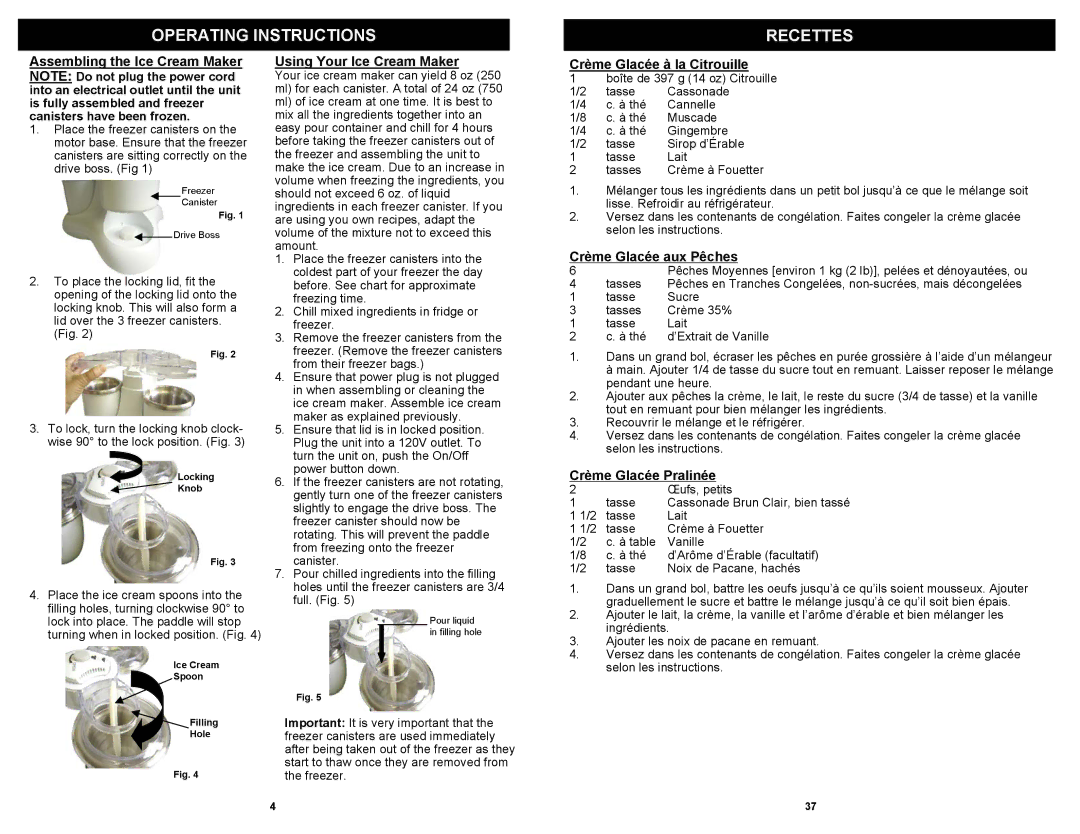
1.Place the freezer canisters on the motor base. Ensure that the freezer canisters are sitting correctly on the drive boss. (Fig 1)

Freezer

Canister

Fig. 1

Drive Boss

2.To place the locking lid, fit the opening of the locking lid onto the locking knob. This will also form a lid over the 3 freezer canisters. (Fig. 2)

Fig. 2

3.To lock, turn the locking knob clock- wise 90° to the lock position. (Fig. 3)

Locking

Knob

Fig. 3

4.Place the ice cream spoons into the filling holes, turning clockwise 90° to lock into place. The paddle will stop turning when in locked position. (Fig. 4)

Using Your Ice Cream Maker

Your ice cream maker can yield 8 oz (250 ml) for each canister. A total of 24 oz (750 ml) of ice cream at one time. It is best to mix all the ingredients together into an easy pour container and chill for 4 hours before taking the freezer canisters out of the freezer and assembling the unit to make the ice cream. Due to an increase in volume when freezing the ingredients, you should not exceed 6 oz. of liquid ingredients in each freezer canister. If you are using you own recipes, adapt the volume of the mixture not to exceed this amount.

1.Place the freezer canisters into the coldest part of your freezer the day before. See chart for approximate freezing time.

2.Chill mixed ingredients in fridge or freezer.

3.Remove the freezer canisters from the freezer. (Remove the freezer canisters from their freezer bags.)

4.Ensure that power plug is not plugged in when assembling or cleaning the ice cream maker. Assemble ice cream maker as explained previously.

5.Ensure that lid is in locked position. Plug the unit into a 120V outlet. To turn the unit on, push the On/Off power button down.

6.If the freezer canisters are not rotating, gently turn one of the freezer canisters slightly to engage the drive boss. The freezer canister should now be rotating. This will prevent the paddle from freezing onto the freezer canister.

7.Pour chilled ingredients into the filling holes until the freezer canisters are 3/4 full. (Fig. 5)

Pour liquid in filling hole

Crème Glacée à la Citrouille

1

boîte de 397 g (14 oz) Citrouille

1/2

tasse

Cassonade

1/4

c. à thé

Cannelle

1/8

c. à thé

Muscade

1/4

c. à thé

Gingembre

1/2

tasse

Sirop d’Érable

1

tasse

Lait

2

tasses

Crème à Fouetter

1.Mélanger tous les ingrédients dans un petit bol jusqu’à ce que le mélange soit lisse. Refroidir au réfrigérateur.

2.Versez dans les contenants de congélation. Faites congeler la crème glacée selon les instructions.

Crème Glacée aux Pêches

6


Pêches Moyennes [environ 1 kg (2 lb)], pelées et dénoyautées, ou

4

tasses

Pêches en Tranches Congelées, non-sucrées, mais décongelées

1

tasse

Sucre

3

tasses

Crème 35%

1

tasse

Lait

2

c. à thé

d’Extrait de Vanille

1.Dans un grand bol, écraser les pêches en purée grossière à l’aide d’un mélangeur à main. Ajouter 1/4 de tasse du sucre tout en remuant. Laisser reposer le mélange pendant une heure.

2.Ajouter aux pêches la crème, le lait, le reste du sucre (3/4 de tasse) et la vanille tout en remuant pour bien mélanger les ingrédients.

3.Recouvrir le mélange et le réfrigérer.

4.Versez dans les contenants de congélation. Faites congeler la crème glacée selon les instructions.

Crème Glacée Pralinée

2


Œufs, petits

1

tasse

Cassonade Brun Clair, bien tassé

1 1/2

tasse

Lait

1 1/2

tasse

Crème à Fouetter

1/2

c. à table

Vanille

1/8

c. à thé

d’Arôme d’Érable (facultatif)

1/2

tasse

Noix de Pacane, hachés

1.

Dans un grand bol, battre les oeufs jusqu’à ce qu’ils soient mousseux. Ajouter


graduellement le sucre et battre le mélange jusqu’à ce qu’il soit bien épais.

2.

Ajouter le lait, la crème, la vanille et l’arôme d’érable et bien mélanger les


ingrédients.

3.

Ajouter les noix de pacane en remuant.

4.

Versez dans les contenants de congélation. Faites congeler la crème glacée

Ice Cream

Spoon


Fig. 5

Filling

Important: It is very important that the

Hole

freezer canisters are used immediately


after being taken out of the freezer as they


start to thaw once they are removed from

Fig. 4

the freezer.


4

selon les instructions.

37

Page 6
Image 6
Bravetti KP300H owner manual Operating Instructions Recettes, Using Your Ice Cream Maker, Crème Glacée à la Citrouille

KP300H specifications

The Bravetti KP300H is a versatile kitchen appliance designed to redefine the cooking experience for home chefs and food enthusiasts. This multi-functional kitchen tool incorporates advanced features and technologies that make food preparation easier and more efficient.

At the heart of the Bravetti KP300H is its multi-cooking capability. This machine serves as a pressure cooker, slow cooker, rice cooker, steamer, and sauté pan, among others. With such diverse functionalities, users can experiment with a wide array of recipes without needing multiple appliances, saving both space and money in the kitchen.

One of the standout features of the KP300H is its intelligent cooking technology. The built-in microprocessor precisely controls cooking times and temperatures, ensuring each meal is cooked to perfection. This feature allows users to create consistent and flavorful dishes, eliminating the guesswork often associated with cooking.

The KP300H also boasts a generous capacity, accommodating families and gatherings with ease. Its spacious inner pot is made from durable, non-stick materials, promoting easy cleaning and reducing the likelihood of food sticking. The pot is dishwasher safe, a convenience that every busy chef will appreciate.

Safety is another top priority for Bravetti with the KP300H. This appliance includes multiple safety features, including a secure locking lid, pressure release valve, and thermal protection, which help prevent accidents during cooking. These safety mechanisms provide peace of mind for novice and experienced cooks alike.

For added convenience, the KP300H comes with programmable features that allow users to set cooking times and choose from various cooking modes. This means meals can be prepared in advance and ready when you are, fitting perfectly into a busy lifestyle.

Additionally, the KP300H includes a digital display and intuitive controls, making it user-friendly. This design ensures that even those new to cooking can easily navigate its functions and settings.

With its impressive range of capabilities, advanced technologies, and user-friendly design, the Bravetti KP300H is an essential kitchen companion for anyone looking to enhance their culinary skills and streamline their cooking process. Whether you’re a novice cook or a seasoned chef, this appliance is sure to elevate your kitchen experience.