Per cominciare

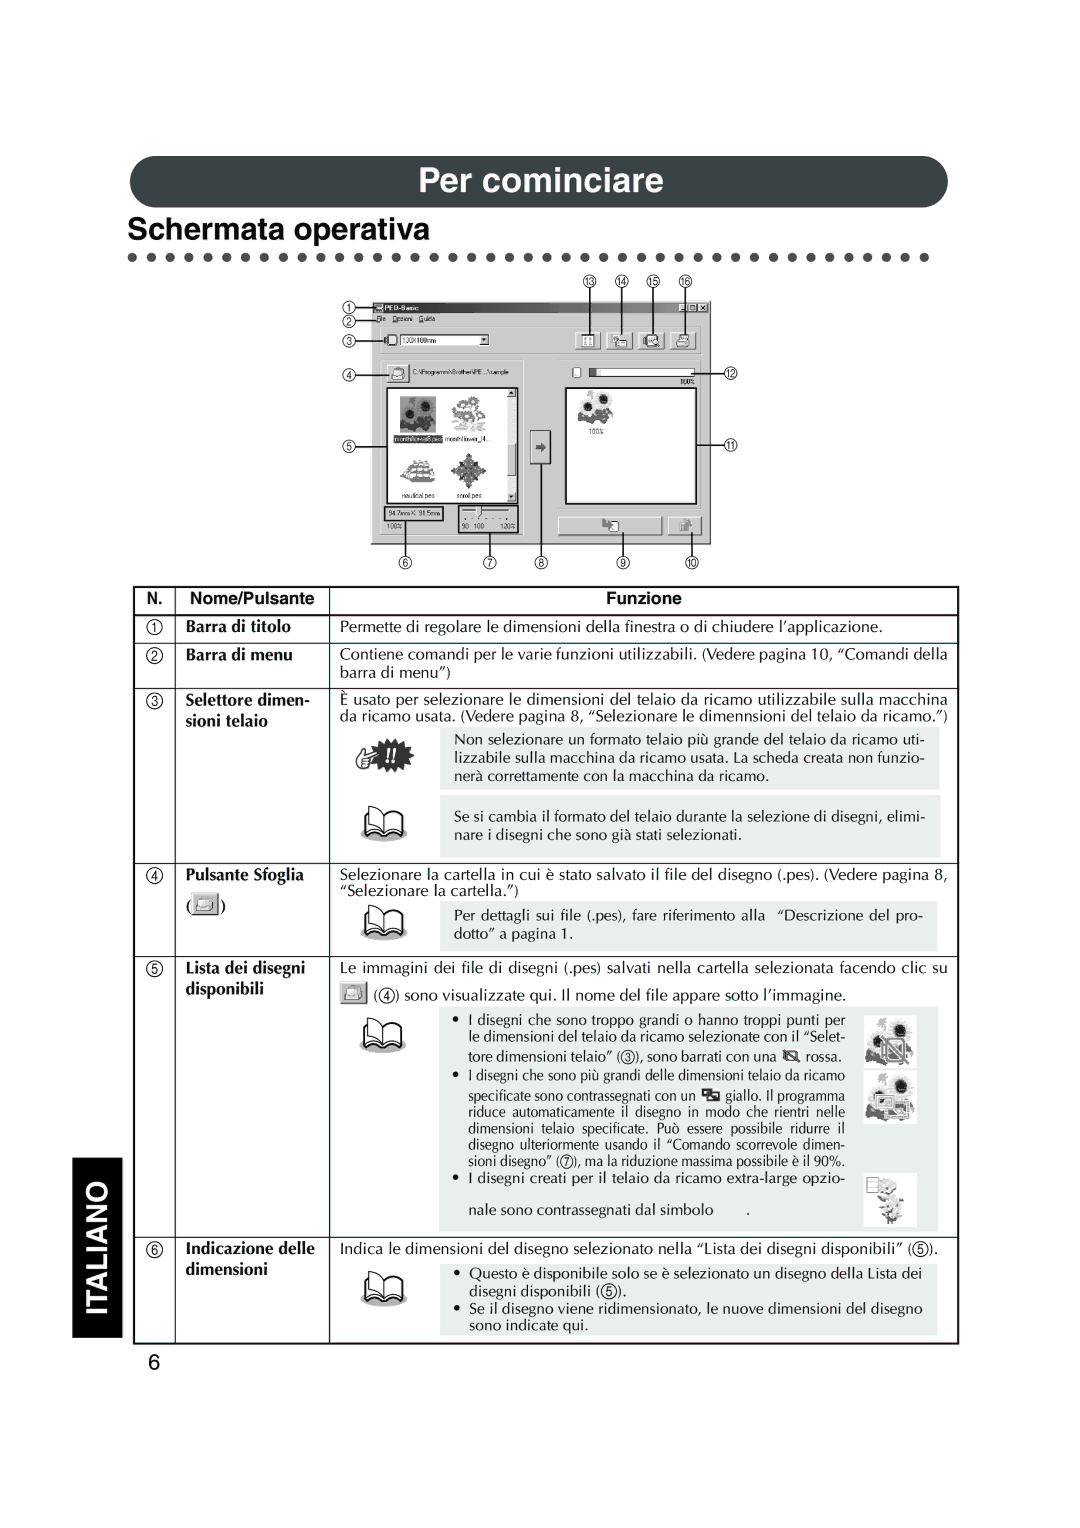
Schermata operativa

● ● ● ● ● ● ● ● ● ● ● ● ● ● ● ● ● ● ● ● ● ● ● ● ● ● ● ● ● ● ● ● ● ● ● ● ● ● ● ● ● ● ●

C D E F

1

2

3

4

B

5

A

ITALIANO

6

7

8

9

0


N. Nome/Pulsante


Funzione


1Barra di titolo Permette di regolare le dimensioni della finestra o di chiudere l’applicazione.

2Barra di menu Contiene comandi per le varie funzioni utilizzabili. (Vedere pagina 10, “Comandi della barra di menu”)

3Selettore dimen- È usato per selezionare le dimensioni del telaio da ricamo utilizzabile sulla macchina

sioni telaio

da ricamo usata. (Vedere pagina 8, “Selezionare le dimennsioni del telaio da ricamo.”)


Non selezionare un formato telaio più grande del telaio da ricamo uti-


lizzabile sulla macchina da ricamo usata. La scheda creata non funzio-


nerà correttamente con la macchina da ricamo.


Se si cambia il formato del telaio durante la selezione di disegni, elimi-


nare i disegni che sono già stati selezionati.


4Pulsante Sfoglia Selezionare la cartella in cui è stato salvato il file del disegno (.pes). (Vedere pagina 8,

(


)

“Selezionare la cartella.”)


Per dettagli sui file (.pes), fare riferimento alla “Descrizione del pro-


dotto” a pagina 1.


5Lista dei disegni Le immagini dei file di disegni (.pes) salvati nella cartella selezionata facendo clic su

disponibili

(4) sono visualizzate qui. Il nome del file appare sotto l’immagine.


I disegni che sono troppo grandi o hanno troppi punti per le dimensioni del telaio da ricamo selezionate con il “Selet- tore dimensioni telaio” (3), sono barrati con una rossa.

I disegni che sono più grandi delle dimensioni telaio da ricamo

specificate sono contrassegnati con un giallo. Il programma riduce automaticamente il disegno in modo che rientri nelle dimensioni telaio specificate. Può essere possibile ridurre il disegno ulteriormente usando il “Comando scorrevole dimen- sioni disegno” (7), ma la riduzione massima possibile è il 90%.

I disegni creati per il telaio da ricamo extra-large opzio-

nale sono contrassegnati dal simbolo .

6Indicazione delle Indica le dimensioni del disegno selezionato nella “Lista dei disegni disponibili” (5).

dimensioni

Questo è disponibile solo se è selezionato un disegno della Lista dei


disegni disponibili (5).

Se il disegno viene ridimensionato, le nuove dimensioni del disegno sono indicate qui.

6

Page 90
Image 90
Brother 1, PED Basic instruction manual Per cominciare, Schermata operativa, Sioni telaio, Disponibili, Dimensioni

1, PED Basic specifications

Brother PED Basic is an innovative software solution designed for embroiderers who want to personalize and manage their embroidery designs efficiently. This powerful tool is a must-have for both beginners and experienced users tending to create stunning embroidery projects.

One of the key features of Brother PED Basic is its ability to convert a wide range of image file formats into embroidery designs. Users can simply import their favorite graphics and transform them into professional-quality stitch files that are compatible with various Brother embroidery machines. The software supports formats such as BMP, JPEG, and GIF, making it versatile for creative exploration.

Another standout characteristic of Brother PED Basic is the user-friendly interface. The layout is intuitive, allowing users to navigate through the program with ease. New users particularly benefit from the step-by-step instructions and tutorials included within the software. This support makes it accessible for individuals with little to no background in embroidery or design, enabling them to get started on their projects quickly.

In terms of design capabilities, Brother PED Basic offers a robust set of editing tools. Users can resize, rotate, and mirror their designs, providing flexibility in customization. Additionally, the software allows users to select individual colors and adjust thread density to achieve the desired effect, ensuring the final product meets their specific requirements.

The software also integrates seamlessly with Brother's embroidery machines, allowing users to transfer designs effortlessly. By connecting through a USB cable or using a memory card, users can quickly upload their new embroidery creations to their machine and begin stitching without any hassles.

One of the technological advancements of Brother PED Basic is its built-in stitch simulator, which gives users a preview of how the design will look once stitched. This feature not only saves time but also helps in making adjustments before committing to the fabric.

Overall, Brother PED Basic stands out for its combination of user accessibility, functionality, and compatibility with a wide range of Brother embroidery machines. Whether you are looking to dip your toes into the world of embroidery or you are an experienced stitcher, Brother PED Basic provides the tools necessary to bring your creative visions to life. Its features and technologies are geared towards enhancing the embroidery experience, making it a valuable asset for anyone passionate about this artisanal craft.