Preparativos

Pantalla de operaciones

● ● ● ● ● ● ● ● ● ● ● ● ● ● ● ● ● ● ● ● ● ● ● ● ● ● ● ● ● ● ● ● ● ● ● ● ● ● ● ● ● ● ●

1

2

3

4

C D E F

B

5

A

ESPAÑOL

6

7

8

9

0


N.° Nombre/botón


Función


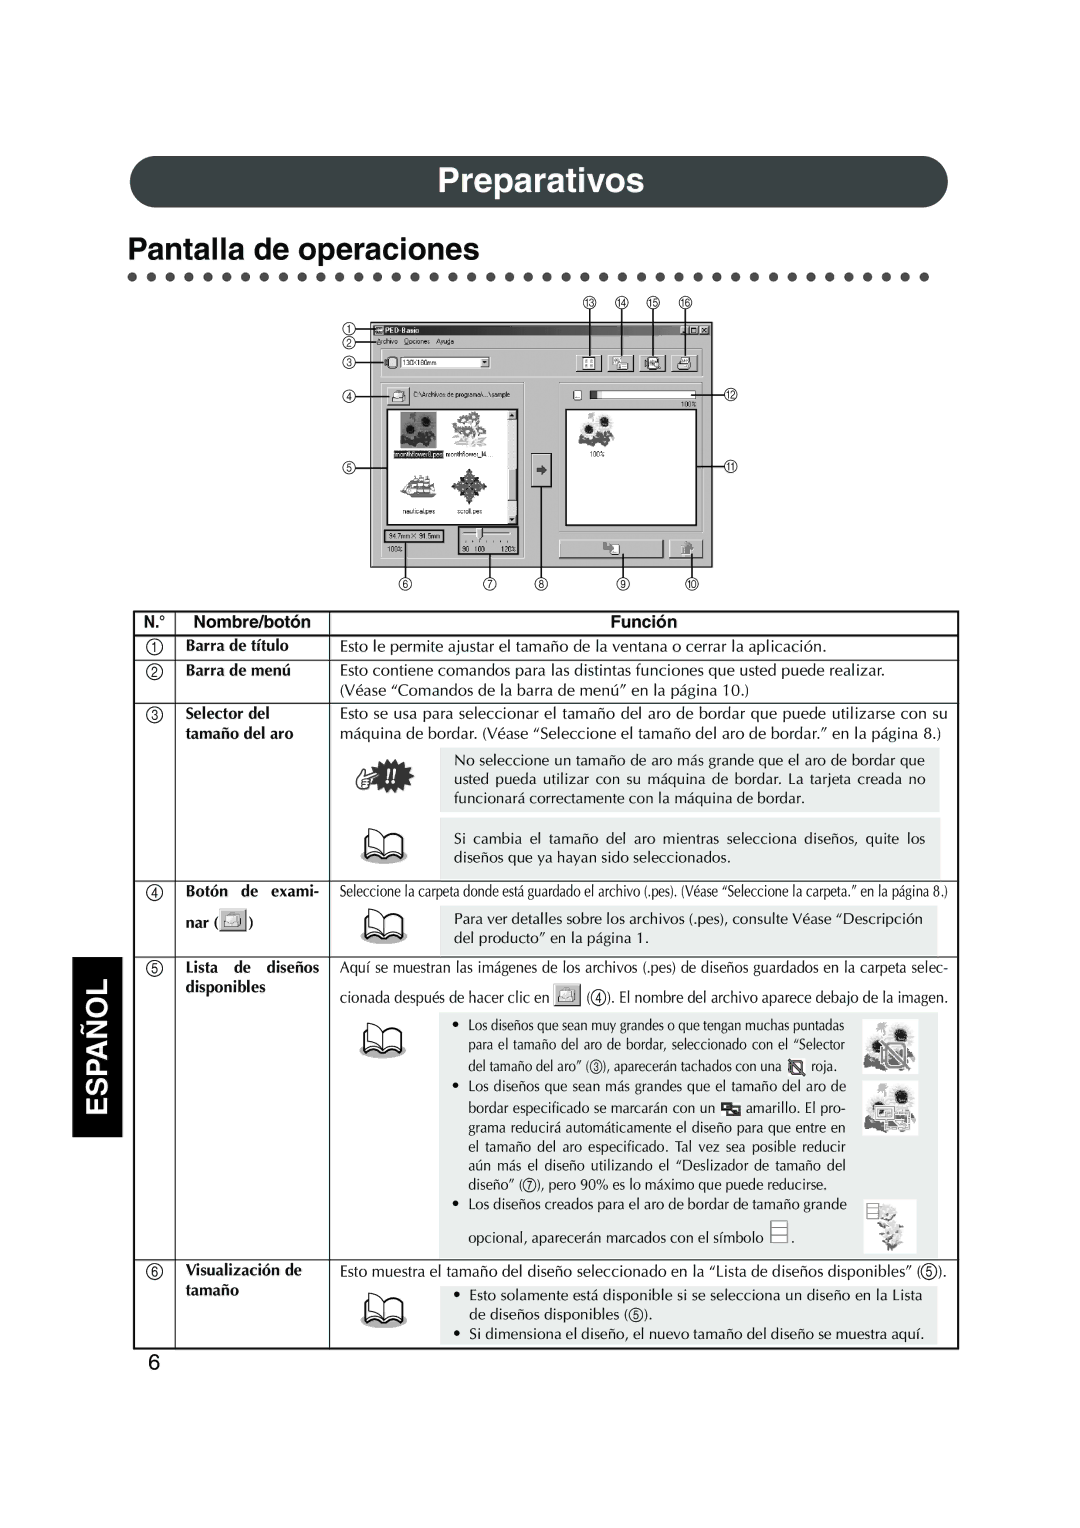
1Barra de título Esto le permite ajustar el tamaño de la ventana o cerrar la aplicación.

2Barra de menú Esto contiene comandos para las distintas funciones que usted puede realizar. (Véase “Comandos de la barra de menú” en la página 10.)

3

Selector del

Esto se usa para seleccionar el tamaño del aro de bordar que puede utilizarse con su


tamaño del aro

máquina de bordar. (Véase “Seleccione el tamaño del aro de bordar.” en la página 8.)


No seleccione un tamaño de aro más grande que el aro de bordar que


usted pueda utilizar con su máquina de bordar. La tarjeta creada no


funcionará correctamente con la máquina de bordar.


Si cambia el tamaño del aro mientras selecciona diseños, quite los


diseños que ya hayan sido seleccionados.


4

Botón

de

exami-

Seleccione la carpeta donde está guardado el archivo (.pes). (Véase “Seleccione la carpeta.” en la página 8.)


nar (


)


Para ver detalles sobre los archivos (.pes), consulte Véase “Descripción


del producto” en la página 1.


5

Lista

de

diseños

Aquí se muestran las imágenes de los archivos (.pes) de diseños guardados en la carpeta selec-


disponibles


cionada después de hacer clic en


(4). El nombre del archivo aparece debajo de la imagen.


Los diseños que sean muy grandes o que tengan muchas puntadas

para el tamaño del aro de bordar, seleccionado con el “Selector

del tamaño del aro” (3), aparecerán tachados con una roja.

Los diseños que sean más grandes que el tamaño del aro de

bordar especificado se marcarán con un amarillo. El pro- grama reducirá automáticamente el diseño para que entre en el tamaño del aro especificado. Tal vez sea posible reducir aún más el diseño utilizando el “Deslizador de tamaño del diseño” (7), pero 90% es lo máximo que puede reducirse.

Los diseños creados para el aro de bordar de tamaño grande opcional, aparecerán marcados con el símbolo .

6Visualización de Esto muestra el tamaño del diseño seleccionado en la “Lista de diseños disponibles” (5).

tamaño

Esto solamente está disponible si se selecciona un diseño en la Lista

de diseños disponibles (5).

Si dimensiona el diseño, el nuevo tamaño del diseño se muestra aquí.

6

Page 74
Image 74
Brother 1, PED Basic instruction manual Preparativos, Pantalla de operaciones, Nombre/botón Función

1, PED Basic specifications

Brother PED Basic is an innovative software solution designed for embroiderers who want to personalize and manage their embroidery designs efficiently. This powerful tool is a must-have for both beginners and experienced users tending to create stunning embroidery projects.

One of the key features of Brother PED Basic is its ability to convert a wide range of image file formats into embroidery designs. Users can simply import their favorite graphics and transform them into professional-quality stitch files that are compatible with various Brother embroidery machines. The software supports formats such as BMP, JPEG, and GIF, making it versatile for creative exploration.

Another standout characteristic of Brother PED Basic is the user-friendly interface. The layout is intuitive, allowing users to navigate through the program with ease. New users particularly benefit from the step-by-step instructions and tutorials included within the software. This support makes it accessible for individuals with little to no background in embroidery or design, enabling them to get started on their projects quickly.

In terms of design capabilities, Brother PED Basic offers a robust set of editing tools. Users can resize, rotate, and mirror their designs, providing flexibility in customization. Additionally, the software allows users to select individual colors and adjust thread density to achieve the desired effect, ensuring the final product meets their specific requirements.

The software also integrates seamlessly with Brother's embroidery machines, allowing users to transfer designs effortlessly. By connecting through a USB cable or using a memory card, users can quickly upload their new embroidery creations to their machine and begin stitching without any hassles.

One of the technological advancements of Brother PED Basic is its built-in stitch simulator, which gives users a preview of how the design will look once stitched. This feature not only saves time but also helps in making adjustments before committing to the fabric.

Overall, Brother PED Basic stands out for its combination of user accessibility, functionality, and compatibility with a wide range of Brother embroidery machines. Whether you are looking to dip your toes into the world of embroidery or you are an experienced stitcher, Brother PED Basic provides the tools necessary to bring your creative visions to life. Its features and technologies are geared towards enhancing the embroidery experience, making it a valuable asset for anyone passionate about this artisanal craft.