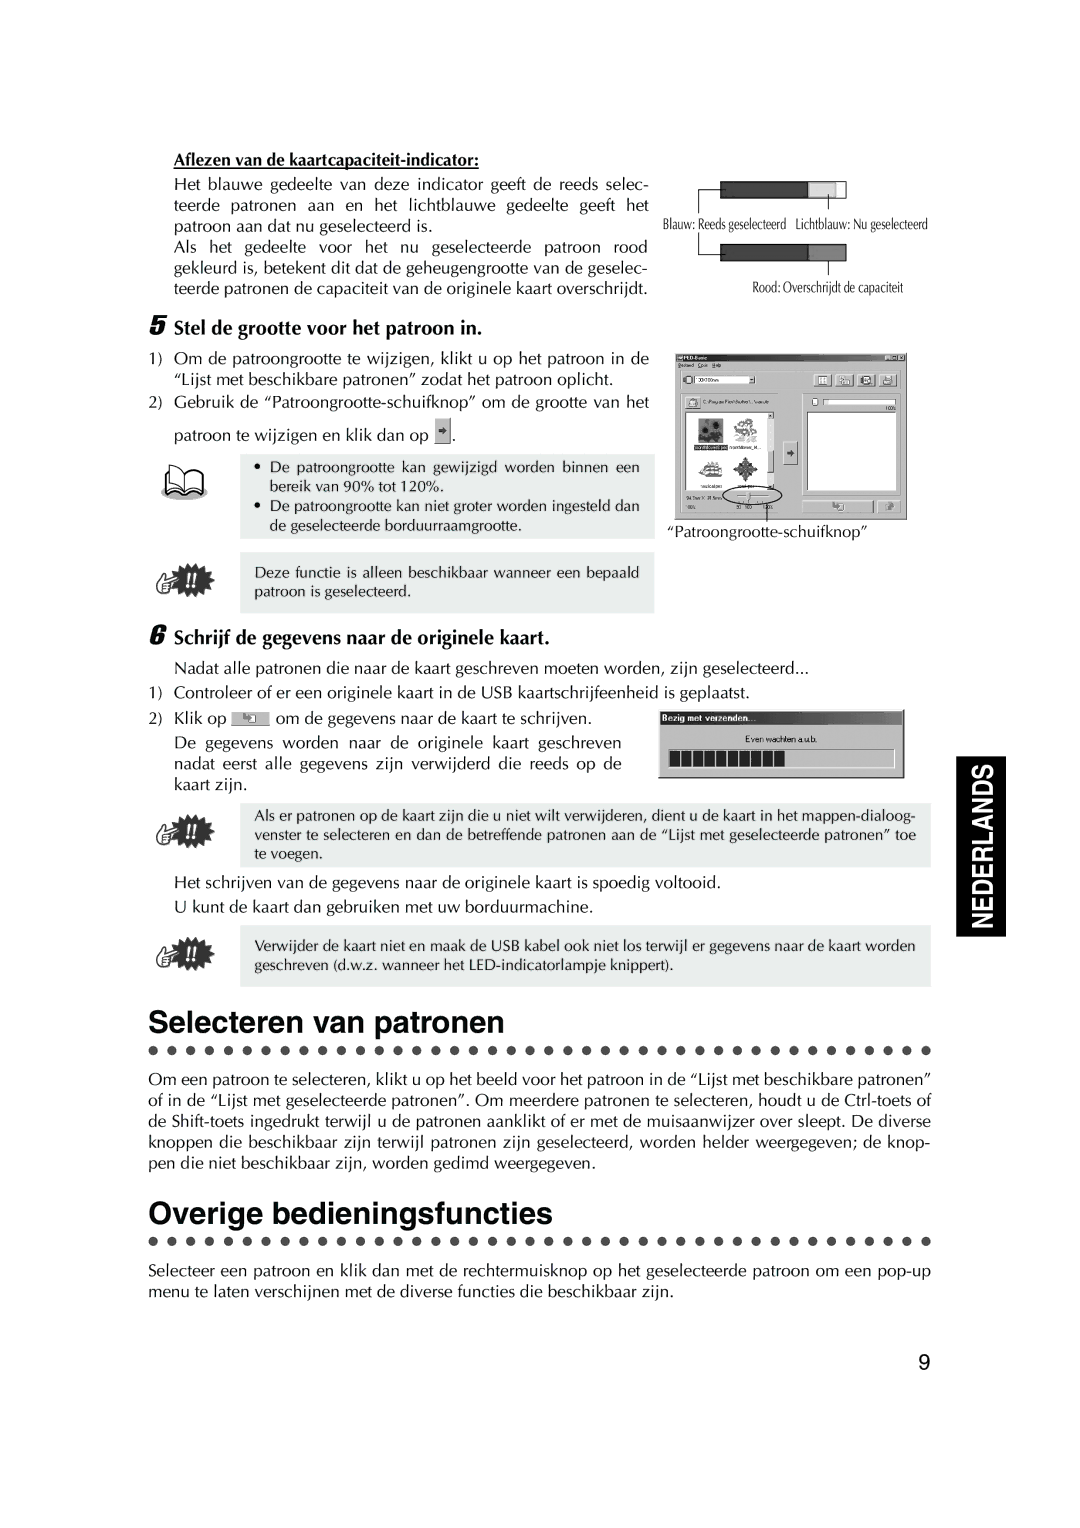
Aflezen van de kaartcapaciteit-indicator:

Het blauwe gedeelte van deze indicator geeft de reeds selec- teerde patronen aan en het lichtblauwe gedeelte geeft het patroon aan dat nu geselecteerd is.

Als het gedeelte voor het nu geselecteerde patroon rood gekleurd is, betekent dit dat de geheugengrootte van de geselec- teerde patronen de capaciteit van de originele kaart overschrijdt.

Blauw: Reeds geselecteerd Lichtblauw: Nu geselecteerd

Rood: Overschrijdt de capaciteit

5 Stel de grootte voor het patroon in.

1)Om de patroongrootte te wijzigen, klikt u op het patroon in de “Lijst met beschikbare patronen” zodat het patroon oplicht.

2)Gebruik de “Patroongrootte-schuifknop” om de grootte van het patroon te wijzigen en klik dan op .

De patroongrootte kan gewijzigd worden binnen een

bereik van 90% tot 120%.

De patroongrootte kan niet groter worden ingesteld dan

de geselecteerde borduurraamgrootte.

“Patroongrootte-schuifknop”


Deze functie is alleen beschikbaar wanneer een bepaald patroon is geselecteerd.

6 Schrijf de gegevens naar de originele kaart.

Nadat alle patronen die naar de kaart geschreven moeten worden, zijn geselecteerd...

1)Controleer of er een originele kaart in de USB kaartschrijfeenheid is geplaatst.

2)Klik op om de gegevens naar de kaart te schrijven. De gegevens worden naar de originele kaart geschreven nadat eerst alle gegevens zijn verwijderd die reeds op de kaart zijn.

Als er patronen op de kaart zijn die u niet wilt verwijderen, dient u de kaart in het mappen-dialoog- venster te selecteren en dan de betreffende patronen aan de “Lijst met geselecteerde patronen” toe te voegen.

Het schrijven van de gegevens naar de originele kaart is spoedig voltooid.

U kunt de kaart dan gebruiken met uw borduurmachine.

Verwijder de kaart niet en maak de USB kabel ook niet los terwijl er gegevens naar de kaart worden geschreven (d.w.z. wanneer het LED-indicatorlampje knippert).

Selecteren van patronen

● ● ● ● ● ● ● ● ● ● ● ● ● ● ● ● ● ● ● ● ● ● ● ● ● ● ● ● ● ● ● ● ● ● ● ● ● ● ● ● ● ●

Om een patroon te selecteren, klikt u op het beeld voor het patroon in de “Lijst met beschikbare patronen” of in de “Lijst met geselecteerde patronen”. Om meerdere patronen te selecteren, houdt u de Ctrl-toets of de Shift-toets ingedrukt terwijl u de patronen aanklikt of er met de muisaanwijzer over sleept. De diverse knoppen die beschikbaar zijn terwijl patronen zijn geselecteerd, worden helder weergegeven; de knop- pen die niet beschikbaar zijn, worden gedimd weergegeven.

Overige bedieningsfuncties

● ● ● ● ● ● ● ● ● ● ● ● ● ● ● ● ● ● ● ● ● ● ● ● ● ● ● ● ● ● ● ● ● ● ● ● ● ● ● ● ● ●

Selecteer een patroon en klik dan met de rechtermuisknop op het geselecteerde patroon om een pop-up menu te laten verschijnen met de diverse functies die beschikbaar zijn.

NEDERLANDS

9

Page 61
Image 61
Brother PED Basic, 1 Selecteren van patronen, Overige bedieningsfuncties, Stel de grootte voor het patroon

1, PED Basic specifications

Brother PED Basic is an innovative software solution designed for embroiderers who want to personalize and manage their embroidery designs efficiently. This powerful tool is a must-have for both beginners and experienced users tending to create stunning embroidery projects.

One of the key features of Brother PED Basic is its ability to convert a wide range of image file formats into embroidery designs. Users can simply import their favorite graphics and transform them into professional-quality stitch files that are compatible with various Brother embroidery machines. The software supports formats such as BMP, JPEG, and GIF, making it versatile for creative exploration.

Another standout characteristic of Brother PED Basic is the user-friendly interface. The layout is intuitive, allowing users to navigate through the program with ease. New users particularly benefit from the step-by-step instructions and tutorials included within the software. This support makes it accessible for individuals with little to no background in embroidery or design, enabling them to get started on their projects quickly.

In terms of design capabilities, Brother PED Basic offers a robust set of editing tools. Users can resize, rotate, and mirror their designs, providing flexibility in customization. Additionally, the software allows users to select individual colors and adjust thread density to achieve the desired effect, ensuring the final product meets their specific requirements.

The software also integrates seamlessly with Brother's embroidery machines, allowing users to transfer designs effortlessly. By connecting through a USB cable or using a memory card, users can quickly upload their new embroidery creations to their machine and begin stitching without any hassles.

One of the technological advancements of Brother PED Basic is its built-in stitch simulator, which gives users a preview of how the design will look once stitched. This feature not only saves time but also helps in making adjustments before committing to the fabric.

Overall, Brother PED Basic stands out for its combination of user accessibility, functionality, and compatibility with a wide range of Brother embroidery machines. Whether you are looking to dip your toes into the world of embroidery or you are an experienced stitcher, Brother PED Basic provides the tools necessary to bring your creative visions to life. Its features and technologies are geared towards enhancing the embroidery experience, making it a valuable asset for anyone passionate about this artisanal craft.