SERVICE (cont.)

DILUTION SOLENOID VALVE

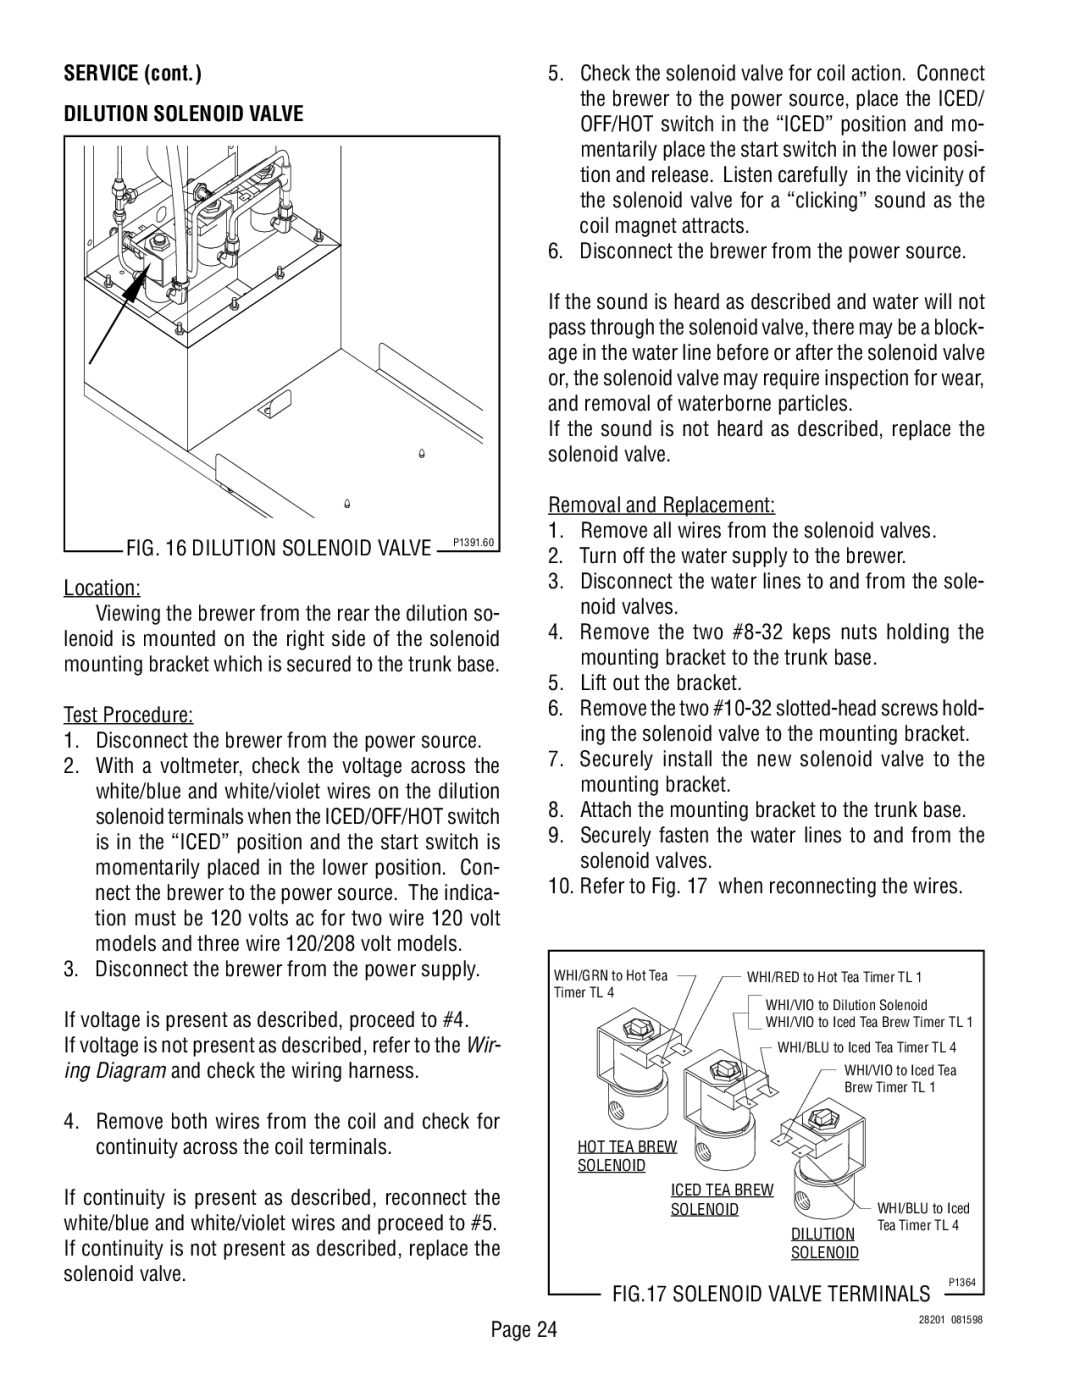
FIG. 16 DILUTION SOLENOID VALVE

P1391.60


Location:

Viewing the brewer from the rear the dilution so- lenoid is mounted on the right side of the solenoid mounting bracket which is secured to the trunk base.

Test Procedure:

1.Disconnect the brewer from the power source.

2.With a voltmeter, check the voltage across the white/blue and white/violet wires on the dilution solenoid terminals when the ICED/OFF/HOT switch is in the “ICED” position and the start switch is momentarily placed in the lower position. Con- nect the brewer to the power source. The indica- tion must be 120 volts ac for two wire 120 volt models and three wire 120/208 volt models.

3.Disconnect the brewer from the power supply.

If voltage is present as described, proceed to #4.

If voltage is not present as described, refer to the Wir- ing Diagram and check the wiring harness.

4.Remove both wires from the coil and check for continuity across the coil terminals.

If continuity is present as described, reconnect the white/blue and white/violet wires and proceed to #5.

5.Check the solenoid valve for coil action. Connect the brewer to the power source, place the ICED/ OFF/HOT switch in the “ICED” position and mo- mentarily place the start switch in the lower posi- tion and release. Listen carefully in the vicinity of the solenoid valve for a “clicking” sound as the coil magnet attracts.

6.Disconnect the brewer from the power source.

If the sound is heard as described and water will not pass through the solenoid valve, there may be a block- age in the water line before or after the solenoid valve or, the solenoid valve may require inspection for wear, and removal of waterborne particles.

If the sound is not heard as described, replace the solenoid valve.

Removal and Replacement:

1.Remove all wires from the solenoid valves.

2.Turn off the water supply to the brewer.

3.Disconnect the water lines to and from the sole- noid valves.

4.Remove the two #8-32 keps nuts holding the mounting bracket to the trunk base.

5.Lift out the bracket.

6.Remove the two #10-32 slotted-head screws hold- ing the solenoid valve to the mounting bracket.

7.Securely install the new solenoid valve to the mounting bracket.

8.Attach the mounting bracket to the trunk base.

9.Securely fasten the water lines to and from the solenoid valves.

10.Refer to Fig. 17 when reconnecting the wires.

WHI/GRN to Hot Tea

WHI/RED to Hot Tea Timer TL 1

Timer TL 4

WHI/VIO to Dilution Solenoid


WHI/VIO to Iced Tea Brew Timer TL 1


WHI/BLU to Iced Tea Timer TL 4


WHI/VIO to Iced Tea


Brew Timer TL 1

HOT TEA BREW

SOLENOID

ICED TEA BREW

SOLENOID


WHI/BLU to Iced


DILUTION

Tea Timer TL 4


If continuity is not present as described, replace the solenoid valve.

SOLENOID

FIG.17 SOLENOID VALVE TERMINALS

P1364

Page 24

28201 081598

Page 24
Image 24
Bunn TNTF-3 service manual Dilution Solenoid Valve, Test Procedure Disconnect the brewer from the power source

TNTF-3 specifications

The Bunn TNTF-3 is a high-performance coffee brewer designed for commercial use, specifically suited for busy environments such as restaurants and cafes. This machine seamlessly combines efficiency with quality, making it a popular choice for professionals who demand the best in their equipment.

One of the standout features of the Bunn TNTF-3 is its three warmer plates, which allow users to brew and store multiple batches of coffee simultaneously. This design ensures that there’s always fresh coffee ready for customers, minimizing downtime during peak service hours. Each warmer has its own independent control, providing versatility in temperature settings to accommodate different coffee types and customer preferences.

The Bunn TNTF-3 utilizes a patented SplashGard funnel that helps to keep the brewing process clean and efficient. This technology not only prevents splashes and messes but also improves user safety by protecting operators from hot water and coffee spills. The brewer’s stainless steel construction contributes to its durability, enhancing its longevity in a high-volume setting.

In terms of brewing capabilities, the TNTF-3 can prepare up to 3.8 gallons of coffee per hour, making it ideal for both small and large operations. The machine is equipped with a brew control feature that allows users to customize the strength and flavor of the coffee, ensuring that each cup meets the highest standards. Additionally, the digital timer and brew status light offer convenient monitoring at a glance.

For ease of maintenance, the Bunn TNTF-3 is designed with accessibility in mind. With removable components and straightforward cleaning procedures, operators can keep the machine in top condition without significant downtime. The brewer also features a low-water shut-off system, which helps to protect the unit from damage due to insufficient water levels.

Overall, the Bunn TNTF-3 embodies a blend of innovative technology, practical design, and optimal performance, making it a powerful tool for coffee professionals. Whether it be for daily service or special events, the Bunn TNTF-3 stands out as a reliable coffee brewing solution that consistently delivers rich, flavorful coffee with every batch. Its combination of speed, safety, and quality assurance solidifies its status as a preferred choice in commercial settings.