8.Mark the location of the pilot main burner on the manifold if the marking on manifold is missing or obliterated.

9.Hold burner at throat,

a.1 inch and 40mm diameter burners. Lift front of burner to clear orifice. Burner which holds pilot can only be removed by lifting the burner adjacent to its right first.

b.50 mm dia. burners only. Push toward the rear until the burner face plate clears the orifice. Lift burner out.

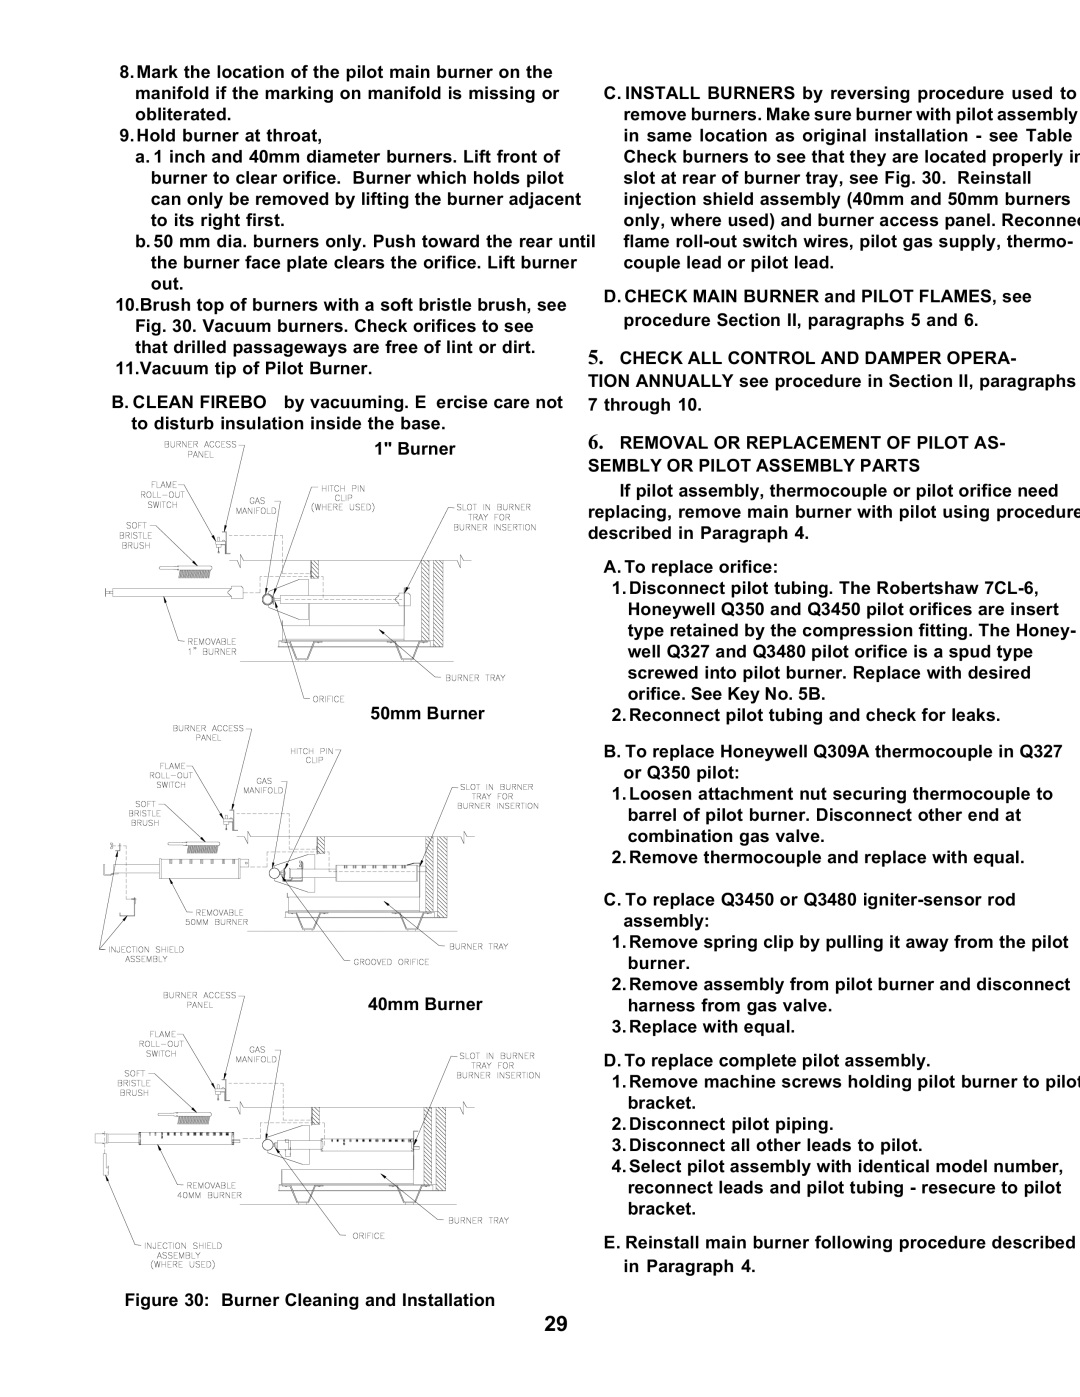
10.Brush top of burners with a soft bristle brush, see Fig. 30. Vacuum burners. Check orifices to see that drilled passageways are free of lint or dirt.

11.Vacuum tip of Pilot Burner.

B. CLEAN FIREBOX by vacuuming. Exercise care not to disturb insulation inside the base.

1" Burner

50mm Burner

40mm Burner

Figure 30: Burner Cleaning and Installation

C. INSTALL BURNERS by reversing procedure used to remove burners. Make sure burner with pilot assembly is in same location as original installation - see Table 5 Check burners to see that they are located properly in slot at rear of burner tray, see Fig. 30. Reinstall injection shield assembly (40mm and 50mm burners only, where used) and burner access panel. Reconnect flame roll-out switch wires, pilot gas supply, thermo- couple lead or pilot lead.

D. CHECK MAIN BURNER and PILOT FLAMES, see procedure Section II, paragraphs 5 and 6.

5.CHECK ALL CONTROL AND DAMPER OPERA- TION ANNUALLY see procedure in Section II, paragraphs 7 through 10.

6.REMOVAL OR REPLACEMENT OF PILOT AS- SEMBLY OR PILOT ASSEMBLY PARTS

If pilot assembly, thermocouple or pilot orifice need replacing, remove main burner with pilot using procedure described in Paragraph 4.

A. To replace orifice:

1.Disconnect pilot tubing. The Robertshaw 7CL-6, Honeywell Q350 and Q3450 pilot orifices are insert type retained by the compression fitting. The Honey- well Q327 and Q3480 pilot orifice is a spud type screwed into pilot burner. Replace with desired orifice. See Key No. 5B.

2.Reconnect pilot tubing and check for leaks.

B.To replace Honeywell Q309A thermocouple in Q327 or Q350 pilot:

1.Loosen attachment nut securing thermocouple to barrel of pilot burner. Disconnect other end at combination gas valve.

2.Remove thermocouple and replace with equal.

C.To replace Q3450 or Q3480 igniter-sensor rod assembly:

1.Remove spring clip by pulling it away from the pilot burner.

2.Remove assembly from pilot burner and disconnect harness from gas valve.

3.Replace with equal.

D.To replace complete pilot assembly.

1.Remove machine screws holding pilot burner to pilot bracket.

2.Disconnect pilot piping.

3.Disconnect all other leads to pilot.

4.Select pilot assembly with identical model number, reconnect leads and pilot tubing - resecure to pilot bracket.

E.Reinstall main burner following procedure described in Paragraph 4.

29

Page 29
Image 29
Burnham SERIES 2 manual Burner Cleaning and Installation

SERIES 2 specifications

The Burnham SERIES 2 is a highly regarded addition to the lineup of residential and commercial heating systems, known for its efficiency, reliability, and innovative design. Designed with the user in mind, the SERIES 2 boasts a range of main features that cater to the needs of modern heating solutions.

One of the standout characteristics of the Burnham SERIES 2 is its advanced cast iron construction. This material is renowned for its durability and excellent heat retention capabilities, ensuring that the system provides consistent warmth over extended periods. The cast iron heat exchanger allows for efficient heat transfer and maximizes energy output while minimizing heat loss.

Efficiency is a key focus for the Burnham SERIES 2, and it is designed to operate at high annual fuel utilization efficiency (AFUE) ratings. With its efficiency-enhancing features, including advanced combustion technology, the system helps homeowners save on energy costs while reducing their environmental footprint. The SERIES 2’s design helps ensure that a greater percentage of the fuel consumed is converted into usable heat, making it a smart choice for energy-conscious users.

Another significant feature is the versatile configuration options available with the Burnham SERIES 2. It can be installed in various settings, including basements, utility rooms, or even garages, due to its compact design. The system is compatible with multiple fuel types, allowing users to select between natural gas and propane to suit their specific preferences and availability.

The Burnham SERIES 2 also prioritizes ease of maintenance. Its user-friendly design includes access panels that simplify servicing and routine inspections. Additionally, it incorporates a range of safety features, such as an automatic shut-off system and built-in controls, to ensure safe operation.

In terms of technology, the SERIES 2 utilizes an innovative control system that optimizes heating cycles based on user demands and external conditions. This intelligent control enhances comfort and prevents excessive cycling, thereby prolonging the lifespan of the unit.

Overall, the Burnham SERIES 2 is distinguished by its robust construction, energy-efficient operation, versatility in installation, ease of maintenance, and advanced technology. For homeowners and businesses seeking a reliable heating solution, it represents a compelling choice, delivering warmth and comfort while remaining mindful of energy consumption and environmental impact.