Model LIT. # 98-0429/07-04
Contents
Install Batteries and Optional SD Card
Adjust the Binocular for Comfortable Viewing
Check Camera Settings
Quick Guide Bushnell Imageview
Binocular Instructions
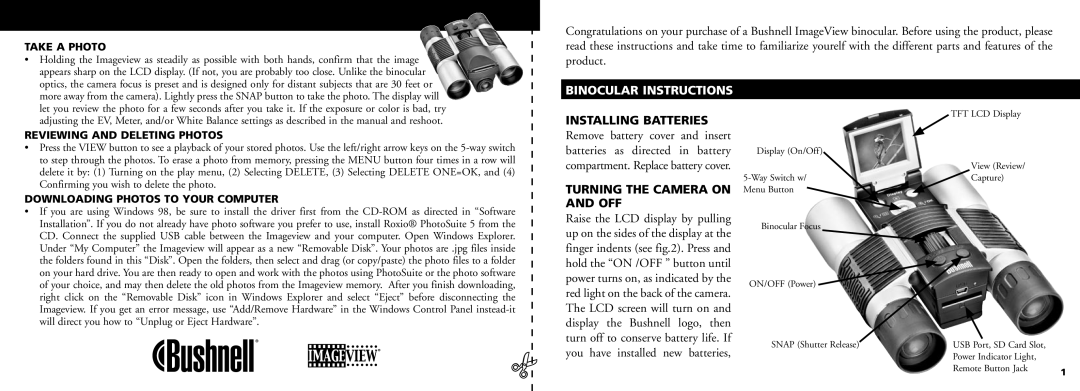
Installing Batteries
Turning the Camera on and OFF
Following settings are provided
Changing Camera Settings
Settings pixels 2048×1536, 1600×1200, 1280×1024, 800×600
Taking a Picture
To USE Special Capture Modes
Reviewing Photos Stored in Memory
Photo is also seen
Upper corner of the LCD
Low 1 Battery Meter Displays battery level
SD card Displayed when a card is inserted
DELETING/PROTECTING Photos and Formatting a NEW SD Card
Beginning to shoot photos. You may choose
Software Installation
Review
LED/SOUND Indications
System Requirements for Included Photosuite Software
Downloading Photos
Photo Suite 5 Installation
Either of two methods may be used
EYE Adjustments Figure
Focusing
Eyecups Figure
Cleaning
Warranty / Repair
Instructions for Care of Binoculars
Installation DES Piles ET DE LA Carte SD Optionnelle
Guide Rapide Imageview Bushnell
Activation DE L’APPAREIL Photo ET DE L’ÉCRAN
Réglage DES Jumelles Pour UNE Observation Confortable
Instructions Pour LES Jumelles
Pour Mettre L’APPAREIL Photo Sous Tension ET Hors Tension
Prise D’UNE Photo
Pour Revoir ET Effacer DES Photos
Pour Prendre UNE Photo
Changement DES Réglages DE L’APPAREIL Photo
Réglages -2, -1.5, -1.0, -0.5, 0, +0.5, +1, +1.5, +2
Capacité réelle dépend du contenu des photos
Utilisation DES Modes Spéciaux DE Prise DE Vues
Pour Visionner LES Photos Mémorisées
Dans ce menu
Qualité de l’image *** le mieux, ** mieux, * standard
Séquentielle icône d’images multiples
Carte SD Affiché quand une carte est insérée
Installation DU Logiciel
Play Lecture
Indications PAR DEL/SON
Système Requis Pour LE Logiciel Photosuite Inclus
Installation DE Photo Suite
Téléchargement DES Photos
Réglages EN Fonction DES Yeux figure
Mise AU Point
Ceilletons D’OCULAIRES figure
Nettoyage
Instructions Pour L’ENTRETIEN DES Jumelles
Garantie Limitée DE Deux ANS
Comprobar LAS Configuraciones DE LA Cámara
Guía Rápida DEL Imageview 11-0832 DE Bushnell
Instalar LAS Pilas Y LA Tarjeta SD Opcional
Encender LA Cámara Y LA Pantalla DE Visualización
Instrucciones DEL Binocular
Sacar UNA Fotografía
Vista Previa Y Borrar Fotografías
Descargar Fotografías a SU ORDENADOR/COMPUTADOR
Cambiar LA Configuración DE LA Cámara
Pulse Menú para confirmar y volver al menú de configuración
Se ofrecen las siguientes configuraciones
Configuraciones -2, -1.5, -1.0, -0.5, 0, +0.5, +1, +1.5, +2
Para Usar Modalidades Especiales DE Disparo
Excelente para tomar fotografías de deportes o acción
Vista Previa DE LAS Fotografías Guardadas EN LA Memoria
En la esquina superior derecha de la pantalla LCD
Símbolos DE LA Pantalla LCD Iconos Visibles EN
Medidor de pila Visualiza el nivel de las pilas
Guardadas en la memoria interna o en la tarjeta SD
Secuencial icono de imágenes múltiples
Play Reproducir
Indicacions DE LUZ LED/SONIDO
Requisitos DEL Sistema Para EL Software Photosuite Incluido
Instalación DEL Software
Cómo SE Descargan LAS Fotografías
Instalación DE Photo Suite
Se puede usar cualquiera de los métodos siguientes
Instrucciones DE LOS Binoculares
Enfoque
Ajustes Para LOS Ojos Figura
Ojeras Figura
Instrucciones Para EL Cuidado DE LOS Binoculares
Limpieza
Kurzer Leitfaden Bushnell Imageview
Batterien UND ALS Option DIE SD Karte Einlegen
DIE Kamera UND DAS Display Einschalten
DIE Kameraeinstellungen Prüfen
Batterien Einlegen
Anleitung FÜR DIE Stereokamera
EIN- UND Ausschalten DER Kamera
EIN Bild Aufnehmen
Änderung DER Kameraeinstellungen
Folgende Einstellungen sind vorhanden
Einstellungen -2, -1.5, -1.0, -0.5,0, +0.5, +1, +1.5, +2
To USE Benutzung Spezieller Aufnahmemodi
Kontrolle VON Fotos IM Speicher
Kontrolle
Batteriemeßgerät Zeigt den Füllstand der Batterie an
Oder auf der SD Karte gespeicherten Fotos
SD Karte Wird angezeigt, wenn eine Karte eingeschoben ist
LED/TON-ANGABEN
Play Abspielen
Anschluss AN DEN Computer
Installation VON Photo Suite
Downloaden VON Fotos
Sie können die eine oder die andere Methode benutzen
Alle Fotos AN Ihre Interne Festplatte Übertragen Empfohlen
Anleitung FÜR Fernglas
Fokussieren
Augenanpassung Abbildung
Augenmuscheln Abbildung
Anleitung FÜR DIE Pflege VON Ferngläsern
Reinigung
Installazione Delle Pile E Facoltativamente Della Scheda SD
Guida DI Consultazione Rapida Bushnell Imageview
Accensione Della Fotocamera E DEL Display
Regolazione DEL Binocolo PER UNA Visione Soddisfacente
Installazione Delle Pile
Istruzioni PER L’USO DEL Binocolo
Accensione E Spegnimento Della Fotocamera
Scatto DI UNA Foto
Ripresa DI UN’IMMAGINE
Modifica Delle Impostazioni Della Fotocamera
Sono disponibili le seguenti impostazioni
Impostazioni -2, -1.5, -1.0, -0.5,0, +0.5, +1, +1.5, +2
USO Delle Modalità DI Scatto Speciali
Esame Delle Foto Memorizzate Nella Fotocamera
1280×1024, L 800×600
Indicatore batteria segnala il livello di carica delle pile
Sequenza icona di più inquadrature
Installazione DEL Software
Modalità Riproduzione Play
SPIE/SEGNALI Acustici
Requisiti DI Sistema PER IL Software Photosuite Incluso
Scaricamento Delle Foto
Installazione DI Photo Suite
Potete usare l’uno o l’altro dei due metodi che seguono
Regolazioni PER L’ADATTAMENTO Agli Occhi Figura
Messa a Fuoco
Bordi Degli Oculari Figura
Pulizia
Come Avere Cura DEL Binocolo
Garanzia Limitata PER DUE Anni
Guia DE Consulta Rápida Bushnell Imageview
Instale AS Pilhas E O Cartão DE Memória SD Opcional
Ligue a Câmara E O Display
White Bal Equilíbrio de branco Auto Automático
Instruções do Binóculo
Instalação DAS Pilhas
Como Ligar E Desligar
Câmara
Como Mudar AS Configurações DA Câmara
Configurações -2, -1.5, -1.0, -0.5,0, +0.5, +1, +1.5, +2
Configurações pixels 2048x1536, 1600x1200, 1280x1024
Como Tirar Fotografias
Para Usar OS Modos Especiais AO Tirar Fotografias
Como Examinar AS Fotografias Armazenadas NA Memória
Medidor de pilhas Exibe o nível de carga das pilhas
Armazenadas na memória interna ou no cartão SD
1280x1024, L
Superior, * Standard Padrão
Play Reprodução
Indicações DE LED/SOM
Requisitos do Sistema Para O Software Photosuite Incluído
Instalação do Software
Como Fazer O Download DAS Fotografias
Instalação do Photo Suite
Podem ser usados um dos seguintes métodos abaixo
Ajuste AOS Olhos Figura
Focalização
Viseiras Figura
Como Cuidar DOS Binóculos
Evite bater ou derrubar o binóculo
Armazene-o em um local fresco e seco
Ele não é à prova d’água/embaçamento
Bushnell Performance Optics