Operating Instructions | CHN10101AV |
Manual de Instrucciones | CHN10101AV |
General Safety Information (Continued)
•Assuring the proper maintenance of all tools in employer’s possession.
•Ensuring that tools which require repair are not further used before repair. Tags and physical segrega- tion are recommended means of control.
GENERAL
●To reduce the risk of electrical shock, fire, and personal injury, read all the instructions before using the tool.
●Read and understand tool labels and manual. Failure to follow warnings, dangers, and cautions could result in DEATH or SERIOUS INJURY.
●Use only a pressure- regulated com-
pressed air source to limit the air pressure supplied to the tool. The regulated pres-
sure must not exceed 100 psi. If the regulator fails, the pressure deliv- ered to the tool must not exceed 200 psi. The nailer could explode which will cause death or serious personal injury.
●Do not make any modifications to the tool without first obtaining written approval from Campbell Hausfeld. Do not use the nailer if any shields or guards are removed or altered. Do not use the nailer as a hammer. Personal injury or tool
damage may occur.
WORK AREA
●Keep the work area clean and well lighted. Cluttered benches and dark areas increase the risk of electrical shock, fire, and personal injury.
●Do not operate the tool in explosive atmospheres, such as in the presence of flammable liquids, gases, or dust. The tool is able to create sparks resulting in the ignition of dust or fumes.
●Keep bystanders, children, and visi- tors away while operating the tool. Distractions are able to result in the loss of control of the tool.
PERSONAL SAFETY
●Stay alert. Watch what you are doing and use common sense when operating the tool. Do not use the tool while tired or under the influ- ence of drugs, alcohol, or medica- tion. A moment of inattention while operating the tool increases the risk of injury.
●Dress properly. Do not wear loose clothing or jewelry. Contain long hair. Keep hair, clothing, and gloves away from moving parts. Loose clothes, jewelry, or long hair increas- es the risk of injury as a result of being caught in moving parts.
●Avoid unintentional starting. Be sure the switch is off before connecting to the air supply. Do not carry the tool with your finger on the switch or connect the tool to the air supply with the switch on.
●Do not overreach.
Keep proper foot- ing and balance at all times. Proper footing and bal- ance enables bet-
ter control of the tool in unexpected situations.
●Use safety equipment. A dust mask,
●Do not attach the hose or tool to your body. Attach the hose to the structure to reduce the risk of loss of balance if the hose shifts.
●Always assume that the tool con- tains fasteners. Do not point the tool toward yourself or anyone whether it contains fasteners or not.
! WARNING
Do not nail on top of another nail. This is able to cause the nail to be deflected and
hit someone, or cause the tool to react and result in personal injury.
Remove finger
! WARNING from the trigger when not driving fasteners. Never carry the tool with your finger on trigger; the tool is able to fire a fastener.
●Never place hands or any other body parts in the nail discharge area of the nailer. The nailer might eject a fastener and could result in
death or serious personal injury.
●Do not drop or throw the tool. Dropping or throwing the tool can result in damage that will make the tool unusable or unsafe. If the tool has been dropped or thrown, exam- ine the tool closely for bent, cracked or broken parts and air leaks. STOP and repair before using or serious injury could occur.
Accesorios
Estos clavos para acabado de Campbell Hausfeld los puede comprar en su tienda más cercana. Si necesita ayuda para encon- trar un artículo, comuníquese al
Modelo # | Longitud | Calibre | Acabado | Cabeza | Unión | Clavos por | Clavos por | |
del cuerpo | línea | Caja | ||||||
|
|
|
|
| ||||
FB001600 | 15,9mm (5/8") | Calibre 18 | Galvanizado | De puntilla/Café | Adhesivo | 100 | 5000 | |
FB002000 | 19,1mm (3/4") | Calibre 18 | Galvanizado | De puntilla/Café | Adhesivo | 100 | 5000 | |
FB002500 | 25,4mm (1") | Calibre 18 | Galvanizado | De puntilla/Café | Adhesivo | 100 | 5000 | |
FB003000 | 31,8mm (11⁄4") | Calibre 18 | Galvanizado | De puntilla/Café | Adhesivo | 100 | 5000 | |
FB180016 | 15,9mm (5/8") | Calibre 18 | Galvanizado | De puntilla/Café | Adhesivo | 100 | 1000 | |
FB180025 | 25,4mm (1") | Calibre 18 | Galvanizado | De puntilla/Café | Adhesivo | 100 | 1000 | |
FB180030 | 31,8mm (11/4") | Calibre 18 | Galvanizado | De puntilla/Café | Adhesivo | 100 | 1000 |
Información de intercambio
Puede usar clavos de las siguientes marcas de clavadoras para acabado neumáticas: Bostitch®
Campbell Hausfeld® NB0030, DeWalt® D51238K, Paslode®
Guía de Diagnóstico de Averías
!ADVERTENCIA Deje de usar la clavadora inmediatamente si alguno de los siguientes problemas ocurre. Podría resultado en heridas graves. Cualquier reparación o reemplazo de piezas los debe hacer
un técnico calificado personal de un centro autorizado de servicio.
| Problema | Causa | Solución |
|
| Hay una fuga de aire en el | Los anillos en O de la cubierta de la válvula | Debe reemplazar los anillos en O & chequear el funcion- | |
| área de la válvula del gatillo | del gatillo están dañados | amiento del elemento de funcionamiento al contacto | |
|
|
|
|
|
| Hay una fuga de aire entre | Los anillos en O están dañados | Debe reemplazar los anillos en O | |
| la cubierta y la boquilla | La cubierta está dañada | Debe reemplazar la defensa | |
|
|
|
| |
| Hay una fuga de aire entre | Los tornillos están flojos | Debe apretar los tornillos | |
| la cubierta y la tapa | El empaque está dañado | Debe reemplazar el empaque | |
|
|
|
|
|
| La clavadora deja de clavar | La cubierta está desgastada | Debe reemplazar la cubierta | |
| un clavo | La boquilla está sucia | Debe limpiar el canal del sistema de impulso | |
|
| La suciedad o daños evitan el desplazamien | Debe limpiar el cargador | |
|
| to libre de los clavos o el mecanismo de |
|
|
|
| impulso en el cargador |
|
|
|
| El resorte del mecanismo de impulso está | Debe reemplazar el resorte | |
|
| dañado |
|
|
|
| El flujo de aire hacia la clavadora es | Cheque las conexiones, la manguera o el compresor | |
|
| inadecuado |
|
|
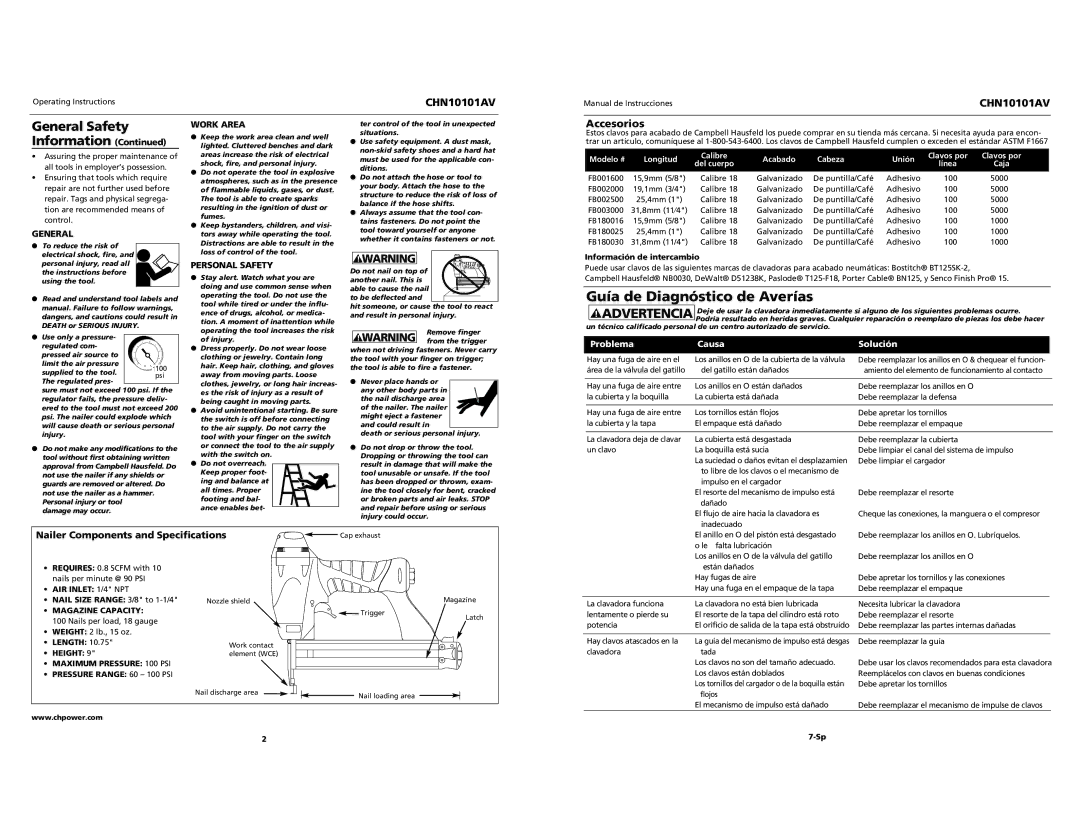
Nailer Components and Specifications
![]() Cap exhaust
Cap exhaust
El anillo en O del pistón está desgastado | Debe reemplazar los anillos en O. Lubríquelos. |
o le falta lubricación |
|
Los anillos en O de la válvula del gatillo | Debe reemplazar los anillos en O |
•REQUIRES: 0.8 SCFM with 10 nails per minute @ 90 PSI
•AIR INLET: 1/4" NPT
•NAIL SIZE RANGE: 3/8" to
•MAGAZINE CAPACITY:
100 Nails per load, 18 gauge
•WEIGHT: 2 lb., 15 oz.
•LENGTH: 10.75"
•HEIGHT: 9"
•MAXIMUM PRESSURE: 100 PSI
•PRESSURE RANGE: 60 – 100 PSI
Nozzle shield
Work contact element (WCE)
Magazine
Trigger
Latch
| están dañados |
|
|
| Hay fugas de aire | Debe apretar los tornillos y las conexiones | |
| Hay una fuga en el empaque de la tapa | Debe reemplazar el empaque | |
|
|
|
|
La clavadora funciona | La clavadora no está bien lubricada | Necesita lubricar la clavadora | |
lentamente o pierde su | El resorte de la tapa del cilindro está roto | Debe reemplazar el resorte | |
potencia | El orificio de salida de la tapa está obstruído | Debe reemplazar las partes internas dañadas | |
|
|
|
|
Hay clavos atascados en la | La guía del mecanismo de impulso está desgas | Debe reemplazar la guía | |
clavadora | tada |
|
|
| Los clavos no son del tamaño adecuado. | Debe usar los clavos recomendados para esta clavadora | |
| Los clavos están doblados | Reemplácelos con clavos en buenas condiciones | |
| Los tornillos del cargador o de la boquilla están | Debe apretar los tornillos | |
Nail discharge area | Nail loading area |
|
www.chpower.com
flojos |
|
El mecanismo de impulso está dañado | Debe reemplazar el mecanismo de impulse de clavos |
2 | |
|