Manual de Instrucciones
Model SB504000
Cómo usar la Herramienta (Cont.)
3.Remueva (3) tornillos de cabeza de la boca de la herramienta. Remueva la placa de la boca, el espaciador y el Elemento de Contacto de Trabajo para dejar expuesto el sujetador atascado.
4.Vuelva a instalar el conjunto de la boca en el orden inverso del paso #3.
5.Asegúrese que el gatillo funciona y que el Elemento de Contacto de Trabajo se mueve libremente hacia arriba y hacia abajo sin atascarse o pegarse.
Si no se retiran
todos los sujetadores éstos saldrán por el frente de la herramienta.
Servicio Técnico
Si desea hacer alguna pregunta refe- rente a la reparación u operación de las herramientas, o para solicitar copias adicionales de este manual, sírvase llamar a nuestro número especial, 1-
Sujetadores y Piezas de Repuesto
![]() Use solamente sujetadores Campbell Hausfeld originales calibre 16 (o su equivalente) - (vea la información sobre intercambio de sujetadores). El desempeño de las herramientas, la seguridad y la duración pueden disminuir si no se utilizan los sujetadores adecuados. Cuando ordene piezas de repuesto o sujetadores, especifique el número de la pieza.
Use solamente sujetadores Campbell Hausfeld originales calibre 16 (o su equivalente) - (vea la información sobre intercambio de sujetadores). El desempeño de las herramientas, la seguridad y la duración pueden disminuir si no se utilizan los sujetadores adecuados. Cuando ordene piezas de repuesto o sujetadores, especifique el número de la pieza.
Para reparar la herramienta
La herramienta debe ser reparada únicamente por personal calificado, y deben usar piezas de repuesto y accesorios originales Campbell Hausfeld, o piezas y accesorios que funcionen de manera equivalente.
Para colocarle los sellos
Cada vez que repare una herramienta deberá limpiarle y lubricarle las partes internas. Le recomendamos que use Parker
Operating The Tool
(Continued)
5. Depress the Work
Contact Element (WCE) against the work
surface without pulling the trigger. The tool
MUST NOT OPERATE. Do not use the tool if it operates without pulling the trigger. Personal injury may result.
6. Remove the tool from
the work surface. The Work Contact Element
(WCE) must return to its
original down position. ![]() The tool MUST NOT OPERATE. Do not use the tool if it operates while lifted from the work surface.
The tool MUST NOT OPERATE. Do not use the tool if it operates while lifted from the work surface.
Personal injury may result.
7. Pull the
trigger and
depress the work
contact
element (WCE) against the work surface. The tool MUST NOT OPERATE.
8.Depress the Work Contact Element (WCE)
against the work surface. Pull the trigger. The tool MUST OPERATE.
![]() An improperly functioning tool must not be used. Do not actuate the tool unless the tool is placed firmly against the work piece.
An improperly functioning tool must not be used. Do not actuate the tool unless the tool is placed firmly against the work piece.
LOADING/UNLOADING THE TOOL
1. Always connect the tool to the air supply before loading fasteners.
2. Push down |
| Latch |
on the latch |
| |
| Button | |
button. |
| |
|
| |
Pull back |
|
|
on the |
|
|
|
| |
magazine cover. |
| |
3a. For nails,
insert a stick of
Campbell
Hausfeld
nails or equivalent (see “Fasteners” section) into the magazine. Make sure the pointed ends of the
fasteners are resting on the bottom ledge of the magazine when loading. Make sure the nails are not dirty or damaged.
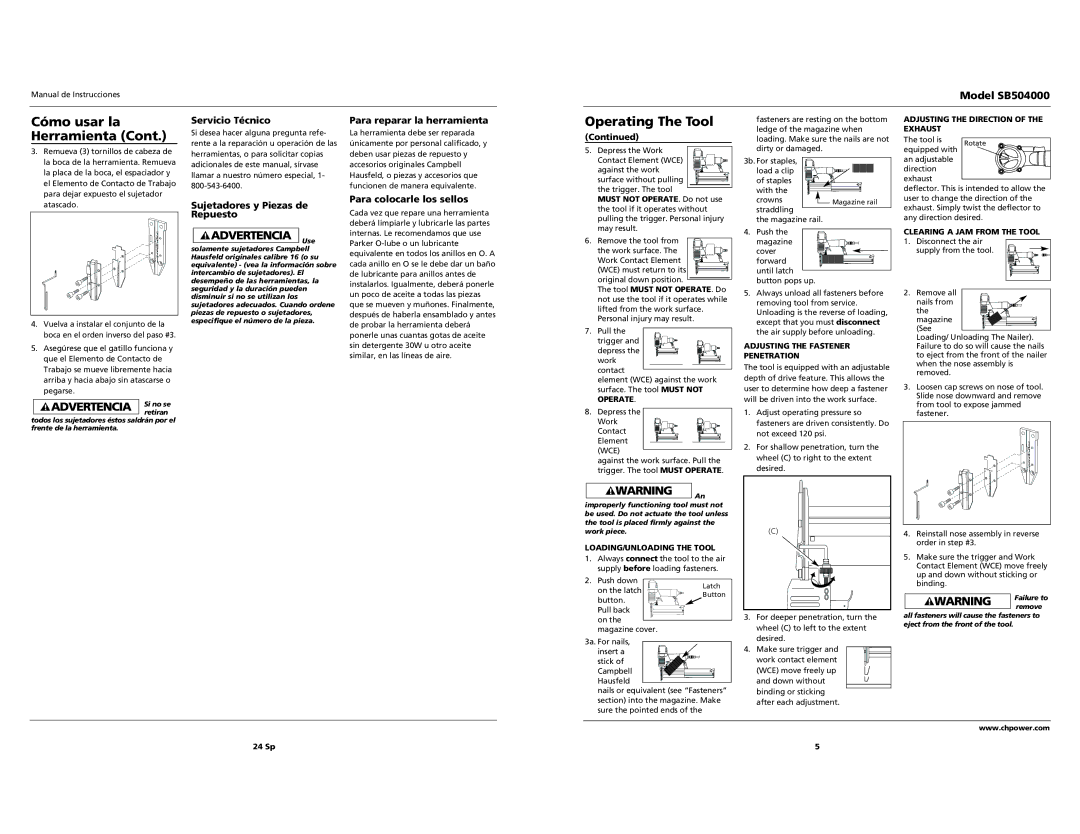
3b. For staples, load a clip of staples with the
crowns |
| Magazine rail |
|
straddling
the magazine rail.
4. Push the magazine cover forward until latch button pops up.
5.Always unload all fasteners before removing tool from service. Unloading is the reverse of loading, except that you must disconnect the air supply before unloading.
ADJUSTING THE FASTENER
PENETRATION
The tool is equipped with an adjustable depth of drive feature. This allows the user to determine how deep a fastener will be driven into the work surface.
1.Adjust operating pressure so fasteners are driven consistently. Do not exceed 120 psi.
2.For shallow penetration, turn the wheel (C) to right to the extent desired.
(C)
3.For deeper penetration, turn the wheel (C) to left to the extent desired.
4.Make sure trigger and work contact element (WCE) move freely up and down without binding or sticking after each adjustment.
ADJUSTING THE DIRECTION OF THE EXHAUST
The tool is | Rotate | |
equipped with | ||
| ||
an adjustable |
| |
direction |
| |
exhaust |
|
deflector. This is intended to allow the user to change the direction of the exhaust. Simply twist the deflector to any direction desired.
CLEARING A JAM FROM THE TOOL
1. Disconnect the air supply from the tool.
2. Remove all
nails from the
magazine (See
Loading/ Unloading The Nailer). Failure to do so will cause the nails to eject from the front of the nailer when the nose assembly is removed.
3.Loosen cap screws on nose of tool. Slide nose downward and remove from tool to expose jammed fastener.
4.Reinstall nose assembly in reverse order in step #3.
5.Make sure the trigger and Work Contact Element (WCE) move freely up and down without sticking or binding.
Failure to remove
all fasteners will cause the fasteners to eject from the front of the tool.
www.chpower.com
24 Sp | 5 |