Camera User Guide
Camera User Guide
Quick Start
Selected and press
Confirm that Erase is
Front View
Components Guide
Back View
Lower Indicator
Upper Indicator
Orange Ready to shoot, using the flash
Operation Panel
Shooting mode should be set to , , or
Symbols Used
About this Camera User Guide
Question? Look here first
Table of Contents
Table of Contents
USB Cable 101 Downloading directly from a CF card 104
Connecting the camera to a computer via
Resetting the Settings to Default 112 List of Messages 113
Camera Body Temperature
Accessories
Language Setting
Read this First
Please Read
Safety Precautions
Read this First
Read this First
Read this First
Read this First
Avoid Strong Magnetic Fields
Preventing Malfunctions
Be sure that the camera power is off
Installing the Battery and CF Card
Insert the batteries as shown and close the battery cover
Preparing the Camera
Preparing the Camera
Proper Battery Handling
Preparing the Camera
About CF Cards
Battery Status Indications
Rec. or Play menu will display
Setting the Date / Time
Turn the power on p Press the Menu button
Press to select the Set up menu
Setting the Language
Set the date and time
Press the SET button Press the Menu button
Set the language
Changing the language settings
Press the SET button
Press To select the language
Shooting Mode
Turning the Power on / OFF
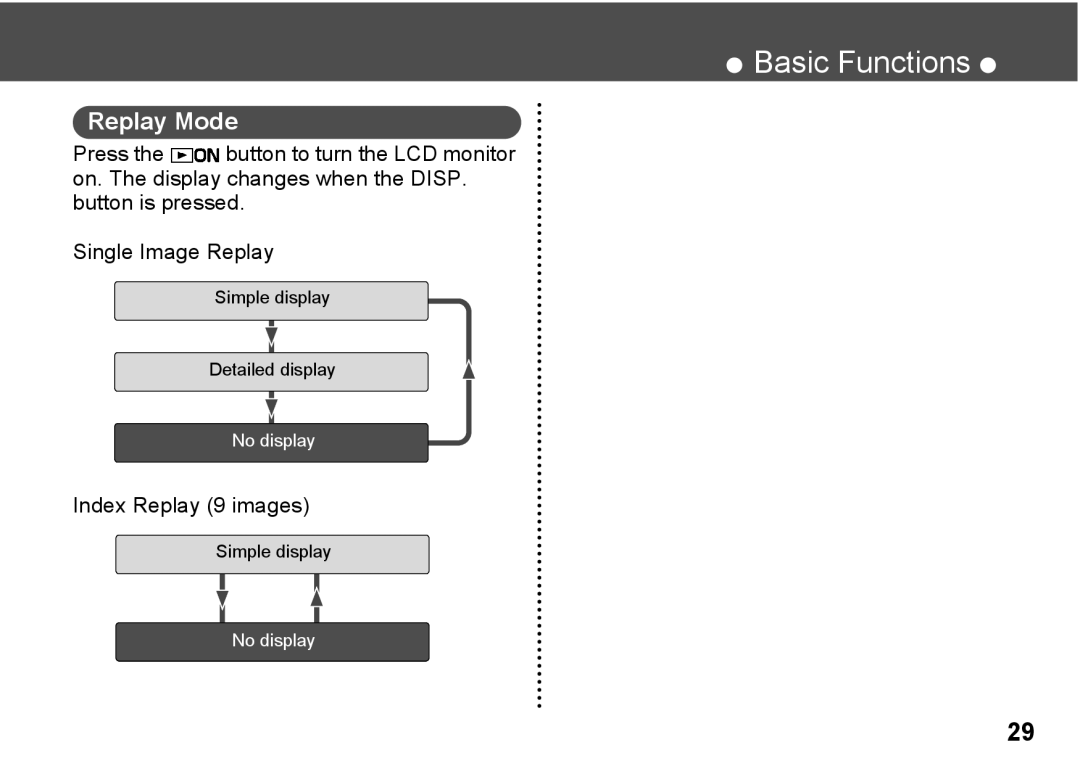
Replay Mode
Basic Functions
Open the lens cover to switch to Shooting mode
Switching between Shooting / Replay
Press the button to switch to Replay mode
Using the LCD Monitor
Index Replay 9 images
Information Displayed on the LCD Monitor
Replay Mode Detailed Display
Replay Mode Simple Display
Following information is displayed for the Simple Display
File no
About the AF Function
Using the Viewfinder
You can press the shutter button all the way down or halfway
Pressing the Shutter Button
You can erase the images while they are displayed p
Using the Digital Zoom
Adjust Zoom
Press the FUNC. button
Selecting Menus and Settings
Icons displayed indicate the current settings
Settings with the Menu button
FUNC. Menu
Menu Items Available Settings
Menu Settings and Default Settings
Items set with the Menu button
Exposure Compensation
Reference Pages
Some menu items are unavailable in certain shooting modes
Customizing the Camera My Camera Settings
Mode
Changing My Camera Settings
Press the Menu button. The menu will appear
Press the button Press the Menu button
Registering My Camera Settings
Menu will appear
Will be displayed
Proceed to step
Recording Time
File Format of My Camera Settings
Set the shooting mode switch to
Selecting the Shooting Mode
Shooting
Selecting , , or
Changing the Resolution / Compression
Press the FUNC. button Select * or * with
Select the compression or resolution With
Current setting is displayed
Available Available only for the first image
Using the Flash
Shoot the image
Red-Eye Reduction
Press On the omni
Macro Infinity Modes
Mode. Subjects framed in the viewfinder
Phenomenon
Appears on the LCD monitor Shoot the image
Continuous Mode Self-Timer
Framing a Subject
Stitch Assist Mode
Shooting
See Functions Available in Each Shooting Mode p
Shoot the next images in the same way
Press the SET button to end the shooting
Resolution can be set to 640 x 320 x 240, or 160 x 120. p
Movie Mode
Using the Focus Lock
Rec. menu, select
Switching between AF Modes
Press to select On or Off Press the Menu button
While the AF function is set to AiAF, you can
You can switch between metering modes to shoot
Switching between Light Metering Modes
Press to adjust the compensation
Adjusting the Exposure
Current settings is displayed
Press the FUNC. button and select With
Press
Setting the White Balance
Select with
Setting a Custom White Balance
Shooting
Changing the Photo Effect
Effect Mode
Press the FUNC. button, and select
Select the photo effect with
Press the FUNC. button, and select With
Changing the ISO Speed
Set up menu, select File No. Reset
Resetting the File Number
Select the set up method for the file number
Press to select On or Off and press the Menu button
Magnifying Images
Replaying
Displaying Images Individually
Nine images appear at a time
Viewing Images in Sets of Nine
Changing the Displayed Images
Press to select the movie
Viewing Movies
Select with , and press the SET button
Replay movies you shot
Select the movie you wish to edit, and press the SET button
Editing Movies
Select Edit with , and press the SET button
Viewing Movies p
Select the editing position with
Select the editing method with
Select Replay with , and press the SET button
Select Save with , and press the SET button
Select Overwrite or New File with , and press the SET button
Play Menu, select Rotate and press the SET button
Rotating Images in the Display
Attaching Sound Memos to Image
Playing the Sound Memos
Erasing the Sound Memos Settings
Erasing the Sound Memos
Select in step
To stop Auto Play, press the Menu button
As with the single image display mode
Auto Play
Play Menu, select Protect and press the SET button
Protecting Images
Icon appears on the protected image
To release the protection, press the SET button again
Erasing Single Images
Erasing
Erasing All Images
Press to select OK and press the SET button
Formatting a CF Card
Set up Menu, select Format and press the SET button
About Printing
Printing
Printing
Selecting from the Print Order Menu
Direct Print Function Replay Dpof Settings Replay
Turn off the Camera
Connecting the Camera to a Printer
Press the button to turn the camera power on
Press the printers ON/OFF button to turn on the power
Turn the BJ printers power on after
Connecting Bubble Jet Printer to the Camera
Cable
If the printer is correctly connected, the icon
Printing
Movies cannot be printed
Setting the Number of Copies
Print Settings Direct Print Function
Setting the Print Style
You can specify print settings while a printer is connected
Direct Print Function Compliant BJ Printer
While displaying the image, press
Press to select Image or Paper, Borders, or Date
Date Select On or Off
You can print a portion of the image
Specifying the Printing Area Trimming
Trim the image
Setting the Position of the Trimming Frame
Rotating the Trimming Frame
Changing the Size of the Trimming Frame
For setting images one by one
Print Settings Dpof Print Settings
Selecting Images for Printing
Display the Print Order menu
Select Clear all to remove all settings
For setting all images on the CF card
Index Reduced-size images per Type Both
You can set up the print style as follows
Print
Select Cancel and press the SET button to cancel the reset
Resetting the Print Settings
See Setting the Print Style p
Printing with Dpof Print Settings
Card Size 20 images Size 42 images Postcard Size 63 images
Cancel Printing p Restarting Printing
Selecting Images for Transferring
Setting the Image Transfer
Play menu, select Transfer Order and press the SET button
Press to select Order and press the SET button
Select images for transferring
Press the button to switch to index replay 3-images display
Downloading Images to a Computer
Connecting the camera to a computer via the USB Cable
102
103
Double-click the icon of the drive with the CF card
Downloading directly from a CF card
FUNC. Menu
Item / Menu Screen Setting Content
List of Menu Options and Messages
Rec. Menu
Play Menu
108
Set up Menu
110
Item / Menu Screen
My Camera Menu
Turn on the camera
Resetting the Settings to Default
Press the Menu button for longer
Than 5 seconds
Busy
List of Messages
Formatting will erase all data in the card
Change the batteries
Unidentified image
You attempted to replay an image recorded in the RAW format
Recorded by a different camera in a proprietary format, etc
Whether the image was actually recorded
Paper and ink are from different sets
Trimming settings were set
Cannot Print
Format, or downloaded to and edited on a computer
Printer in use
Printer error
Completing the current printing
Printer warming up
Shift the date battery slightly
Replacing the Date Battery
Appendices
Direction of the arrow
Appendices
Using Rechargeable Batteries
119
120
To a power outlet
Using the AC Adapter Kit ACK800
Lead to other problems
Camera Care and Maintenance
Wiping the lens lightly with a soft cloth
Lens
Steady orange
Troubleshooting
Battery capacity drops due to low
Problem Cause Solution
Ambient temperatures
Etc. until ready to use them Battery terminals are dirty
125
Camera to infinity mode
When shooting distant subjects, set
When flash is used, the distance between
Off On p
Will be recorded when shooting movies
Adjust the camera angle
Set the flash mode to any other mode
Too bright Cm 7.9 Subject is brighter than
Camera Effective Pixels
Focusing Range
Image Sensor
Digital Zoom
Flash Range
Flash
Shooting Modes
Continuous Shooting
Large 2048 x 1536 pixels
My Camera Settings
Number
Recording
Operating Temperatures
Power Source
Operating Humidity 10 90% Dimensions w x h x d
Weight
CF Cards and Estimated Capacities Recordable Images
Approximate File Size for One Image
Battery Performance
Battery Charger CB-3AH
NiMH Battery NB-1AH
Compact Power Adapter CA-PS800
CompactFlash Card
Index
DC in Terminal Default 112
CF Cards
Digital Terminal
Index
Setting
Print Settings Direct Print Function Print Style
Selecting from the Print Order Menu
Rec. Menu 106 Red-Eye Reduction Red-Eye Reduction Lamp
138
139
Digital Camera, Model PC1045
FCC Notice
141
Resolution Middle
Functions Available in Each Shooting Mode
Pages
Large
143