Install Economizer Hoods (48ZT,ZW Units) —

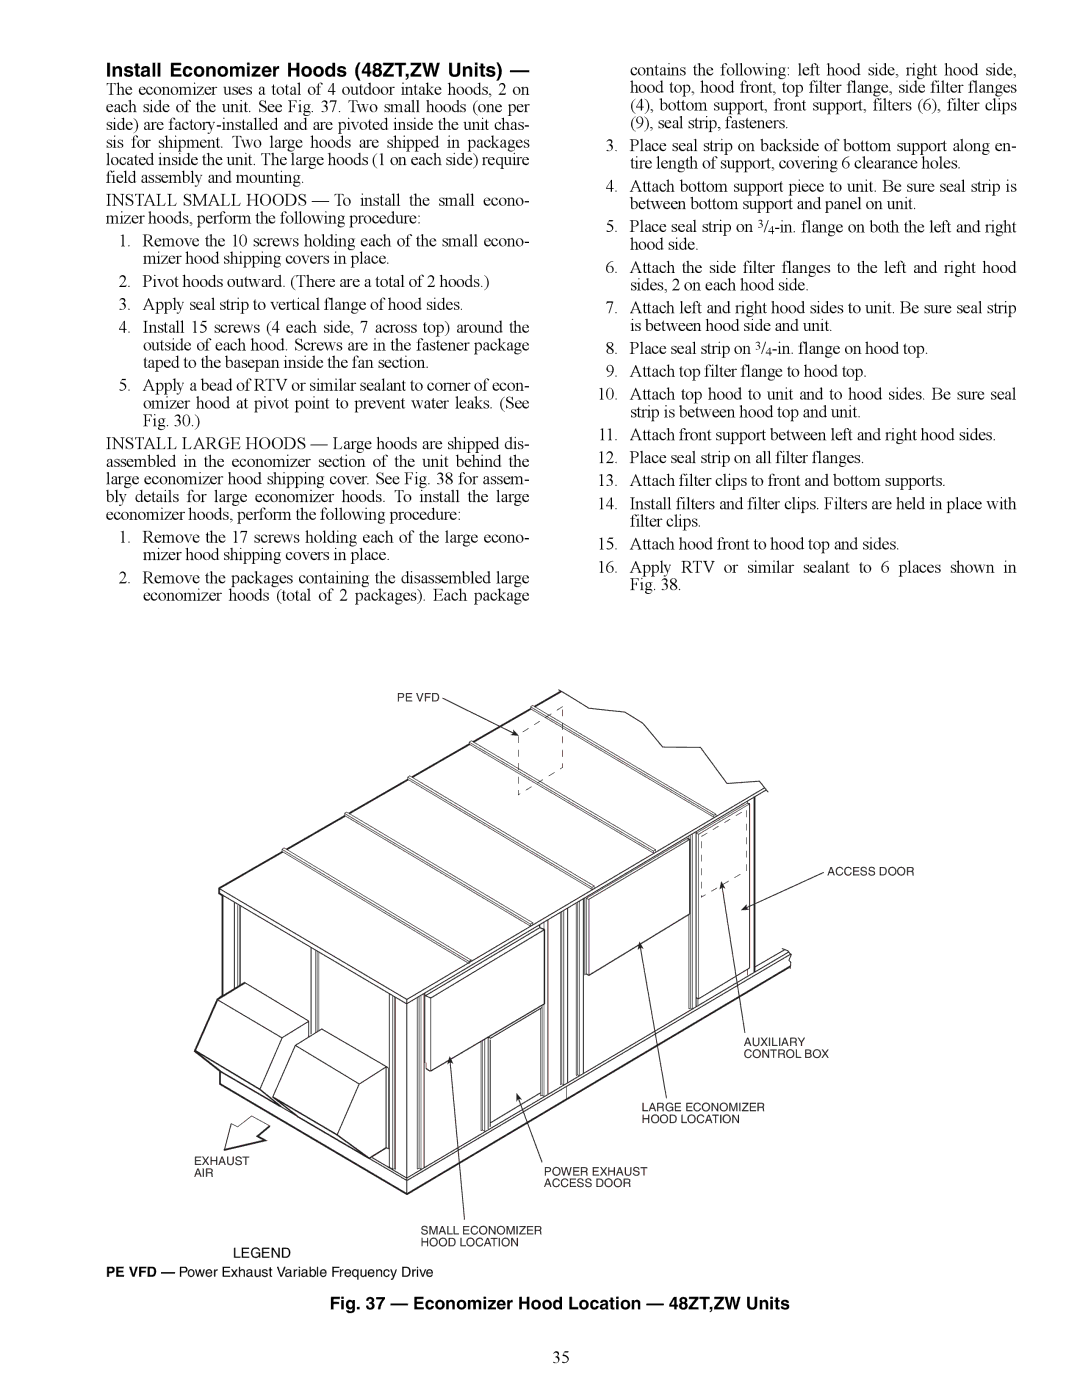
The economizer uses a total of 4 outdoor intake hoods, 2 on each side of the unit. See Fig. 37. Two small hoods (one per side) are factory-installed and are pivoted inside the unit chas- sis for shipment. Two large hoods are shipped in packages located inside the unit. The large hoods (1 on each side) require field assembly and mounting.

INSTALL SMALL HOODS — To install the small econo- mizer hoods, perform the following procedure:

1.Remove the 10 screws holding each of the small econo- mizer hood shipping covers in place.

2.Pivot hoods outward. (There are a total of 2 hoods.)

3.Apply seal strip to vertical flange of hood sides.

4.Install 15 screws (4 each side, 7 across top) around the outside of each hood. Screws are in the fastener package taped to the basepan inside the fan section.

5.Apply a bead of RTV or similar sealant to corner of econ- omizer hood at pivot point to prevent water leaks. (See Fig. 30.)

INSTALL LARGE HOODS — Large hoods are shipped dis- assembled in the economizer section of the unit behind the large economizer hood shipping cover. See Fig. 38 for assem- bly details for large economizer hoods. To install the large economizer hoods, perform the following procedure:

1.Remove the 17 screws holding each of the large econo- mizer hood shipping covers in place.

2.Remove the packages containing the disassembled large economizer hoods (total of 2 packages). Each package

contains the following: left hood side, right hood side, hood top, hood front, top filter flange, side filter flanges (4), bottom support, front support, filters (6), filter clips (9), seal strip, fasteners.

3.Place seal strip on backside of bottom support along en- tire length of support, covering 6 clearance holes.

4.Attach bottom support piece to unit. Be sure seal strip is between bottom support and panel on unit.

5.Place seal strip on 3/4-in. flange on both the left and right hood side.

6.Attach the side filter flanges to the left and right hood sides, 2 on each hood side.

7.Attach left and right hood sides to unit. Be sure seal strip is between hood side and unit.

8.Place seal strip on 3/4-in. flange on hood top.

9.Attach top filter flange to hood top.

10.Attach top hood to unit and to hood sides. Be sure seal strip is between hood top and unit.

11.Attach front support between left and right hood sides.

12.Place seal strip on all filter flanges.

13.Attach filter clips to front and bottom supports.

14.Install filters and filter clips. Filters are held in place with filter clips.

15.Attach hood front to hood top and sides.

16.Apply RTV or similar sealant to 6 places shown in Fig. 38.

EXHAUST

AIR

LEGEND

PE VFD

ACCESS DOOR

AUXILIARY

CONTROL BOX

LARGE ECONOMIZER

HOOD LOCATION

POWER EXHAUST

ACCESS DOOR

SMALL ECONOMIZER

HOOD LOCATION

PE VFD — Power Exhaust Variable Frequency Drive

Fig. 37 — Economizer Hood Location — 48ZT,ZW Units

35

Page 35
Image 35
Carrier 48ZG, ZN030-105, Z6, Z8075-105 installation instructions Install Economizer Hoods 48ZT,ZW Units

Z6, 48ZG, 48ZT, ZW, Z8075-105 specifications

The Carrier Z8075-105, Z6, 48ZG, 48ZT, and ZW series of HVAC systems represent a significant advancement in heating, ventilation, and air conditioning technology. These units are specifically designed for enhanced energy efficiency, superior performance, and ultimate comfort in residential and commercial spaces.

The Carrier Z8075-105 model stands out due to its impressive cooling and heating capabilities. It features a high Seasonal Energy Efficiency Ratio (SEER) and Heating Seasonal Performance Factor (HSPF), allowing for reduced energy consumption and lower utility bills. This model is equipped with advanced inverter technology that enables variable speed operation, significantly reducing noise levels and providing consistent temperature control.

Turning to the Z6 model, it is engineered for both robustness and reliability. It incorporates a modular design that allows for easy installation and maintenance. One of its key features is the use of innovative insulation materials that minimize sound levels, making it ideal for noise-sensitive environments. Furthermore, the Z6 series comes with a smart control system that allows users to monitor and adjust settings remotely, further optimizing energy usage.

The 48ZG and 48ZT models are designed with durability in mind. They utilize a fully enclosed compressor system that protects critical components from environmental damage. These models also boast enhanced dehumidification capabilities, making them suitable for humid climates. Equipped with advanced filtration systems, they improve indoor air quality by removing allergens and particulates effectively.

Carrier's ZW series exemplifies cutting-edge technology with its dual fuel capability, which allows the system to switch between a heat pump and a gas furnace, depending on outdoor temperatures. This feature maximizes energy savings while ensuring a comfortable indoor climate year-round. The ZW models also support integration with smart home systems, providing seamless control through mobile apps.

Collectively, these Carrier models are designed to meet the diverse needs of today’s consumers, offering a blend of efficiency, comfort, and intelligent control. Their ability to adapt to various environmental conditions while maintaining optimal performance makes them a leading choice in the HVAC market. With a focus on sustainability, these systems not only offer significant energy savings but also contribute to reducing the carbon footprint. As technology continues to evolve, Carrier remains at the forefront, delivering reliable, innovative HVAC solutions.