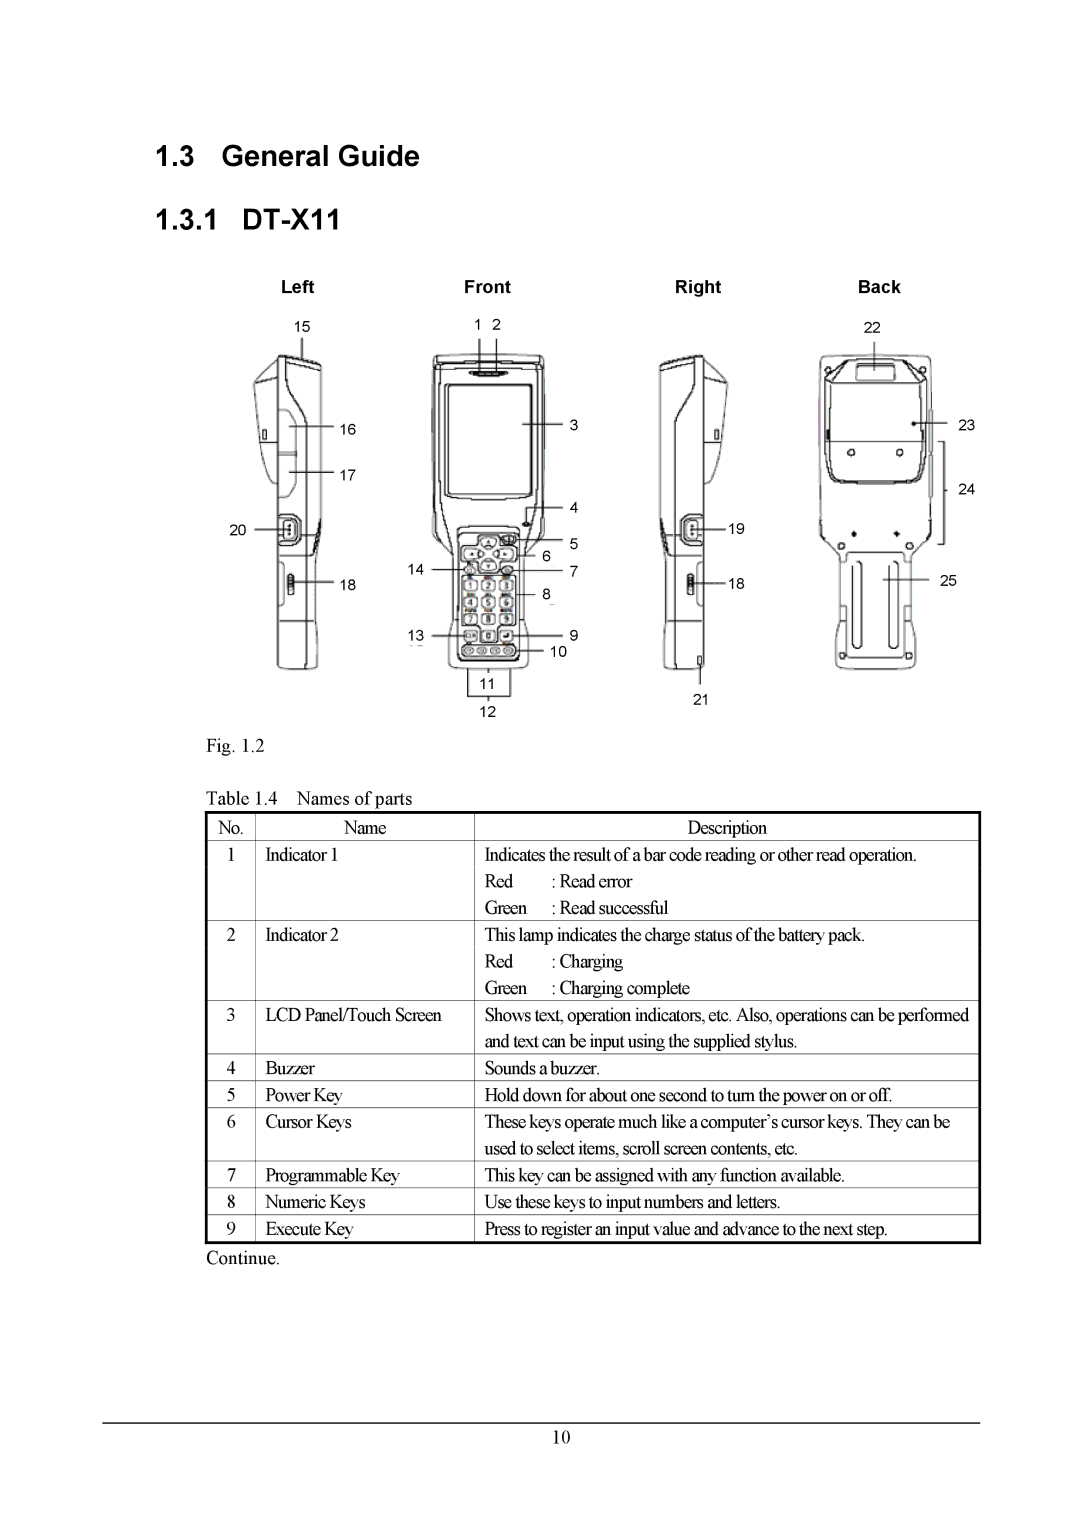
1.3General Guide 1.3.1 DT-X11

Left


Front


Right


Back


1

2


15


22


3


23


16


17


24


4


19


20


5


6


14


7


25


18


18


8


9


13


10


11


21


Fig. 1.2


12


Table 1.4 Names of parts


No.


Name


Description


1


Indicator 1

Indicates the result of a bar code reading or other read operation.


Red


: Read error


Green


: Read successful


2


Indicator 2

This lamp indicates the charge status of the battery pack.


Red


: Charging


Green


: Charging complete


3


LCD Panel/Touch Screen

Shows text, operation indicators, etc. Also, operations can be performed


and text can be input using the supplied stylus.


4


Buzzer

Sounds a buzzer.


5


Power Key

Hold down for about one second to turn the power on or off.


6


Cursor Keys

These keys operate much like a computer’s cursor keys. They can be


used to select items, scroll screen contents, etc.


7


Programmable Key

This key can be assigned with any function available.


8


Numeric Keys

Use these keys to input numbers and letters.


9


Execute Key

Press to register an input value and advance to the next step.


Continue.

10

Page 10
Image 10
Casio handheld terminals, DT-X11 Series manual General Guide 1.3.1 DT-X11

DT-X11 Series, handheld terminals specifications

The Casio DT-X11 Series represents a remarkable line of handheld terminals designed to meet the needs of various industries, including retail, logistics, and manufacturing. Known for their robust performance and user-friendly interface, these devices have become a favorite among businesses seeking to enhance their operational efficiency.

One of the standout features of the DT-X11 series is its exceptional durability. Built to withstand the rigors of demanding work environments, these terminals are compliant with IP54 standards, making them resistant to dust and water splashes. Additionally, they can endure drops from a height of up to 1.5 meters, ensuring reliability in tough conditions.

The DT-X11 series is powered by a high-performance processor, which facilitates fast data processing and seamless multitasking. This efficiency is complemented by a generous memory capacity, allowing users to run complex applications and store large amounts of data without experiencing slowdowns.

Another key characteristic is the device's display. The DT-X11 series features a high-resolution, daylight-readable screen that ensures clear visibility even in bright conditions. This capability is vital for field operations, where workers must read labels, scan barcodes, or access information outdoors.

Connectivity is a strong suit of the Casio DT-X11 series. Equipped with advanced wireless technologies including Wi-Fi and Bluetooth, these terminals enable real-time data transfer. This connectivity enhances communication between team members and systems, promoting streamlined operations and improved decision-making.

The DT-X11 series also excels in scanning capabilities. With an integrated high-performance imager, it can read various barcode types quickly and accurately. This reliability is essential for inventory management, point-of-sale transactions, and logistics applications, where timely and precise data capture is crucial.

In terms of ergonomics, the design of the DT-X11 series considers the user experience. Its lightweight build and comfortable grip reduce user fatigue during prolonged usage. The touchscreen interface, combined with physical buttons, provides versatility in input methods, catering to different user preferences and environments.

Battery life is another highlight, as the DT-X11 series is equipped with a long-lasting battery that supports extended operations without frequent recharging. Users can confidently engage in full-day tasks without the worry of losing power mid-operation.

In summary, the Casio DT-X11 Series offers a potent combination of durability, performance, connectivity, and user-friendliness. These handheld terminals are designed to empower businesses with the tools they need to improve efficiency and accuracy in their operations, making them an excellent investment for industries that rely on mobile data capture.