Manuals
/
Casio
/
Communications
/
PDAs & Smartphones
Casio
IT-2000
installation manual
Setup of Satellite I/O Box, With single Satellite I/O Box
Models:
IT-2000
1
9
31
31
Download
31 pages
30.53 Kb
6
7
8
9
10
11
12
13
Page 9
Image 9
Page 8
Page 10
Page 9
Image 9
Page 8
Page 10
Contents
Copyright 1998. All rights reserved
April
IT-2000 I/O Box Installation Manual
Version
Appendix
Table of Contents
1. Overview
2. System Configuration and Installation Method
2.1 Options and Software
Software
2.2 System Configuration
2.2.1 With Single I/O Box
2.2.2 With Multiple I/O Boxes
2.2.4 With Multiple Master I/O Boxes
2.2.3 With Single Master I/O Box
2.2.5 With Master and Satellite I/O Boxes
2.3 Installation Method
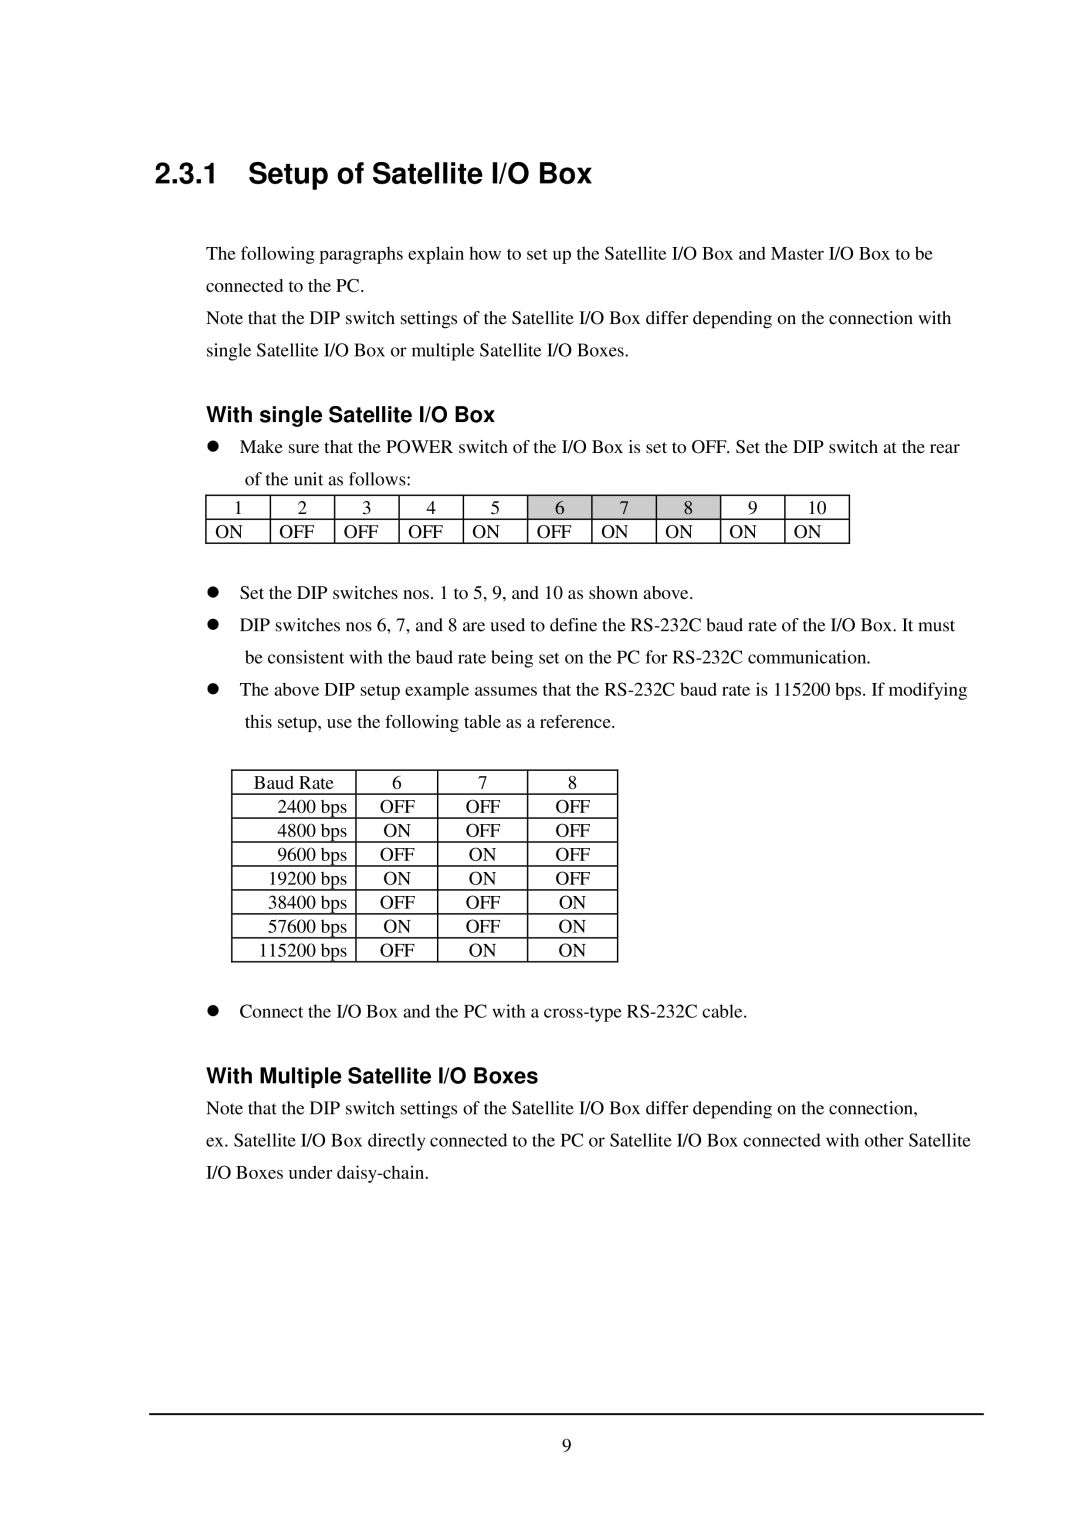
2.3.1 Setup of Satellite I/O Box
With single Satellite I/O Box
With Multiple Satellite I/O Boxes
I/O Box This is for the termination
2.3.2 Setup of Master I/O Box
2.3.3 Setup of Satellite I/O Box to Master I/O Box
2.3.4 Setup of PC
Connection
Startup
Environment Setup
3.1 File Upload
3. Operation Method
3.1.1 Specifying Files from PC
Operation on PC
Operation on IT-2000
FLINK.DLL of Windows 3.1 version
DoFLINK argc, argv argc = argv = fl
FLINK.EXE of MS-DOS version
3.1.2 Specifying Files from IT-2000
FLINK.DLL of Windows 3.1 version
3.2.1 Specifying Files from PC
3.2 File Download
Operation on IT-2000
FLINK /R CFILE D
3.2.2 Specifying Files from IT-2000
DoFLINK argc, argv argc = argv = fl , /r, CFILE, Dyyy
4. Error Codes and Error Messages
Detai
Categ
Table 4.2 Error codes and error messages
5. Q and A
Common to Satellite and Master I/O Boxes
Satellite I/O Box
Master I/O Box
Can I update the version of Master I/O Box firmware ?
6. Reference Manuals
IT-2000 Upload/Download Utility Manual
IT-2000 Technical Reference Manual IT-2000 Hardware Manual
7. List of SCSI Boards and SCSI Cables
SCSI Board
SCSI Cable
Installation
Appendix Installation Method of Upload/Download Utility
Syntax of the Installer Command
setup
Top
Page
Image
Contents