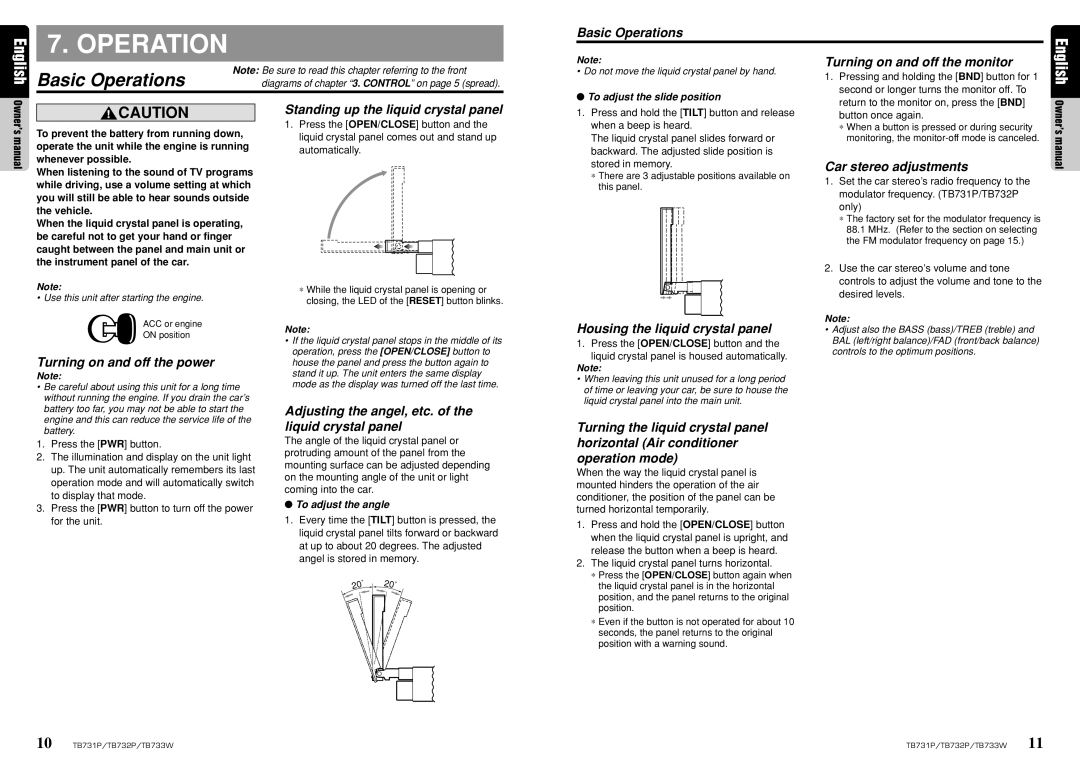
Basic Operations

English

7. OPERATION

Basic Operations

Note: Be sure to read this chapter referring to the front

diagrams of chapter “3. CONTROL” on page 5 (spread).

Note:

Do not move the liquid crystal panel by hand.

To adjust the slide position

Turning on and off the monitor

1. Pressing and holding the [BND] button for 1

second or longer turns the monitor off. To

return to the monitor on, press the [BND]

English

Owner’s manual

CAUTION

To prevent the battery from running down, operate the unit while the engine is running whenever possible.

When listening to the sound of TV programs while driving, use a volume setting at which you will still be able to hear sounds outside the vehicle.

When the liquid crystal panel is operating, be careful not to get your hand or finger caught between the panel and main unit or the instrument panel of the car.

Standing up the liquid crystal panel

1.Press the [OPEN/CLOSE] button and the liquid crystal panel comes out and stand up automatically.

1.Press and hold the [TILT] button and release when a beep is heard.

The liquid crystal panel slides forward or backward. The adjusted slide position is stored in memory.

There are 3 adjustable positions available on this panel.

button once again.

When a button is pressed or during security

monitoring, the monitor-off mode is canceled.

Car stereo adjustments

1.

Set the car stereo’s radio frequency to the


modulator frequency. (TB731P/TB732P


only)


The factory set for the modulator frequency is


88.1 MHz. (Refer to the section on selecting


the FM modulator frequency on page 15.)

2.

Use the car stereo’s volume and tone


controls to adjust the volume and tone to the

Owner’s manual

Note:

Use this unit after starting the engine.

ACC or engine

ON position

Turning on and off the power

Note:

Be careful about using this unit for a long time without running the engine. If you drain the car’s battery too far, you may not be able to start the engine and this can reduce the service life of the battery.

While the liquid crystal panel is opening or closing, the LED of the [RESET] button blinks.

Note:

If the liquid crystal panel stops in the middle of its operation, press the [OPEN/CLOSE] button to house the panel and press the button again to stand it up. The unit enters the same display mode as the display was turned off the last time.

Adjusting the angel, etc. of the liquid crystal panel

Housing the liquid crystal panel

1. Press the [OPEN/CLOSE] button and the

liquid crystal panel is housed automatically.

Note:

When leaving this unit unused for a long period of time or leaving your car, be sure to house the liquid crystal panel into the main unit.

Turning the liquid crystal panel

desired levels.

Note:

Adjust also the BASS (bass)/TREB (treble) and BAL (left/right balance)/FAD (front/back balance) controls to the optimum positions.

1.Press the [PWR] button.

2.The illumination and display on the unit light up. The unit automatically remembers its last operation mode and will automatically switch to display that mode.

3.Press the [PWR] button to turn off the power for the unit.

The angle of the liquid crystal panel or protruding amount of the panel from the mounting surface can be adjusted depending on the mounting angle of the unit or light coming into the car.

To adjust the angle

1.Every time the [TILT] button is pressed, the liquid crystal panel tilts forward or backward at up to about 20 degrees. The adjusted angel is stored in memory.

˚

20

˚

20


horizontal (Air conditioner operation mode)

When the way the liquid crystal panel is mounted hinders the operation of the air conditioner, the position of the panel can be turned horizontal temporarily.

1.Press and hold the [OPEN/CLOSE] button when the liquid crystal panel is upright, and release the button when a beep is heard.

2.The liquid crystal panel turns horizontal.

Press the [OPEN/CLOSE] button again when the liquid crystal panel is in the horizontal position, and the panel returns to the original position.

Even if the button is not operated for about 10 seconds, the panel returns to the original position with a warning sound.

10

TB731P/TB732P/TB733W

TB731P/TB732P/TB733W

11

Page 7
Image 7
Clarion TB731P, TB733W, TB732P owner manual Basic Operations

TB732P, TB731P, TB733W specifications

The Clarion TB733W, TB731P, and TB732P are part of a burgeoning line of advanced multimedia receivers that elevate the in-car entertainment experience. These units are designed for car enthusiasts who prioritize quality audio, extensive connectivity options, and cutting-edge technology.

One of the standout features of the Clarion TB733W is its 7-inch touchscreen display, which offers high-resolution graphics and an intuitive user interface. This makes it easy to navigate through various media sources, whether you're listening to your favorite tunes, accessing smartphone applications, or making hands-free calls. The TB731P and TB732P share a similar user-friendly interface, but the TB732P notably includes a slightly smaller display with 6.2 inches of vibrant visual real estate, catering to different installation preferences.

In terms of audio performance, all three models are equipped with a built-in amplifier that delivers crisp and dynamic sound quality. The receivers support high-resolution audio formats, ensuring that users can enjoy their music in the best possible quality. Additionally, the models feature customizable EQ settings, giving users fine control over their audio experience.

Connectivity is a critical aspect of modern multimedia receivers, and the Clarion TB733W, TB731P, and TB732P shine in this area. They support both Apple CarPlay and Android Auto, allowing users to seamlessly integrate their smartphones for navigation, music streaming, and hands-free communication. Bluetooth technology is also integrated, enabling wireless music playback and phone calls.

Another noteworthy feature is the compatibility with various media formats. The receivers accept USB inputs and SD cards, broadening the range of ways users can access their media libraries. Furthermore, the TB733W comes with additional HDMI input, enhancing the multimedia capabilities by allowing users to connect external devices.

For those concerned about upgrading their vehicle's audio system, all three models are designed with preamp outputs, enabling users to connect external amplifiers and subwoofers easily. This adaptability makes them suitable for anyone looking to customize their listening experience to suit their preferences.

Lastly, safety features are also prioritized. The receivers have user-friendly interfaces that allow for easy operation without distracting the driver. In addition, they include rear-view camera inputs, enhancing visibility and safety when reversing.

Overall, the Clarion TB733W, TB731P, and TB732P are comprehensive multimedia receivers that cater to modern driving needs, balancing excellent audio quality, extensive connectivity, and user-friendliness. Whether you seek a full-featured multimedia hub or a more compact variant, Clarion offers versatile options to enhance any driving experience.