Craftsman 39535006 specifications Instalaation, Install Door Bracket and Plate

Models: 39535006

1 28
Download 28 pages 52.74 Kb
Page 10
Image 10

Instalaation

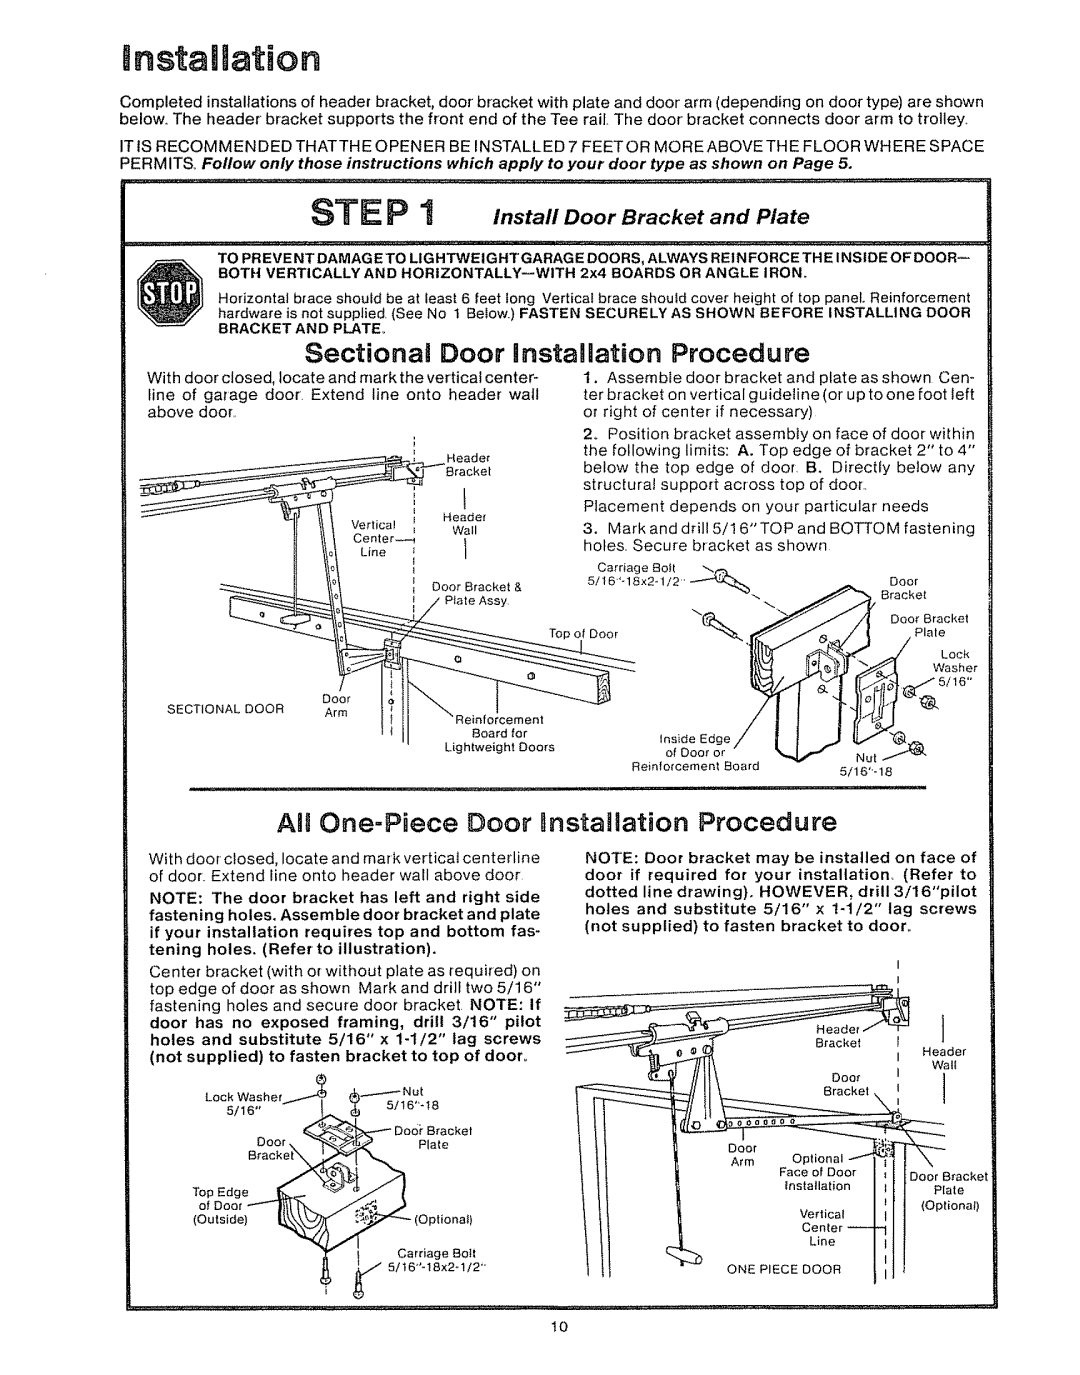
Completed installations of header bracket, door bracket with plate and door arm (depending on door type) are shown below.. The header bracket supports the front end of the Tee rail. The door bracket connects door arm to troltey,

IT IS RECOMMENDED THATTH E OPENER PERMITS. Follow only those instructions

BE INSTALLED 7 FEETOR MOREABOVE THE FLOOR WHERE SPACE which apply to your door type as shown on Page 5.

STEP 1 Install Door Bracket and Plate

TO PREVENT DAMAGE TO LIG HTWEIGHTGARAGE DOORS, ALWAYS REINFORCE THE INSIDE OF DOOR--

BOTH VERTICALLY AND HORIZONTALLYMWITH 2x4 BOARDS OR ANGLE IRON.

Horizontal brace should be at least 6 feet tong Verticat brace should cover height of top panel. Reinforcement hardware is not supplied (See No t Below.) FASTEN SECURELY AS SHOWN BEFORE INSTALLING DOOR

BRACKET AND PLATE_

Sectional Door installation Procedure

With door closed, locate and markthe vertical center-

line of garage door. Extend line onto header wail above door.

1.Assemble door bracket and plate as shown Cen- ter bracket on vertical guideline (or up to one foot left or right of center if necessary)

2o Position bracket assembly on face of door within

Header :kel

L

Header

VerticalWall

Center--

LineI

Door Bracket &

P{ate Assy

the following limits: A. Top edge of bracket 2" to 4" below the top edge of door B. Directly below any structural support across top of door.

Placement depends on your particular needs

3.Mark and drill 5/! 6"TOP and BOTTOM fastening holes Secure bracket as shown

5/16"-18x2-1/2"

._

Door

Carriage Bolt


Bracket


Door Bracket


TOp of Door


Plate


Lock


Washer

SECTIONAL DOOR

Door


5/16"

Arm


Board

for

Inside Edge


Lightweight

Doors

of Door

or


Reinforcement

Nut


Board


5/16"-18

All One-Piece Door installation Procedure

With door closed, locate and mark vertical centerline of door,, Extend line onto header wall above door

NOTE: The door bracket has left and right side fastening holes. Assemble door bracket and plate

if your installation requires top and bottom fas- tening holes. (Refer to illustration).

Center bracket (with or without plate as required) on top edge of door as shown Mark and dri]I two 5/16" fastening holes and secure door bracket. NOTE: if

door has no exposed framing, drill 3/16" pilot

holes and substitute 5/16" x 1-1/2" lag screws (not supplied) to fasten bracket to top of door°

Lock Washer

5/16"5t16"-!8

Bracket

Door,Plate

Top Edge

of Door

(Outside)

- (Optiona!)

Carriage Boil 5/16"-t8x2-1/2'"

NOTE: Door bracket may be installed on face of

door if required for your installation. (Refer to dotted line drawing). HOWEVER, drill 3/16"pilot

holes and substitute 5/16" x t-1/2" lag screws (not supplied) to fasten bracket to door_

Face of DOOr

Door Brackel

installation

Plate


Vertical

(Optional)


Center


Line


ONE PIECE DOOR


lO

Page 10
Image 10
Craftsman 39535006 specifications Instalaation, Install Door Bracket and Plate

39535006 specifications

The Craftsman 39535006 is a versatile and reliable tool designed for both professionals and DIY enthusiasts. This utility tool is part of Craftsman’s extensive range of power tools, known for their durability and innovation. The 39535006 is particularly recognized for its ergonomic design, which makes it comfortable to handle during extended use.

One of the main features of the Craftsman 39535006 is its powerful motor, delivering robust performance suitable for a variety of tasks. Whether you're working on heavy-duty projects or simple home repairs, this tool provides consistent power and efficiency. Its high-torque capabilities allow it to tackle demanding applications, while maintaining precision and control.

Another standout characteristic is the adjustable speed settings. The Craftsman 39535006 allows users to select the optimal speed for their specific project, enabling enhanced control and accuracy. This feature is especially beneficial when working with different materials, as it minimizes the risk of damage while maximizing effectiveness.

In terms of technology, the Craftsman 39535006 incorporates advanced safety features designed to protect the user. The built-in electronic brake is an excellent addition, stopping the tool quickly to minimize potential hazards. Additionally, the tool features an integrated LED light, which illuminates the workspace, providing clarity in low-light conditions.

The build quality of the Craftsman 39535006 is another hallmark of its design. Constructed with high-grade materials, the tool is not only robust but also resistant to wear and tear. This durability ensures that it can withstand the rigors of frequent use, making it an excellent investment for anyone looking to enhance their tool collection.

Furthermore, the Craftsman 39535006 is compatible with a wide array of accessories, allowing for customization based on individual project needs. This versatility means that users can adapt the tool for various tasks, from drilling to sanding, adding to its overall functionality.

In summary, the Craftsman 39535006 combines power, precision, and safety in a single, user-friendly package. With its ergonomic design, adjustable speed settings, and durable construction, this tool stands out in the market. Whether for professional use or home improvement projects, the Craftsman 39535006 is equipped to meet the needs of any user.