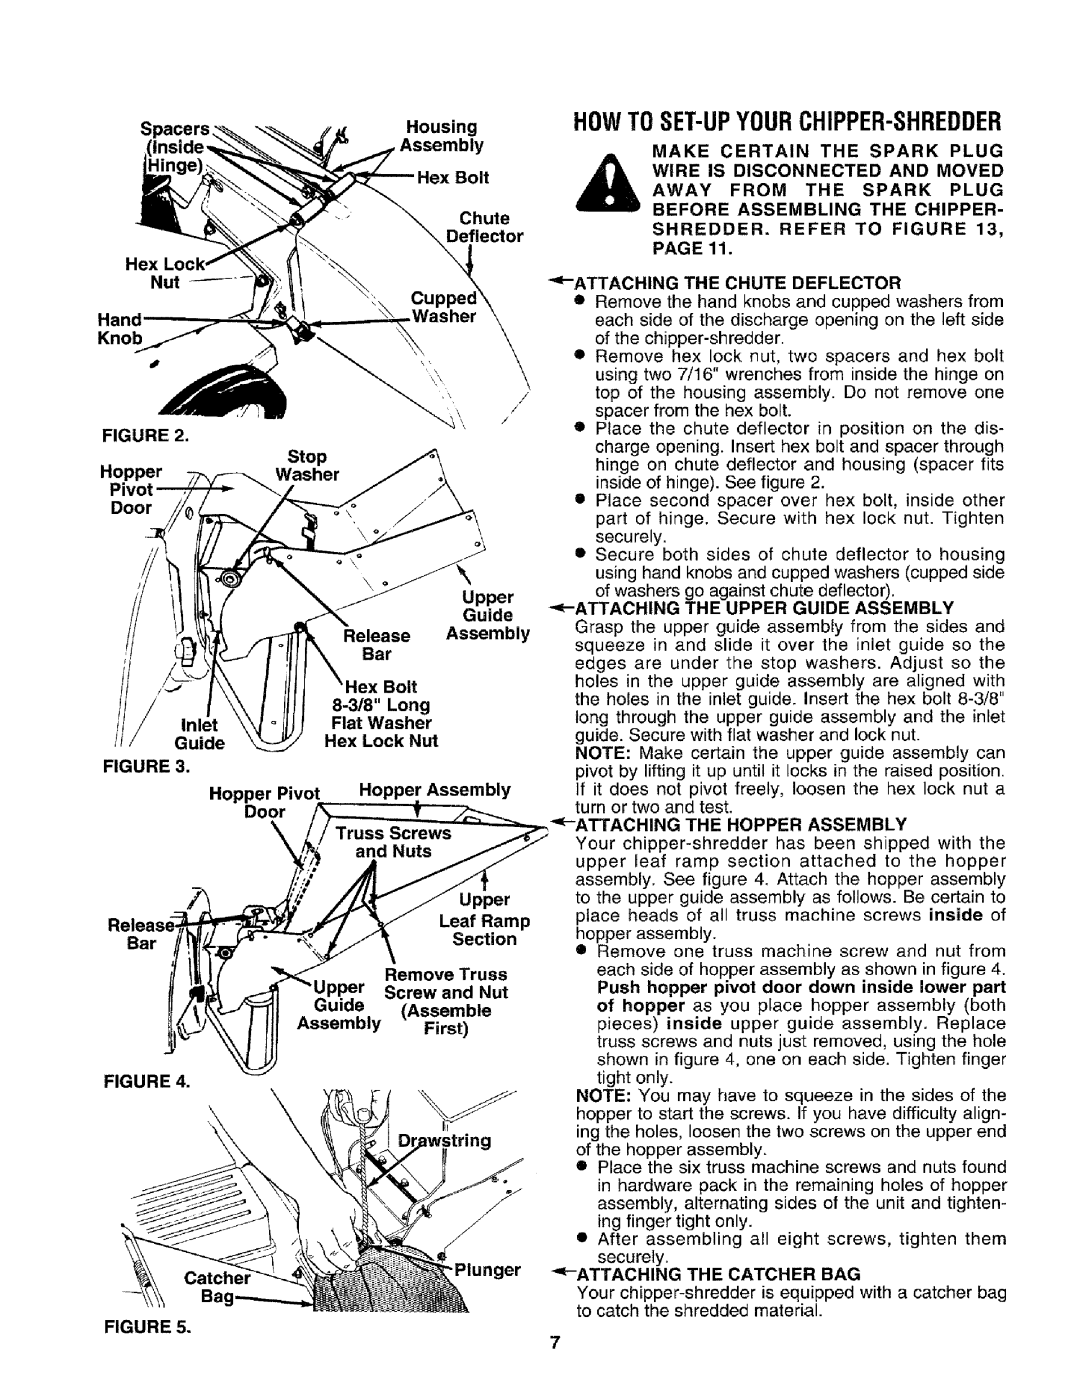
Spacers_Housing
Hex Bolt
Chute
Deflector
Hex
Nut
Hand
Knob
\\\
//
/
/
FIGURE2.
Stop
HopperWasher
Door
|
|
|
|
| \ |
|
|
|
|
| Upper |
|
|
|
|
| Guide |
|
|
| Release | Assembly | |
|
|
| Bar |
| |
|
|
|
| Bolt | |
|
|
| Long | ||
// | Inlet |
| Flat Washer | ||
/ | Guide |
| Hex Lock | Nut | |
FIGURE | 3. |
|
|
|
|
| Hopper | Pivot | Hopper Assembly | ||
| Door |
|
|
| |
|
|
|
|
| Upper |
|
|
|
|
| Leaf Ramp |
Bar |
|
|
|
| Section |
|
|
|
| Remove Truss | |
|
|
|
| Screw and Nut | |
|
| Guide | (Assemble | ||
|
| Assembly |
| First) | |
FIGURE | 4. |
|
|
|
|
.Plunger
FIGURE 5.
HOWTO SET-UPYOUR CHIPPER-SHREDDER
MAKE CERTAIN THE SPARK PLUG
AWAY FROM THE SPARK PLUG
_hb WIRE IS DISCONNECTED AND MOVED
BEFORE ASSEMBLING THE CHIPPER-
SHREDDER. REFER TO FIGURE 13, PAGE 11.
•Remove the hand knobs and cupped washers from each side of the discharge opening on the left side of the
•Remove hex lock nut, two spacers and hex bolt using two 7/16" wrenches from inside the hinge on top of the housing assembly. Do not remove one spacer from the hex bolt.
•Place the chute deflector in position on the dis- charge opening. Insert hex bolt and spacer through hinge on chute deflector and housing (spacer fits inside of hinge). See figure 2.
•Place second spacer over hex bolt, inside other part of hinge. Secure with hex lock nut. Tighten securely.
•Secure both sides of chute deflector to housing using hand knobs and cupped washers (cupped side
of washers go against chute deflector).
"<-ATTACHING THE UPPER GUIDE ASSEMBLY
Grasp the upper guide assembly from the sides and squeeze in and slide it over the inlet guide so the
edges are under the stop washers. Adjust so the holes in the upper guide assembly are aligned with the holes in the inlet guide. Insert the hex bolt
NOTE: Make certain the upper guide assembly can pivot by lifting it up until it locks in the raised position. If it does not pivot freely, loosen the hex lock nut a turn or two and test.
THE HOPPER ASSEMBLY
Your
•Remove one truss machine screw and nut from each side of hopper assembly as shown in figure 4.
Push hopper pivot door down inside lower part of hopper as you place hopper assembly (both pieces) inside upper guide assembly. Replace truss screws and nuts just removed, using the hole shown in figure 4, one on each side. Tighten finger tight only.
NOTE: You may have to squeeze in the sides of the hopper to start the screws. If you have difficulty align- ing the holes, loosen the two screws on the upper end of the hopper assembly.
•Place the six truss machine screws and nuts found in hardware pack in the remaining holes of hopper assembly, alternating sides of the unit and tighten- ing finger tight only.
•After assembling all eight screws, tighten them
securely.
_'-ATTACHING THE CATCHER BAG
Your