Procedimientos de operaci6n

Procedimiento diario de arranque

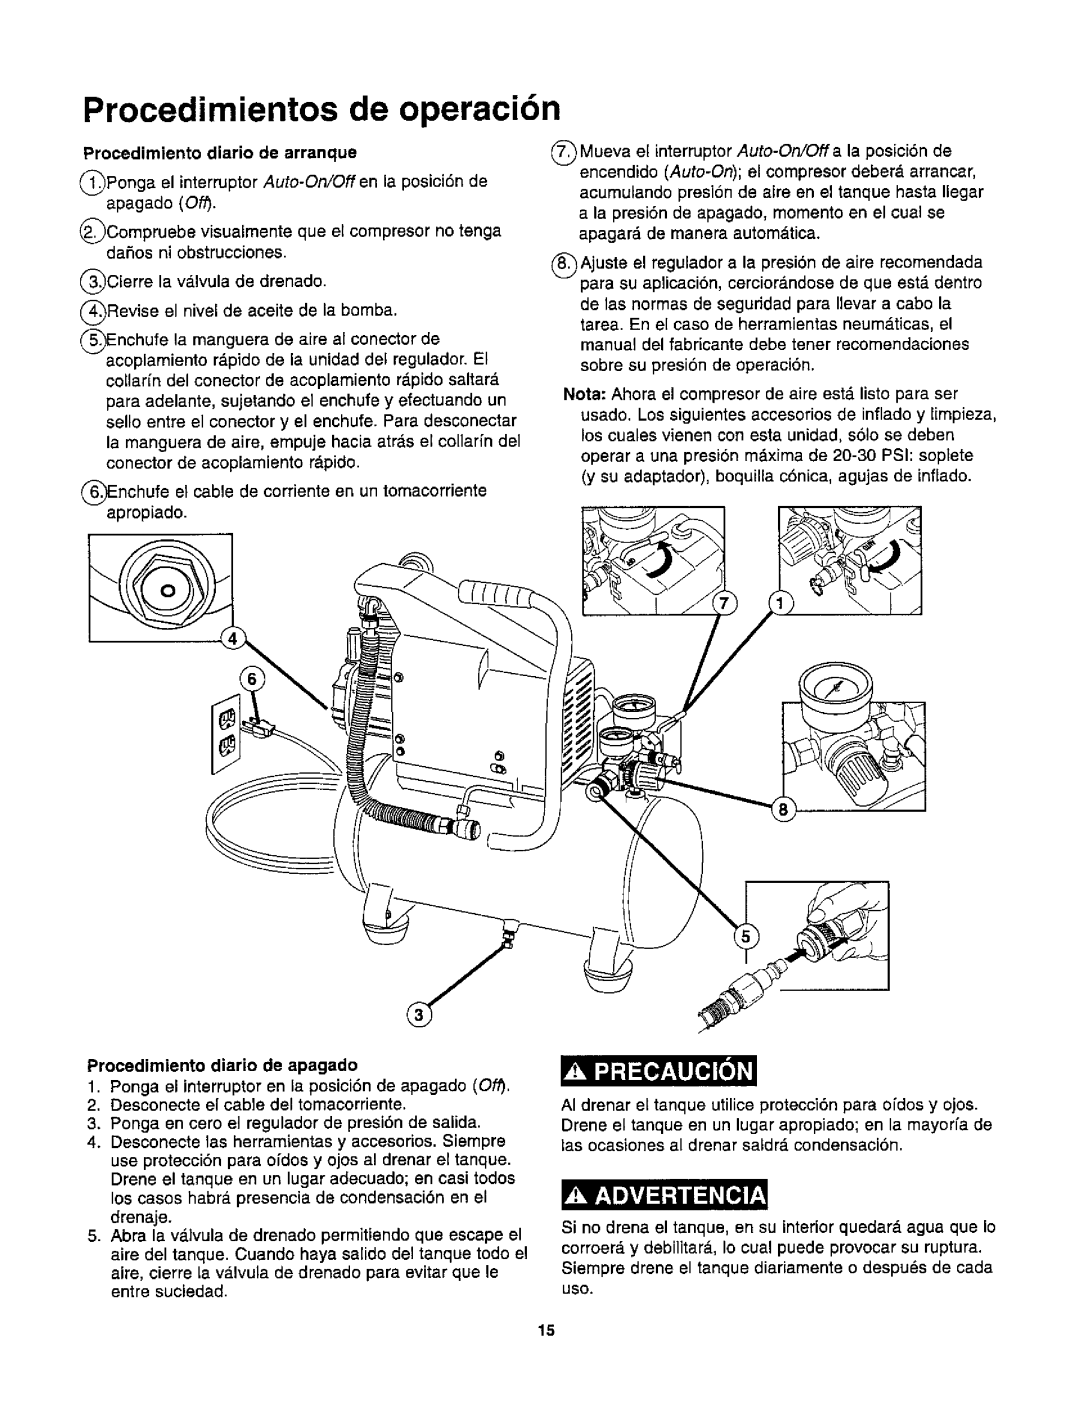
(_Ponga el interruptor Auto-On/Oftenla posici6n de apagado (Off).

_Compruebe visualmente qua el compresor no tenga dafios ni obstrucciones.

(_)Cierre la v&lvula de drenado.

(_Revise el nivel de aceite de la bomba.

Enchufe la manguera de aire al conector de acoplamiento rdpido de la unidad del regulador. El collarin del conector de acoplamiento r#.pido saltar_, para adelante, sujetando el enchufe y efectuando un sello entre el conector y el enchufe. Para desconectar la manguera de aire, empuje hacia atrds el collarfn del conector de acoplamiento rdpido.

(_Enchufe el cable de corriente en un tomacorriente apropiado.

@Mueva el interruptor Auto-OniOffala posici6n de encendido (Auto-On); el compresor deberd arrancar,

acumulando presi6n de aire en el tanque hasta Ilegar a la presi6n de apagado, momento en el cual se apagard de manera automdtica.

(_)Ajuste el regulador a la presi6n de aire recomendada para su aplicaci6n, cercior_.ndose de que est_ dentro

de las normas de segufidad para Ilevar a cabo la tarea. En el caso de herramientas neum&ticas, el manual del fabricante debe tener recomendaciones sobre su presi6n de operaci6n.

Nora: Ahora el compresor de aire est,. listo para ser usado. Los siguientes accesorios de inflado y limpieza, los cuales vienen con esta unidad, solo se deben operar a una presi6n mdxima de 20-30 PSI: soplete (y su adaptador), boquilla c6nica, agujas de inflado.

Procedimiento diario de apagado

1.Ponga el interrupter en la posici6n de apagado (Of/).

2.Desconecte el cable del tomacorriente.

3.Ponga en cero el regulador de presi6n de salida.

4.Desconecte las herramientas y accesofios. Siempre use protecci6n para ofdos y ojos al drenar el tanque. Drene el tanque en un lugar adecuado; en casi todos los casos habra, presencia de condensaci6n en el drenaje.

5.Abra la vdlvula de drenado permitiendo que escape el aire del tanque. Cuando haya salido del tanque todo el aire, cierre la v_.lvula de drenado para evitar que le entre suciedad.

AI drenar el tanque utilice protecci6n para ofdos y ojos. Drene el tanque en un lugar apropiado; en la mayorfa de Lasocasiones al drenar saldr& condensaci6n.

Si no drena el tanque, en su interior quedar_, agua que Io corroer_ y debilitar_., Io cual puede provocar su ruptura. Siempre drene el tanque diariamente o despu_s de cada

use.

15

Page 17
Image 17
Craftsman 921.1531 Procedimientos de operaci6n, Procedimiento diario de arranque, Procedimiento diario de apagado

921.1531 specifications

The Craftsman 921.1531 is a notable addition to the realm of handheld tools, particularly designed for enthusiasts and professionals alike who seek efficiency and performance. This powerful heat gun is celebrated for its versatility, making it suitable for a variety of tasks including paint stripping, thawing frozen pipes, drying damp surfaces, and even crafting projects.

One of the key features of the Craftsman 921.1531 is its dual temperature settings. Users can select from high and low heat options, allowing for precise control depending on the requirements of the job at hand. The low setting, typically around 750°F, is perfect for delicate applications such as loosening adhesive or drying paint, while the high setting—reaching up to an impressive 1,000°F—enables heavy-duty work such as removing old paint from wood surfaces or bending plastic.

The lightweight and ergonomic design of the Craftsman 921.1531 further enhances usability. Weighing in at just over a pound, this heat gun is easy to handle and minimizes user fatigue during extended use. The comfortable grip ensures that the tool can be utilized for prolonged periods without discomfort, making it an excellent choice for both DIY enthusiasts and professionals who demand precision in their work.

In terms of safety, the Craftsman 921.1531 includes built-in features to safeguard the user. The integrated stand allows users to position the heat gun safely during operation, preventing accidental burns or damage. Additionally, the heat gun is designed to quickly cool down after use, enhancing safety and prolonging the lifespan of the tool.

Another vital aspect of the Craftsman 921.1531 is its ease of use. The simple design promotes straightforward operation, with an intuitive on/off switch that allows for immediate readiness and control. This makes it accessible to users of all skill levels, from seasoned craftsmen to novices tackling home improvement projects.

Overall, the Craftsman 921.1531 stands out for its combination of features and user-friendliness. With reliable performance, dual temperature settings, a lightweight design, and safety features, it remains a versatile tool in any workshop. Whether for small home repairs or larger projects, this heat gun is equipped to handle a wide array of tasks, making it a must-have for anyone serious about DIY or professional work.