Remote Control Operating
Instructions
1. Sending Signal: The remote control must be |
aimed directly at the |
control panel when initiating a command. When |
the remote control is switched on and a button is |
pressed, a beep will sound (main unit) confirming a |
signal was sent/received. All program selections |
appearing in the remote control display will appear |
in the display of the main unit when both units are |
operational. If the main unit does not respond to |
the command issued, try the procedure again. |
If the main unit again fails to respond; |
Check the following: |
4.Temperature Setting: Press the remote
+buttons to select the desired C/F operating temperature.
-Each time a button is
pressed the temperature will
increase/decrease 1°C/F. The temperature selected will appear in the remote display. When the main unit is switched on using the remote control, the temperature on the main unit will automatically adjust to the temperature set on the remote control. Temperature ranges from
5. Fan Speed Setting: Press the | “Fan” button |
to select the operating fan speed. Depending on | |
Suggestionspourl’économiedel’énergie
Votre appareilménagerArcticAireestconçupour l’efficacitéenéconomiedel’énergie. Pourlerendement maximal,observerlesrecommandationsquisuivent.
1.Choisirunréglageduthermostatquirépondàvosbesoinsde confortetlelaisserauréglagechoisi.
2.Lefiltreàairesttrèsefficacepouréliminerlesparticulesqui flottentdansl’air. Conserverlefiltreàairpropreentouttemps.
3.Utiliserdesdraperies,desrideauxoudesstorespourprévenir lapénétrationetleréchauffementdelapièceparlesrayons directsdusoleil,maisnepaspermettrelarestrictiondela circulationd’airautourdel’unitéparlesdraperiesoules rideaux.
4.Activervotreclimatiseuravantquelatempératuredel’air extérieurnesoittrèschaudeetinconfortable. Cecipréviendra unepériodeinitialed’inconfortavantquel’uniténepuisse refroidirlapièce. L’usagedelacaractéristiquede MINUTERIEprogrammabled’arrêtetdemiseenmarche automatiquereprésenteunimportantavantageàceteffetsi elleestutiliséeàpleinecapacité.
5.Quandlestempératuresexternessontsuffisammentfroides, placerleclimatiseurhorsdeserviceetutiliserleMODEDE VENTILATEURàlapositionHAUTE,MOYENNEou BASSE. Cecifaitcirculerl’airàl’intérieurdelapiècepour fourniruncertainconfortdeclimatisationenutilisantmoins d’électricité.
| • Are the receiver and the remote unit within the | ||||||||||
|
|
| required 7 meter (23 ft.) operating distance? | ||||||||
| • | Is the receiver window on the main unit partially | |||||||||
|
|
| blocked and/or obscured? |
|
| ||||||
| • | Are the batteries correctly installed inside the | |||||||||
|
|
| remote (positive+ / |
|
| ||||||
| • | Check the batteries. If low, replace. | |||||||||
2. Setting/Adjusting Time of Day Clock | |||||||||||
| (Remote Control): When the batteries are first | ||||||||||
| installed, the clock display flashes “0:00”. Press | ||||||||||
| the M (minute) button to set the correct time in | ||||||||||
| minutes. Each time the M button is pressed the | ||||||||||
| time is increased in 10 minute increments. The | ||||||||||
| time sets automatically (stops flashing) after 5 | ||||||||||
| seconds. Press/hold the H (hour) button to | ||||||||||
| select/change the correct hour time. (time flashes) | ||||||||||
| Each time the H button is pressed the time will | ||||||||||
| increase in 1 hour increments. The time | ||||||||||
| automatically sets (stops flashing) after 5 seconds. | ||||||||||
| When the main unit is swithed on using the remote | ||||||||||
| control, the time on the main unit will automatically | ||||||||||
| adjust to the time set on the remote control. | ||||||||||
3. Mode Setting: Press the “Mode” button to select | |||||||||||
| operating mode. Each time the button is pressed | ||||||||||
| will advance to a different setting i.e |
|
| ||||||||
|
|
|
|
|
| ||||||
| MODE ICONS |
|
|
|
|
| |||||
|
|
|
|
|
|
|
|
|
|
|
|
|
|
|
| COOL |
|
| FAN |
|
| DRY |
|
|
|
|
|
|
|
|
|
| |||
|
|
|
|
|
|
|
|
|
|
|
|
|
|
|
|
|
|
|
|
|
|
|
|
the mode selection, the fan button will advance to |
a different fan speed |
The fan speed selected will appear in the |
display window. |
FAN SPEED ICONS
LOW | MEDIUM | HIGH | |
|
|
| |
MODE | AVAILABLE FAN SPEEDS |
| |
Cool |
| ||
Dry | Low |
| |
Fan |
|
| |
AUTO |
|
| |
LCD Window
5
4
3
8
6
2
Timer On/Off ![]()
18
Installation dans la fenêtre
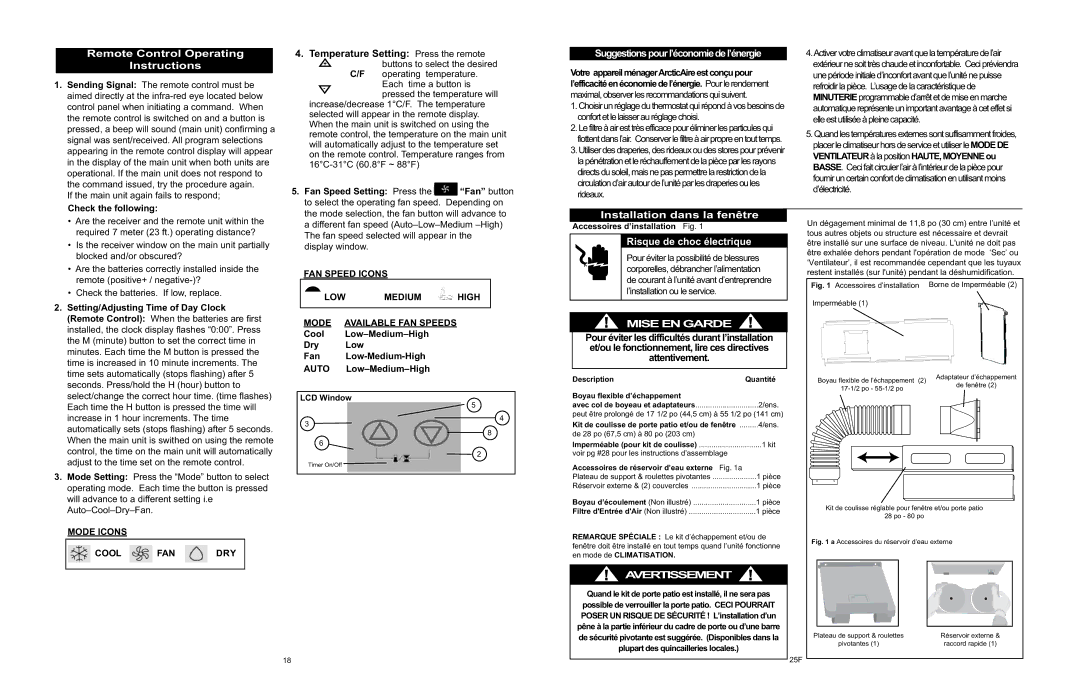
Accessoires d’installation Fig. 1
Risque de choc électrique
Pour éviter la possibilité de blessures corporelles, débrancher l’alimentation de courant à l’unité avant d’entreprendre l’installation ou le service.
 MISEENGARDE
Pour éviter les difficultés durant l’installation et/ou le fonctionnement, lire ces directives attentivement.
Description | Quantité |
Boyau flexible d’échappement |
|
avec col de boyeau et adaptateurs | ..............................2/ens. |
peut être prolongé de 17 1/2 po (44,5 cm) à 55 1/2 po (141 cm)
Kit de coulisse de porte patio et/ou de fenêtre | 4/ens. |
de 28 po (67,5 cm) à 80 po (203 cm) |
|
Imperméable (pour kit de coulisse) | 1 kit |
voir pg #28 pour les instructions d’assemblage |
|
Accessoires de réservoir d’eau externe Fig. 1a |
|
Plateau de support & roulettes pivotantes | 1 pièce |
Réservoir externe & (2) couvercles | 1 pièce |
Boyau d’écoulement (Non illustré) | 1 pièce |
Filtre d'Entrée d'Air (Non illustré) | 1 pièce |
REMARQUE SPÉCIALE : Le kit d’échappement et/ou de fenêtre doit être installé en tout temps quand l’unité fonctionne en mode de CLIMATISATION.
 AVERTISSEMENT
Quand le kit de porte patio est installé, il ne sera pas possible de verrouiller la porte patio. CECI POURRAIT POSER UN RISQUE DE SÉCURITÉ ! L’installation d’un pêne à la partie inférieur du cadre de porte ou d’une barre de sécurité pivotante est suggérée. (Disponibles dans la
plupart des quincailleries locales.)
Un dégagement minimal de 11,8 po (30 cm) entre l’unité et tous autres objets ou structure est nécessaire et devrait être installé sur une surface de niveau. L'unité ne doit pas être exhalée dehors pendant l'opération de mode ‘Sec’ ou ‘Ventilateur’, il est recommandée cependant que les tuyaux restent installés (sur l'unité) pendant la déshumidification.
Fig. 1 Accessoires d’installation | Borne de Imperméable (2) | |
Imperméable (1) |
| |
Boyau flexible de l’échappement (2) | Adaptateur d’échappement | |
de fenêtre (2) | ||
| ||
Kit de coulisse réglable pour fenêtre et/ou porte patio | ||
28 po - 80 po |
| |
Fig. 1 a Accessoires du réservoir d’eau externe | ||
Plateau de support & roulettes | Réservoir externe & | |
pivotantes (1) | raccord rapide (1) | |
25F |
| |