RéglagedelaMINUTERIEENMARCHEAUTO(suite) :
4.Tous les réglages sont maintenant enregistrés.
5.Pour régler la minuterie EN MARCHEAUTO, l’unité doit être hors de service.
6.Appuyer sur la touche EN MARCHEAUTO (Fig K) pour initialiser la séquence de temporisation.
MINUTERIE EN MARCHE apparaîtra sur l’affichage
(Fig L) et les chiffres des minutes clignoteront. Appuyer sur les touches ![]() ou
ou ![]() RÉGLAGE TEMP/HEURE pour choisir les minutes EN MARCHE AUTO. Appuyer sur la touche MINUTERIE EN MARCHE de nouveau et les chiffres des heures
RÉGLAGE TEMP/HEURE pour choisir les minutes EN MARCHE AUTO. Appuyer sur la touche MINUTERIE EN MARCHE de nouveau et les chiffres des heures
clignoteront (Fig M). Appuyer sur les touches
![]() ou
ou ![]() RÉGLAGE TEMP/HEURE pour choisir l’heure de mise en service EN MARCHEAUTO. Appuyer sur la touche MINUTERIE EN MARCHE de nouveau et l’affichage indiquera HORLOGE / EN MARCHE et l’heure réglée EN MARCHEAUTO. Appuyer sur les boutons de l’horloge (MINUTERIE EN MARCHE / MINUTERIE À L’ARRÊT) simultanément pour revenir au réglage de l’heure du jour de l’horloge. L’unité sera automatiquement mise en service à l’heure réglée EN MARCHEAUTO. Pour annuler ou contourner le programme EN MARCHEAUTO, activer l’unité en tout temps avant l’heure préréglée pour le fonctionnement. Vous pouvez vérifier l’heure EN MARCHEAUTO réglée en tout temps (avant l’activation par le programme) en appuyant sur la touche MINUTERIE EN MARCHE. L’heure réglée apparaîtra sur l’affichage.
RÉGLAGE TEMP/HEURE pour choisir l’heure de mise en service EN MARCHEAUTO. Appuyer sur la touche MINUTERIE EN MARCHE de nouveau et l’affichage indiquera HORLOGE / EN MARCHE et l’heure réglée EN MARCHEAUTO. Appuyer sur les boutons de l’horloge (MINUTERIE EN MARCHE / MINUTERIE À L’ARRÊT) simultanément pour revenir au réglage de l’heure du jour de l’horloge. L’unité sera automatiquement mise en service à l’heure réglée EN MARCHEAUTO. Pour annuler ou contourner le programme EN MARCHEAUTO, activer l’unité en tout temps avant l’heure préréglée pour le fonctionnement. Vous pouvez vérifier l’heure EN MARCHEAUTO réglée en tout temps (avant l’activation par le programme) en appuyant sur la touche MINUTERIE EN MARCHE. L’heure réglée apparaîtra sur l’affichage.
Réglage de la MINUTERIE ARRÊT AUTO :
Avant de régler la minuterie ARRÊTAUTO, l’horloge (heure du jour) doit être réglée et/ou opérationnelle.
1. Pour régler la minuterie ARRÊTAUTO, l’unité doit être | |
activée (par le commutateur I/O). |
|
2.Appuyer sur la touche MINUTERIE À L’ARRÊT | |
(Fig N) pour initialiser la séquence de temporisation | |
ARRÊTAUTO. MINUTERIE À L’ARRÊTapparaîtra sur | |
l’affichage (Fig O) et les chiffres des minutes | |
clignoteront. Appuyer sur les touches | ou |
RÉGLAGE TEMP/HEURE pour choisir les minutes | |
ARRÊTAUTO. Appuyer sur la touche MINUTERIE À | |
L’ARRÊTde nouveau et les chiffres des heures | |
clignoteront. Appuyer sur les touche | ou |
RÉGLAGE TEMP/HEURE (Fig M) pour choisir | |
l’heure de mise hors de serviceARRÊTAUTO. Appuyer | |
Fig K
Fig L
Fig M
Fig N
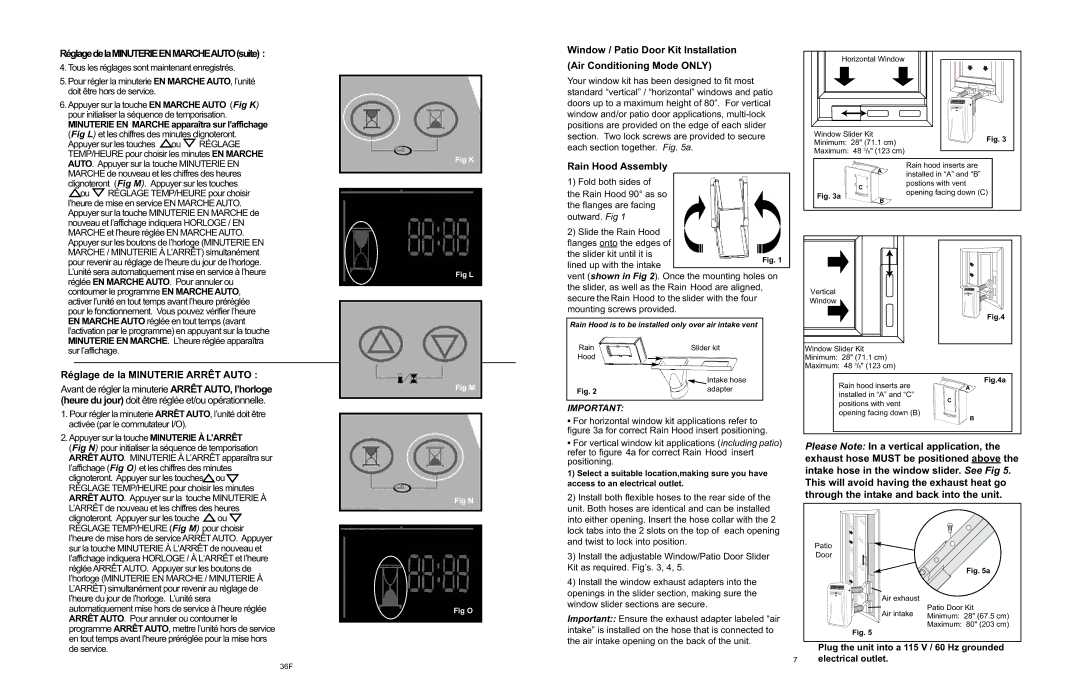
Window / Patio Door Kit Installation
(Air Conditioning Mode ONLY)
Your window kit has been designed to fit most standard “vertical” / “horizontal” windows and patio doors up to a maximum height of 80”. For vertical window and/or patio door applications,
Rain Hood Assembly
1)Fold both sides of the Rain Hood 90° as so the flanges are facing outward. Fig 1
2)Slide the Rain Hood
flanges onto the edges of the slider kit until it is
lined up with the intake
vent (shown in Fig 2). Once the mounting holes on the slider, as well as the Rain Hood are aligned, secure the Rain Hood to the slider with the four mounting screws provided.
Rain Hood is to be installed only over air intake vent
Rain |
|
|
| Slider kit |
| |
|
|
|
| |||
Hood |
|
|
|
|
|
|
|
|
|
|
|
| |
|
|
|
|
|
|
|
|
|
|
|
|
|
|
|
|
|
|
| Intake hose | |
Fig. 2 |
|
|
| adapter | ||
|
|
|
|
| ||
|
|
|
|
|
|
|
IMPORTANT:
•For horizontal window kit applications refer to figure 3a for correct Rain Hood insert positioning.
•For vertical window kit applications (including patio) refer to figure 4a for correct Rain Hood insert positioning.
1) Select a suitable location,making sure you have |
access to an electrical outlet. |
2) Install both flexible hoses to the rear side of the |
unit. Both hoses are identical and can be installed |
into either opening. Insert the hose collar with the 2 |
lock tabs into the 2 slots on the top of each opening |
Horizontal Window |
Window Slider Kit
Minimum: 28" (71.1 cm)![]() Fig. 3
Fig. 3
Maximum: 48 3/8" (123 cm)
Rain hood inserts are
|
| A | installed in “A” and “B” |
|
|
| |
| C |
| postions with vent |
|
| opening facing down (C) | |
Fig. 3a |
|
| |
| B |
| |
|
|
|
Vertical
Window
Fig.4
Window Slider Kit
Minimum: 28" (71.1 cm)
Maximum: 48 3/8" (123 cm)
Fig.4a
Rain hood inserts are | A | |
installed in “A” and “C” | C | |
positions with vent | ||
| ||
opening facing down (B) |
|
B
Please Note: In a vertical application, the exhaust hose MUST be positioned above the intake hose in the window slider. See Fig 5. This will avoid having the exhaust heat go through the intake and back into the unit.
sur la touche MINUTERIE À L‘ARRÊTde nouveau et |
l’affichage indiquera HORLOGE / À L‘ARRÊTet l’heure |
régléeARRÊTAUTO. Appuyer sur les boutons de |
l’horloge (MINUTERIE EN MARCHE / MINUTERIE À |
L’ARRÊT) simultanément pour revenir au réglage de |
l’heure du jour de l’horloge. L’unité sera |
automatiquement mise hors de service à l’heure réglée |
ARRÊTAUTO. Pour annuler ou contourner le |
programme ARRÊTAUTO, mettre l’unité hors de service |
en tout temps avant l’heure préréglée pour la mise hors |
Fig O
and twist to lock into position. |
3) Install the adjustable Window/Patio Door Slider |
Kit as required. Fig’s. 3, 4, 5. |
4) Install the window exhaust adapters into the |
openings in the slider section, making sure the |
window slider sections are secure. |
Important:: Ensure the exhaust adapter labeled “air intake” is installed on the hose that is connected to the air intake opening on the back of the unit.
Patio
Door
Air exhaust
Air intake
Fig. 5
Fig. 5a
Patio Door Kit Minimum: 28" (67.5 cm) Maximum: 80" (203 cm)
de service. |
Plug the unit into a 115 V / 60 Hz grounded
7electrical outlet.
36F