INSTALLATION

ELECTRIC SHOCK HAZARD: To avoid the possibility of personal injury, disconnect power to the unit before installing or servicing.

Caution: To avoid installation/operation difficulties, read these instructions thoroughly.

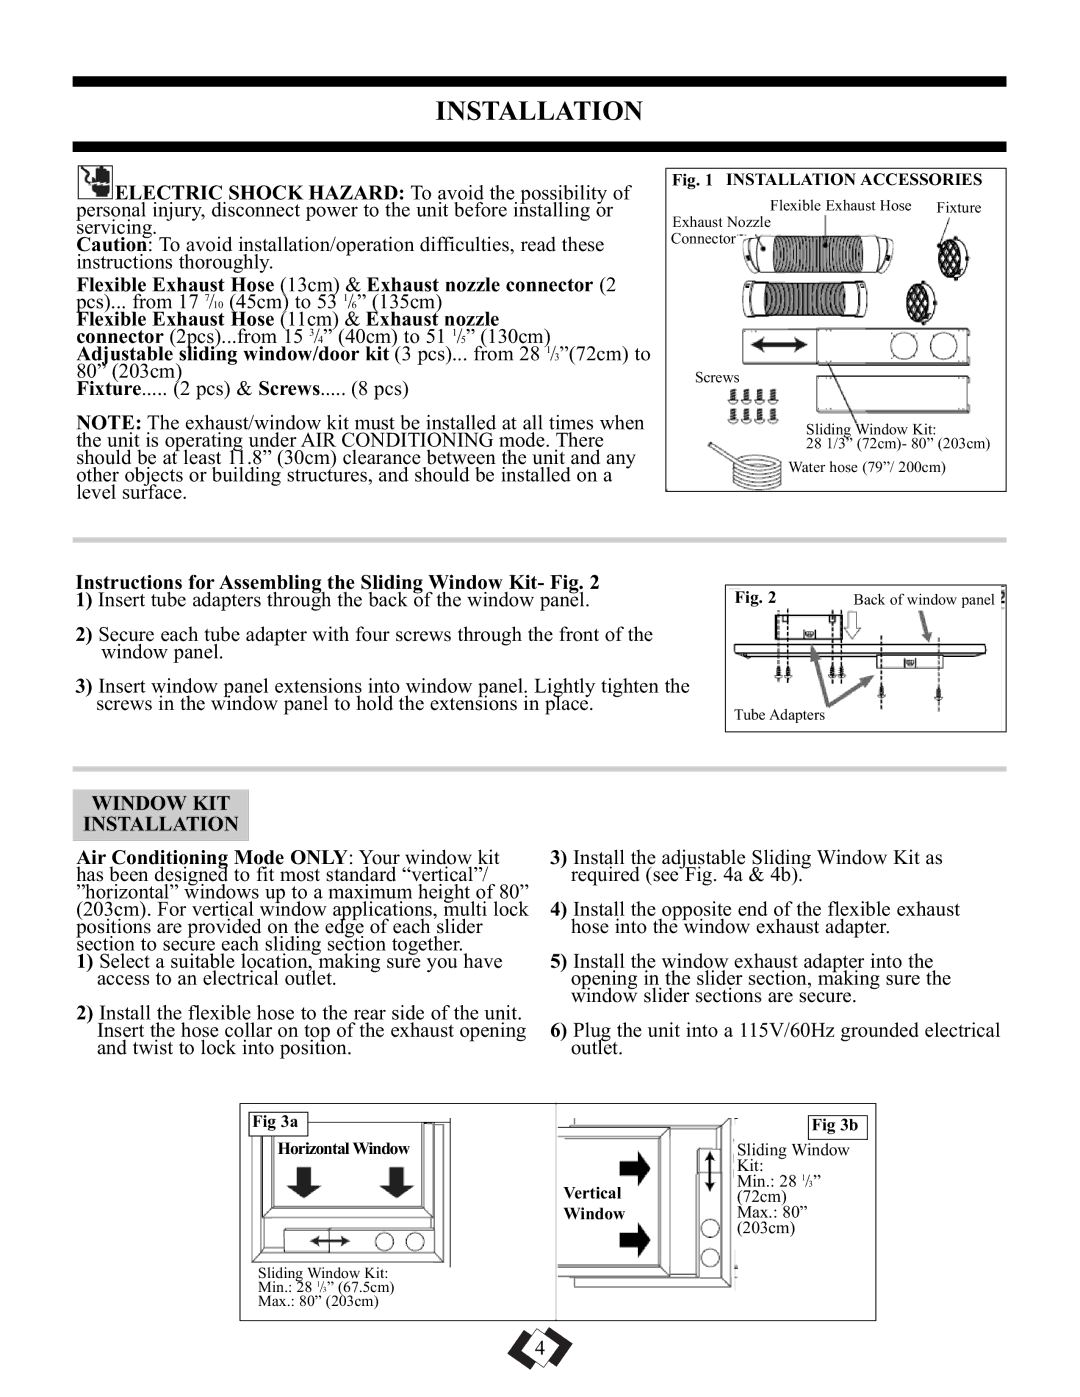
Flexible Exhaust Hose (13cm) & Exhaust nozzle connector (2 pcs)... from 17 7/10 (45cm) to 53 1/6” (135cm)

Flexible Exhaust Hose (11cm) & Exhaust nozzle connector (2pcs)...from 15 3/4” (40cm) to 51 1/5” (130cm) Adjustable sliding window/door kit (3 pcs)... from 28 1/3”(72cm) to 80” (203cm)

Fixture..... (2 pcs) & Screws..... (8 pcs)

NOTE: The exhaust/window kit must be installed at all times when the unit is operating under AIR CONDITIONING mode. There should be at least 11.8” (30cm) clearance between the unit and any other objects or building structures, and should be installed on a level surface.

Fig. 1 INSTALLATION ACCESSORIES


Flexible Exhaust Hose


Fixture

Exhaust Nozzle


Connector


Screws

Sliding Window Kit:

28 1/3” (72cm)- 80” (203cm)

Water hose (79”/ 200cm)

Instructions for Assembling the Sliding Window Kit- Fig. 2

1)Insert tube adapters through the back of the window panel.

2)Secure each tube adapter with four screws through the front of the window panel.

3)Insert window panel extensions into window panel. Lightly tighten the screws in the window panel to hold the extensions in place.

Fig. 2


Back of window panel

Tube Adapters

WINDOW KIT

INSTALLATION

Air Conditioning Mode ONLY: Your window kit has been designed to fit most standard “vertical”/ ”horizontal” windows up to a maximum height of 80” (203cm). For vertical window applications, multi lock positions are provided on the edge of each slider section to secure each sliding section together.

1)Select a suitable location, making sure you have access to an electrical outlet.

2)Install the flexible hose to the rear side of the unit. Insert the hose collar on top of the exhaust opening and twist to lock into position.

3)Install the adjustable Sliding Window Kit as required (see Fig. 4a & 4b).

4)Install the opposite end of the flexible exhaust hose into the window exhaust adapter.

5)Install the window exhaust adapter into the opening in the slider section, making sure the window slider sections are secure.

6)Plug the unit into a 115V/60Hz grounded electrical outlet.


Fig 3a


Fig 3b


Horizontal Window


Sliding Window


Kit:


Min.: 28 1/3


Vertical


(72cm)


Window


Max.: 80”


(203cm)


Sliding Window Kit:


Min.: 28 1/3” (67.5cm)


Max.: 80” (203cm)


4

Page 5
Image 5
Danby DPAC10010, DPAC9010 manual Instructions for Assembling the Sliding Window Kit- Fig, Window KIT Installation

DPAC9010, DPAC10010 specifications

The Danby DPAC9010 and DPAC10010 are portable air conditioners designed to provide effective cooling in various environments, ensuring comfort during warmer months. Both models are part of Danby’s commitment to delivering reliable climate control solutions that cater to modern needs.

The Danby DPAC9010 is ideal for smaller spaces, such as apartments and home offices, with a cooling capacity of 9,000 BTU. This model can effectively cool areas up to 350 square feet, making it perfect for bedrooms or small living rooms. On the other hand, the DPAC10010 boasts a slightly higher cooling capacity of 10,000 BTU and is suitable for spaces up to 450 square feet. This added power makes it an excellent choice for larger rooms or multi-use areas.

Both units are equipped with a control panel that allows users to easily adjust settings, including temperature and fan speed. They come with a remote control for added convenience, allowing users to change settings from a distance. A key feature of these models is their programmable timer function, which enables users to set the air conditioner to operate only when needed, promoting energy efficiency and reducing electricity costs.

Regarding technologies, both models utilize a refrigerant known for its environmental safety, aligning with today's eco-conscious standards. They also feature a built-in dehumidifier, which helps reduce humidity levels in the air, further enhancing comfort and reducing the feeling of stickiness in warmer weather.

The Danby DPAC9010 and DPAC10010 are designed with portability in mind. Each unit is equipped with smooth-rolling caster wheels and side handles that facilitate easy movement from room to room. The installation process is straightforward, with a quick-connect window kit included, allowing users to set up the units without the need for specialized tools.

In terms of energy efficiency, both models have earned the Energy Star certification, signifying their ability to cool rooms effectively while consuming minimal energy. This characteristic not only contributes to lower utility bills but also supports a greener environment.

Durability is another hallmark of Danby's design philosophy. The exterior casing is built to withstand the rigors of daily use while maintaining an aesthetically pleasing appearance. Additionally, both units have a washable air filter for easy maintenance, ensuring that the air quality remains high and the units operate efficiently.

In summary, the Danby DPAC9010 and DPAC10010 stand out as dependable portable air conditioning solutions. Their combination of cooling efficiency, user-friendly features, and environmentally conscious technology makes them excellent choices for anyone looking to beat the heat with convenience and comfort.