Dell OptiPlex 740 Users Guide
LegacySelect Technology Control
Advanced Features
Manageability
Security
Password Protection
If Password Status is set to Locked
Option Settings
Assigning a System Password
Typing Your System Password
Deleting or Changing an Existing Administrator Password
Administrator Password
Deleting or Changing an Existing System Password
Assigning an Administrator Password
Trusted Platform Module TPM
System Setup
Disabling a Forgotten Password and Setting a New Password
Enabling the TPM Feature
System Setup Options
Entering System Setup
System Setup Screen
ATA
Desktop, and Sata 0 and SATA1 for the small form factor
64MB
Maintenance
Changing Boot Sequence for the Current Boot
Floppy Drive
Booting to a USB Device
Jumper Settings
Memory Key
Jumper Setting Description
Clearing Forgotten Passwords
Power Management
Clearing Cmos Settings
HyperTransport and Dual-Core Technology
Verifying That RAID Is Working
About RAID Configurations
RAID Level 0 Configuration
Sleep Mode Wake-Up Methods Windows XP
Setting Your Computer to RAID-Enabled Mode
RAID Level 1 Configuration
Configuring Your Hard Drives for RAID
Using the Nvidia MediaShield ROM Utility
Creating a RAID Array
Using Nvidia MediaShield
Click Create under System Tasks
Click Convert Array in the System Tasks pane
Deleting a RAID Array
Free Disk Selection window appears
Clearing System Data window appears
Enabling Cool n Quiet Technology
Rebuilding a RAID Configuration
Nvidia Convert Array Wizard appears
Replacing the Battery
Battery
Back to Contents
Before Working Inside Your Computer
Before You Begin
Recommended Tools
Turning Off Your Computer
Back to Contents
Floppy Drive
Cleaning Your Computer
Computer, Keyboard, and Monitor
Mouse
CDs and DVDs
About Your Desktop Computer
Desktop Computer
Front View
Back View
Back-Panel Connectors
Inside Your Computer
System Board Components
Back to Contents
PCI, PCI Express Cards, and PS/2 Serial Port Adapters
Installing a PCI Card
PCI Cards
Removing a PCI Card
Installing a PCI Card in the Riser-Card Cage
Page
Removing a PCI Card From the Riser-Card Cage
Page
PCI Express and DVI Cards
Installing a PCI Express x16 Card or DVI-Card
Page
Removing a PCI Express x16 Card or DVI-Card
Installing a PCI Express Card in the Riser-Card Cage
Page
Page
Removing a PCI Express Card From the Riser-Card Cage
PS/2 Serial Port Adapters
Installing a PS/2 Serial Port Adapter
Removing a PS/2 Serial Port Adapter
Installing a Serial Port Adapter in the Riser-Card Cage
Removing a Serial Port Adapter From the Riser-Card Cage
Removing the Processor
Processor
Installing the Processor
Back to Contents
Page
Power Cable Connectors
General Installation Guidelines
Connecting Drive Cables
Drive Interface Connectors
Removing an Optical Drive
Connecting and Disconnecting Drive Cables
Serial ATA Power Connector
Optical Drive
Installing an Optical Drive
Removing a Floppy Drive
Installing a Floppy Drive
Removing the Media Card Reader
Media Card Reader
Installing the Media Card Reader
Removing the Hard Drive
Hard Drive
Installing a Hard Drive
Removing and Replacing a Second Hard Drive
Page
Back to Contents
Desktop Computer
About Your Computer Removing and Replacing Parts
Removing the I/O Panel
Panel
Replacing the I/O Panel
Replacing the Power Supply
Power Supply
Pin Number Signal name AWG Wire
DC Power Connectors
DC Power Connector P2
Back to Contents
Removing the Computer Cover
Computer Information
Desktop Computer Model # Dcne Specifications
Microprocessor
Memory
Controllers
Connectors
Video
Audio
Key Combinations
Power
Controls and Lights
Environmental
Physical
Speaker
Installing a Speaker
Removing a Speaker
FCC Regulatory Model U.S. Only
Find It Here
Finding Information
Click Select Model
Dell Support Website support.dell.com
Then click Welcome Center
Dell Support
Ftp.dell.com
Online Services
Getting Help
Obtaining Assistance
Support Service
Problems With Your Order
AutoTech Service
Automated Order-Status Service
Contacting Dell
Before You Call
Visit support.dell.com
Glossary
Docking device See APR
Device driver See driver
Page
Page
NIC See network adapter
Module bay See media bay
Page
Video resolution See resolution
Back to Contents
DDR2 Memory Overview
Memory
Mini Tower, Desktop, and Small Form Factor Matched Pairs
Removing Memory
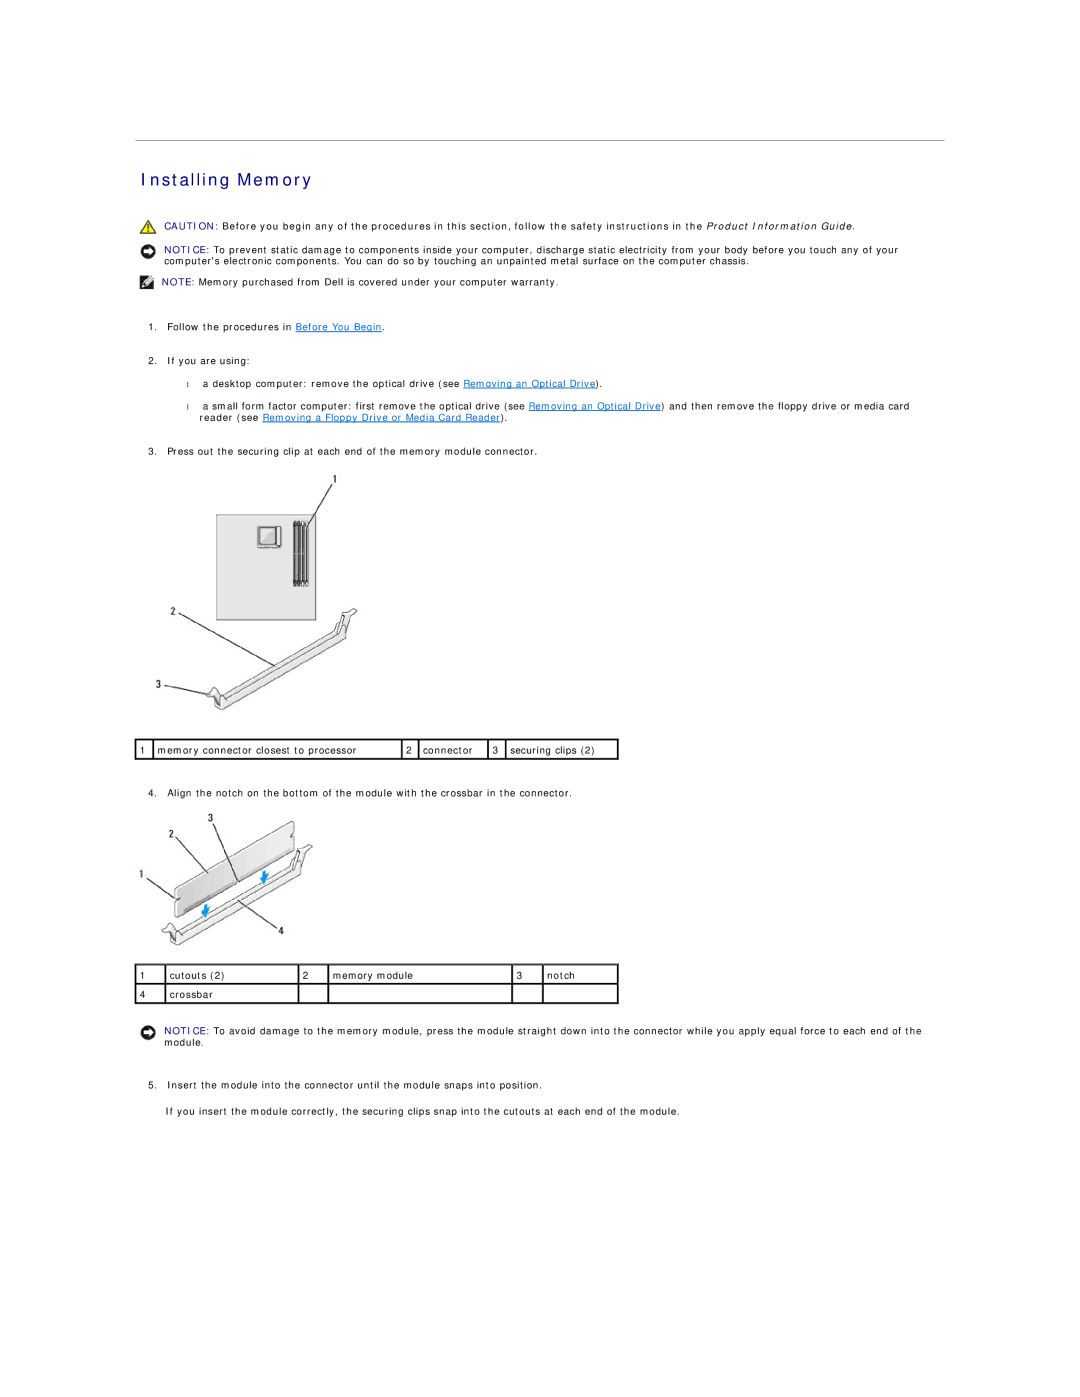
Installing Memory
Back to Contents
PCI, PCI Express Cards, and PS/2 Serial Port Adapters
Removing a PCI Card
Page
PCI Express Cards
Installing a PCI Express x1 Card
Page
Removing a PCI Express x1 Card
Installing PCI Express x16 Cards and DVI-Cards
Page
Removing PCI Express x16 Cards and DVI-Cards
PS/2 Serial Port Adapters
Removing a PS/2 Serial Port Adapter
Back to Contents
Processor
Installing the Processor
Page
Back to Contents
Interface cable connector Interface connector
Removing a Hard Drive
Installing a Hard Drive
Page
Adding a Second Hard Drive
Drive-Panel Inserts
Page
Removing the Floppy Drive
Installing the Floppy Drive
Media Card Reader
Installing the Media Card Reader
Optical Drive
Page
Back to Contents
Mini Tower Computer
Panel
Page
Power Supply
V12P0DIG White +3.3 VDC Orange +3.3VDC/SE 12 VDC Blue
DC Power Connectors P3, P5, P8, and P9
Removing the Computer Cover
Mini Tower Computer Model #DCSM Specifications
Video
Four 7-pin connectors
G2 or lower as defined by ISA-S71.04-1985
Speaker
Back to Contents
Microsoft Windows XP
Microsoft Windows XP and Windows Vista Features
Transferring Information to a New Computer
Microsoft Windows Vista
Click Start Run
Windows XP
User Accounts and Fast User Switching
Adding User Accounts
Windows Vista
Click Switch User
Setting Up a Home and Office Network
Fast User Switching
Connecting to a Network Adapter
Click Checklist for creating a network
Network Setup Wizard
Select an option under Choose a connection option
Replacing the Computer Cover
PCI, PCI Express Cards, and PS/2 Serial Port Adapters
Removing a PCI Card
PCI Express and DVI Cards
Installing a PCI Express x16 Card or DVI Card
Removing a PCI Express x16 Card or DVI Card
Page
PS/2 Serial Port Adapters
Removing a PS/2 Serial Port Adapter
Processor
Installing the Processor
Page
Back to Contents
Removing the Computer Cover
Drives
Hard Drive
Installing a Hard Drive
Page
Replacing a Hard-Drive Fan
Installing an Optical Drive
Removing a Floppy Drive or Media Card Reader
Floppy Drive and Media Card Reader
Installing a Floppy Drive or Media Card Reader
Page
Back to Contents
Small Form Factor Computer
Panel
Replacing the I/O Panel
Power Supply
V12P0DIG Yellow +3.3 Orange +3.3V Optional Blue
DC Power Connectors P3
Small Form Factor Computer Model # Dccy Specifications
Drives One Sata controller supporting two devices
Two 7-pin connectors
Weight Kg 16.4 lb
Speaker
About Your Small Form Factor Computer
Small Form Factor Computer
Back View
Inside Your Computer
POWER1 SATA0, SATA1 DIMM4
Optional DVI-card connector Dvihdr Speaker connector Intspkr
Identifying Drivers
Reinstalling Drivers and the Operating System
What Is a Driver?
Drivers
Using the Optional Drivers and Utilities media
Reinstalling Drivers and Utilities
Using Windows Vista Device Driver Rollback
Using Windows XP Device Driver Rollback
Using the Windows XP Drivers and Utilities Media
Manually Reinstalling Drivers for Windows Vista
Click Next at the Welcome Dell System Owner screen
Restoring the Computer to an Earlier Operating State
Windows XP Creating a Restore Point
Restoring Your Operating System
Windows Vista
Click Performance and Maintenance
Reinstalling Microsoft Windows Vista and Windows XP
Undoing the Last System Restore
Enabling System Restore
Windows XP Setup
Booting From the Operating System Media
Before You Begin
Back to Contents
Card Problems
Solving Problems
Troubleshooting Tips
Battery Problems
CD and DVD drive problems
Drive Problems
Problems writing to an Optical-RW drive
Mail, Modem, and Internet Problems
Keyboard Problems
Hard drive problems
Computer stops responding
Fan Problems
Lockups and Software Problems
Computer does not start up
Solid blue screen appears
Media Card Reader Problems
Other software problems
Program crashes repeatedly
Mouse Problems
Memory Problems
Power Problems
Network Problems
If the power light is blinking amber
Printer Problems
No sound from speakers
Restoring Default Settings
Serial or Parallel Device Problems
Sound and Speaker Problems
No sound from headphones
Video and Monitor Problems
If the screen is blank
If the screen is difficult to read
Check the diagnostic lights See Diagnostic Lights
Removing the Chassis Intrusion Switch
Chassis Intrusion Switch
Mini Tower Computer Desktop Computer
Resetting the Chassis Intrusion Detector
Replacing the Chassis Intrusion Switch
Small Form Factor Computer
Back to Contents
Mini Tower System Board Screws
Replacing the System Board
Desktop System Board Screws
Small Form Factor System Board Screws
Back to Contents
Dell Optiplex 740 Systems Users Guide
About Your Mini Tower Computer
Mini Tower Computer
Back View
Inside Your Computer
Intspkr
Frontpanel POWER1 Intruder
Starting the Dell Diagnostics From Your Hard Drive
Troubleshooting Tools and Utilities
Dell Diagnostics
When to Use the Dell Diagnostics
Option Function
Dell Diagnostics Main Menu
Power Light Problem Description Suggested Resolution
System Lights
Light Pattern Problem Description Suggested Resolution
Diagnostic Lights
Click the Change or Remove Program icon
Error Messages
Beep Codes
Code Cause
Decreasing available memory
Read fault Requested sector not found Reset failed
Resolving Software and Hardware Incompatibilities
Click Performance and Maintenance and click System
Back to Contents
Warranty